
I think most online business owners would agree with me when I say:
It takes a lot of effort to drive people to your site—but that’s just 10% of the work. Then, you also need to capture, nurture, and sell to them.
You would need an army of people to do all of this effectively—unless you create a system that will do it for you.
That’s where automated marketing funnels come in.
Last year, I helped ClickMinded, an SEO training course, leverage free trials of their course to create a funnel that generates sales on autopilot.
By taking a few actions, I was able to increase their number of new weekly email subscribers by 46% and drive numerous recurring monthly sales without them needing to lift a finger.
The free trial funnel worked out so well for ClickMinded that they still use this exact version today.
This post will show you EXACTLY how to set up your own automated free trial funnel.
What is an automated marketing funnel and why does it matter?
Marketing funnels define the stages a person needs to go through to go from stranger to customer. Moreover, it includes the steps that person takes on each of those stages to move on to the next one.
When you add “automated” to “marketing funnel,” you get a process that runs on its own and is specifically designed to drive visitors to purchase.
If you are a solopreneur or a small business owner, you probably have limited resources—time, money, and people.
Automated marketing funnels allow people like you to run full-blown customer acquisition schemes without having to do all of the heavy lifting, so you can focus on the important things: strategy and optimization.
The automated free trial funnel
Free trials are a great way to allow people to get a sense of the quality of your course, your style of teaching, and depth of the content covered in it.
It’s safe to say that a visitor who has viewed a free trial of your course is more likely to buy it than someone who hasn’t.
However, not everyone who views your free trial will buy your course right away. This is completely normal and here are just a few reasons why this could happen:
- They got distracted, left your website and forgot about it.
- They need more information about your course before making the decision to purchase it.
- They plan to explore a few other options before choosing a course.
- Taking the course right away is not high on their list of priorities.
That’s why it’s important to:
- Know who these people are.
- Send them additional content that will help them make the decision to get your course.
Here’s the process I designed to do that:
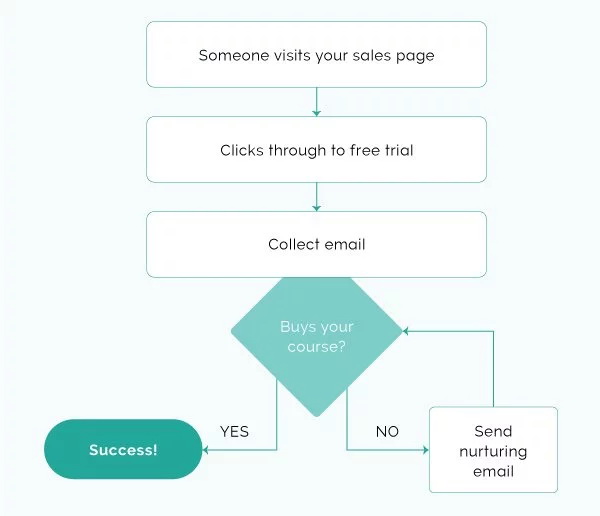
There are three stages to building and setting up this automated free trial funnel:
- Adding a free trial on your school.
- Creating a signup wall.
- Segmenting and nurturing your subscribers.
See how to accomplish all three stages with the steps below.
Step #1: Adding a free trial on your school
First, we’ll need to make some content available for free to your website visitors and create a single point of entry to the free trial.
Here’s the exact process to do that.
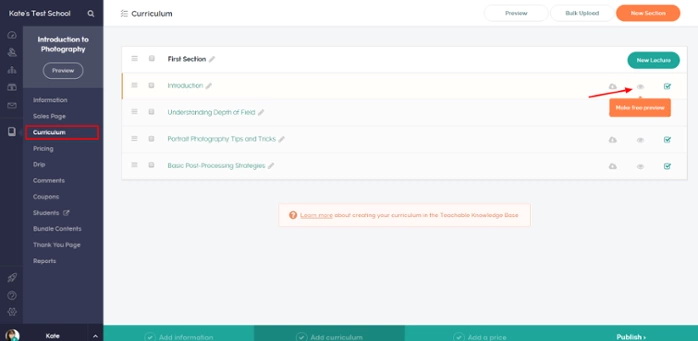
1. Once your course is ready, navigate to the Curriculum area of the course, and mark a few of the first lessons as free previews by clicking the eyeball icon on the right.
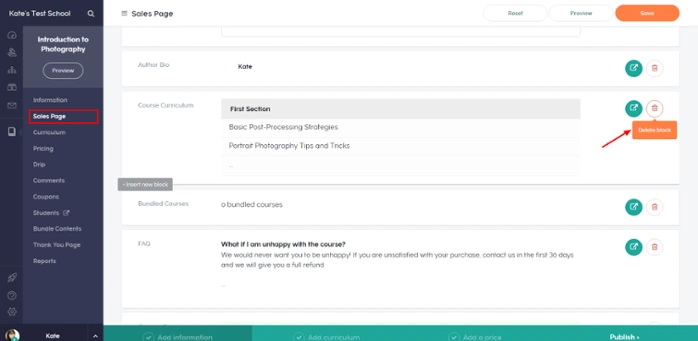
2. Next, go to the Sales Page tab and scroll to locate the Course Curriculum block. You’ll want to remove this by clicking the red trash icon so that students must enter the free trial flow to view the lesson previews. If you keep the block, anyone who visits the sales page will be able to see the lessons without entering the flow. (Don’t worry: you can add the block back in at any time.)
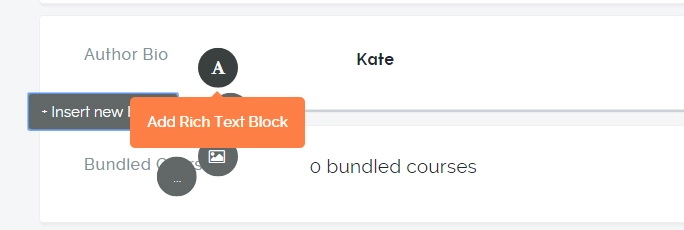
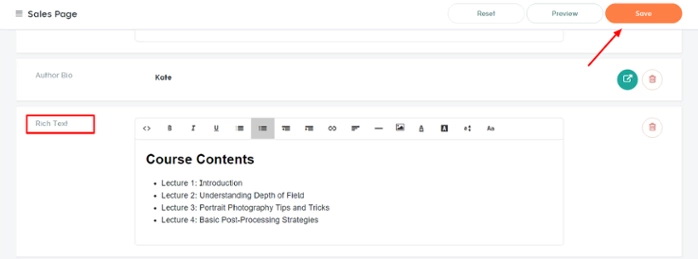
3. If you still want to display course contents on your sales page without making them accessible, simply add a new rich text block. You can accomplish this by hovering over an existing block, clicking the gray Insert New Block tab that appears, and clicking Add Rich Text Block at the top of the selection wheel.
In this block, manually enter your curriculum details. Here, I used HTML to create an <h2></h2> “Course Contents” heading and a bullet-point list of my lessons.
Make sure to click Save at the top of the sales page to save the deleted curriculum block and the new rich text block. You can then preview your sales page to see what it looks like in student view.
4. Finally, return to the sales page, and add another rich text block with a button or link prompting users to sign up for the free trial.
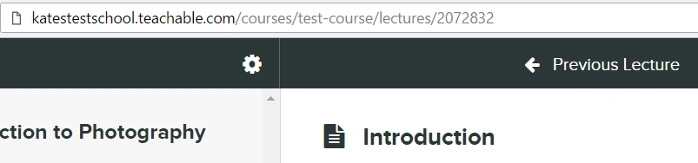
You’ll want your link to lead to the first lesson in the course or trial. You can generate this link by opening a new tab, going to your Curriculum page, and clicking on the lesson. Then, click the Preview button in the top right, and copy the resulting URL.
To create a button that looks like the others on your page, feel free to copy and paste this button code into the rich text block:
<a href="#"><button class="btn btn-hg btn-primary btn-enroll">Get a free trial</button></a>
Do this by toggling into HTML mode and substituting your lesson link for the # symbol inside the quote marks. Again, click Save when done.

5. Preview the sales page again to see your button and make sure the link is working properly.

Step #2: Creating a signup wall
Now that you’ve finished creating a single way for your website visitors to view a free trial, we’ll show you how to capture the emails of people entering this funnel.
To do this, we’ll use a product from the Sumo (formerly known as SumoMe) suite called “Welcome Mat” to create a signup wall—which, as the name suggests it, is a way to ask people for their email address to view the free lessons.
Another option to Sumo’s Welcome Mat is to use a similar service like Hello Bar, or you could even create another page with a form that redirects to the first lesson in the free trial.
6. If you don’t have Sumo installed in your Teachable School, navigate to Site > Code Snippets and install your Sumo code in the Logged Out head includes section.
Why do we put this in the Logged Out section? Because it will prevent enrolled students from seeing the signup wall you’re about to create.

Important: If you already have Sumo set up on the school, you will need to install a separate instance here (aka create a new Sumo account only for this.)
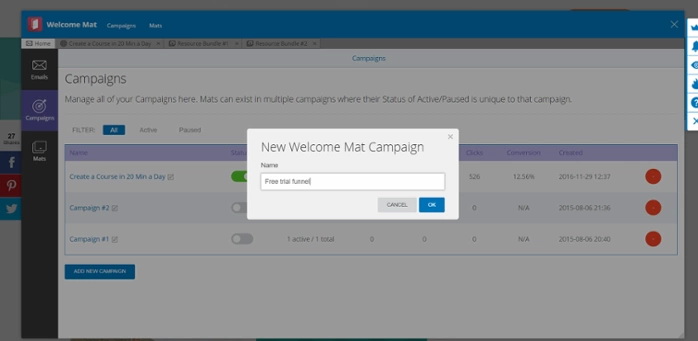
7. In Sumo, create a new Welcome Mat campaign for the free trial funnel.
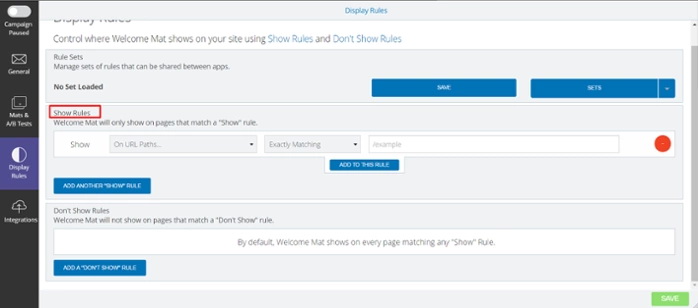
8. Set up your Welcome Mat to only trigger in the first lesson of the free trial by entering the lesson URL (the same one you copied in step 4) in the “show rules” section of the Display Rules tab. Set your display parameters to “On URL paths” and “Exactly Matching,” respectively.
9. Create your Welcome Mat and customize it as you see fit. Save your changes.

10. Remove the possibility to dismiss or scroll away from the Sumo Welcome Mat by toggling the Enable instant landing page switch found under the Behavior tab. This means visitors who view this will need to enter their email to continue.

Important: If you want to test the sign up wall, you will need to visit your course sales page using incognito browsing. That’s because we’ve set up the signup wall in a way that will only be visible to logged out users, so you won’t see it if you’re logged in to your own school.
Step #3: Segmenting and nurturing your subscribers
The final step to setting up this funnel is segmenting these subscribers and nurturing them with valuable information to convert a fraction of these into paying customers.
Segments are nothing more than groups of people within your audience that have something in common. In marketing, we use segments to define targeting, design tactics, and tailor content to fit the needs of these groups.
For this walkthrough, I’ll show you how to achieve this with Mailchimp, but you could easily set this up with any other email service provider (i.e. Convertkit, Infusionsoft, Drip, etc.)
11. Decide which list you want these subscribers to be added to and create segments within that list. These are the segments we’ll create and why:
- Viewed free trial: this segment will contain everyone who leaves their email to access the free trial. Using this segment allows you to create automated email workflows or sequences for this particular group of site visitors.
- Enrolled in school: this segment will include those who have purchased your course. Creating this segment enables you to exclude people who already became paying customers from receiving or continuing to receive the emails in the workflow.
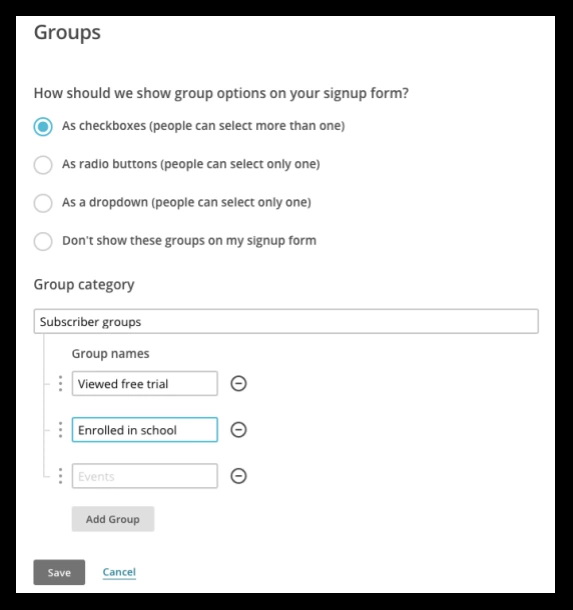
To create segments in MailChimp go to Lists > Manage contacts > Groups.

12. Click on Create groups and fill the Group category field and add 2 groups with the same names as the segments described above. Click Save.
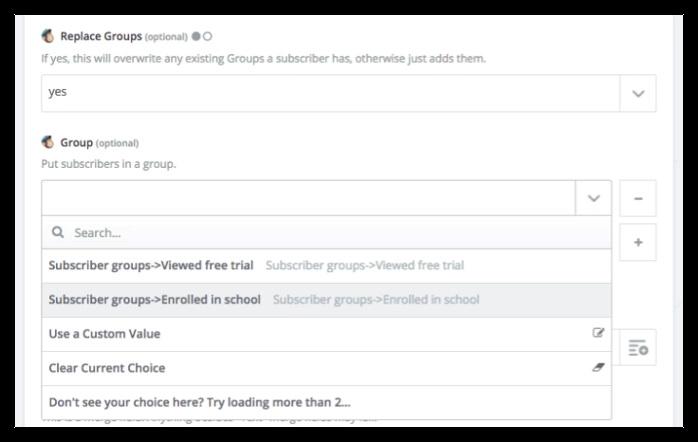
13. Now, to get the right people into the appropriate group, go back to your Sumo Welcome Mat and click Integrations > MailChimp (connect your account if you haven’t yet) and select Viewed free trial under Subscriber groups.

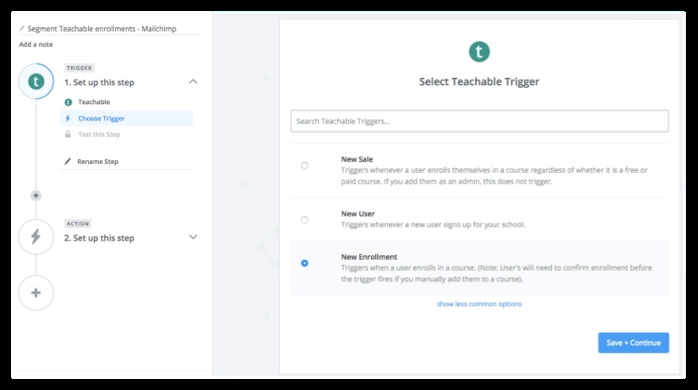
14. To get people who enroll to be added to the Enrolled in school group, we’ll use Zapier. Go to your Zapier dashboard, create a new zap, add Teachable as a trigger app, and select New enrollment as the trigger.
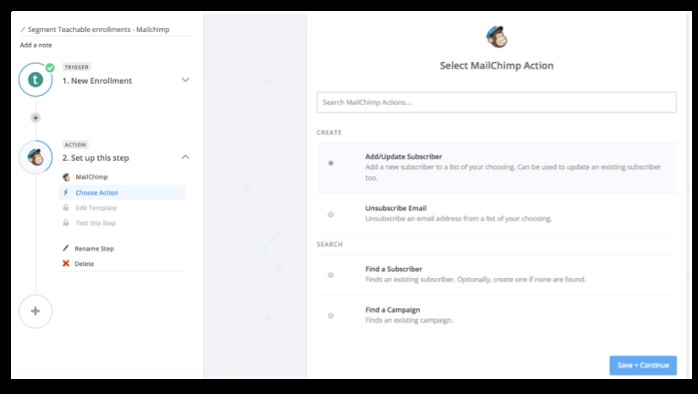
15. Next, choose MailChimp as an action app and select Add/Update Subscriber as the action.
16. Under the action template, choose the list you decided to use for the free trial subscribers, and fill the Subscriber Email field with the enrolled student’s email.
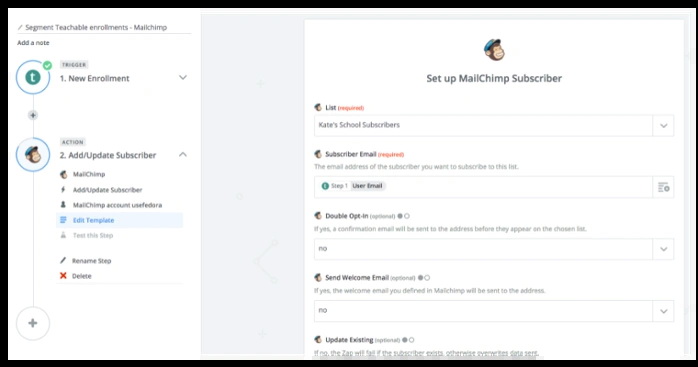
17. Under the Group field, select the Enrolled in school group you created for this list.
18. Test your zap and turn it on.
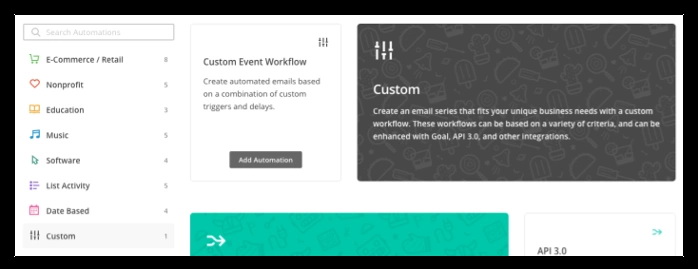
19. Move back to MailChimp and go to Automation > Add Automation and create a custom automation for the same list you’ve been using.
20. Click on Edit trigger.

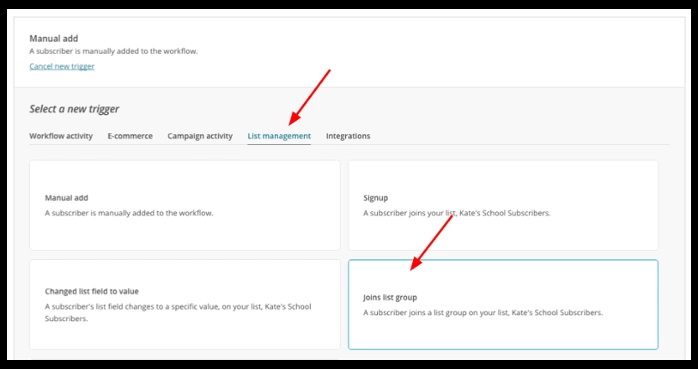
21. Click on Change trigger > List management > Joins list group.
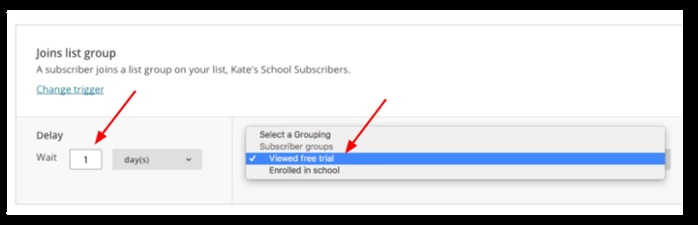
22. Choose a delay for your workflow—we recommend keeping a delay of at least 1 hour to prevent people who purchase the course shortly after consuming the free trial from receiving the first email. Next, select the Viewed free trial group as the trigger for your email workflow and update your trigger.
23. Back in the workflow view, click on Edit segment.
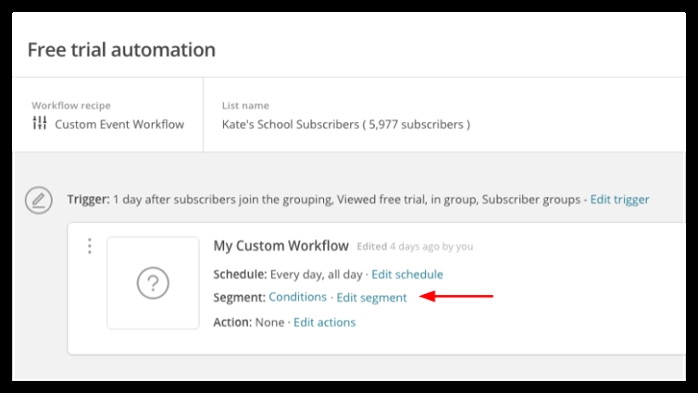
24. Click on Choose segmentation conditions > Subscribers match the following conditions and then select the following options from the dropdown menus: Subscriber groups, none of, and Enrolled in school. Save your segment.
This step ensures that anyone who enrolls in your school will not receive this email.

25. Write emails for your workflow. We suggest that you first send valuable information about the topic you teach (blog posts, content upgrades, videos, webinar invitations, etc.) over a series of emails, as opposed to just selling them on your course.
This will allow you to send a more promotional email (consider including a coupon code) at the end of the sequence.
The email sequence I created for ClickMinded includes 2 informational emails with blog posts and videos and 1 final email with a coupon.
Important: You’ll need to repeat steps 22 and 23 for every new email you create.
You’re done! You’ve just created an acquisition funnel using a free trial.
How you can take this further
This post is just a baseline on how to create a free trial funnel for your course.
Here are a few ideas I think would be cool to add to all of this:
- Add better, more attractive ways to present the free trial on your sales page.
- Spend some time in the design of the signup wall.
- Add a coupon to the locked lessons of your curriculum, to add an incentive for visitors who view all the free lessons and want to continue taking your course.

Join more than 150,000 creators who use Teachable to make a real impact and earn a real income.
.png)

.png)

.png)
.png)
