Thank you! Your submission has been received!
Oops! Something went wrong while submitting the form.
MENU

The sad reality of running an online business is that countless people will start working their way through your checkout flow and then spontaneously abandon their cart. Using abandoned cart email subject lines can be a helpful first step.
Unlike a physical storefront where you can walk customers through their purchases and counter their objections, online your potential customers are anonymous and can disappear at the click of a mouse.
Building compelling emails is important and can promote sales.

This is a tough reality check for most people who are new to running an online business. But don’t let this data discourage you. This is not the end of the story.
This post will show you exactly how to generate additional revenue from your existing site visitors, by using a simple but highly effective technique: abandoned cart emails.
Once you’ve made peace with the fact that most people who start your checkout process will not finish it, you will be able to see abandoned carts for what they really are: an opportunity.
Let us break this down for you:
Have you ever walked through a supermarket and noticed a jar of mayonnaise in the cookie aisle? This is not a sign that you should dip your Oreos in mayo. Some other shopper probably grabbed the item from the shelf and changed their mind before reaching the checkout lane.
The same type of thing happens when you sell digital products.
In your online business, abandoned carts happen when website visitors start the checkout process for a product but leave your site before completing the purchase.
This leads to the next obvious question:
Before you give up on improving your cart abandonment rates, you can do your best to remove any obstacles that could discourage your potential customers from purchasing.
According to Statista, these are the main reasons why digital shoppers in the U.S. abandon their carts.
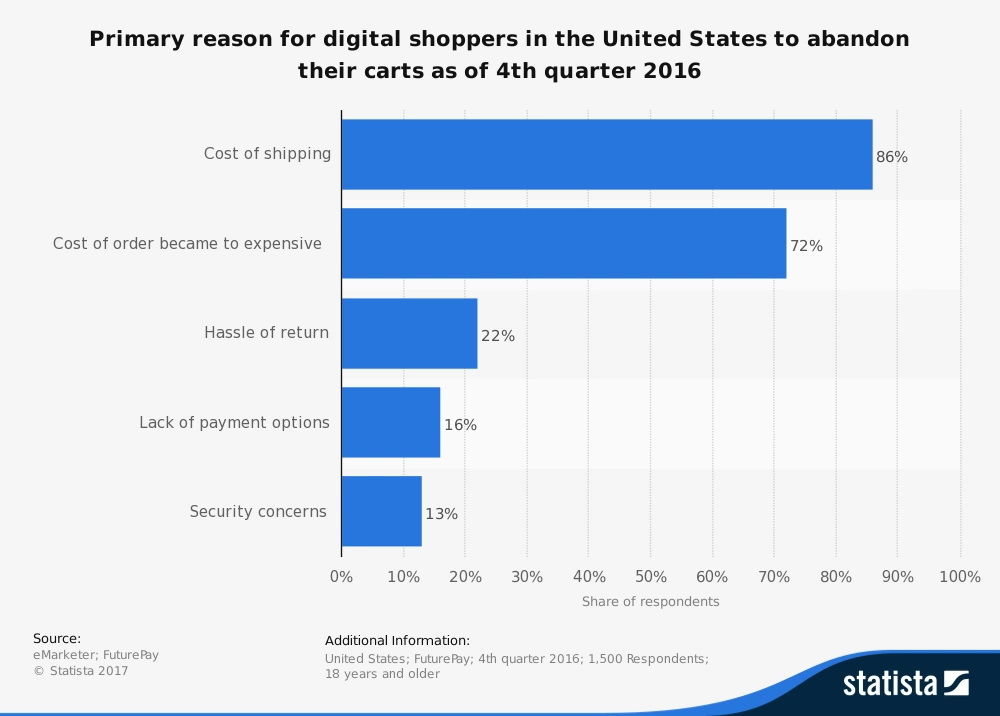
Let’s dig in a little, shall we?
There is one factor that did not make the top five reasons for cart abandonment. Whether or not the checkout process should include the creation of an account (to collect email addresses) before presenting the user with the checkout total and payment options is the source of a lot of dissenting opinions amongst digital marketers.
Since collecting emails is fundamental to this tutorial, we think it’s worthwhile to review this question.
Let’s start with the main reason why some people are against this method: it adds another step to the checkout process.
This is 100% a valid concern.
By collecting their email addresses, you are asking people to fill in at least one additional field and make one additional click, which can seem like a lot in the world of online marketing.
However, if you look at this additional step through the lens of the top five reasons for cart abandonment, you’ll notice that it does not fit any one of the reasons shown above. In any case, it can actually make it easier for you to issue a refund when necessary.
For the most part, the main advantage far outweighs any downside of asking customers to take this extra step. Since you now know that most of the people who start your checkout process will drop out, you need to find an effective way to re-engage them.
If you did not have a way of collecting emails during the checkout process, your only other option (for attempts to recover some of the sales from cart abandonment) would be retargeting.
Have you ever looked at a fancy new pair of shoes online, and then found yourself being followed around the Internet by these shoes? The shoes are not stalking you; that’s retargeting at work.
While retargeting is great, it does have some disadvantages:
On the other hand, following up on abandoned carts via email has none of these disadvantages. Instead, emails have advantages such as:
Ultimately, the ability to send emails to abandoned-cart segments is worth the additional friction of a two-step checkout process.
Some may people will disagree with this. However, do you know who else agrees with asking visitors for their email address during checkout? Only the largest online retailer in the world.
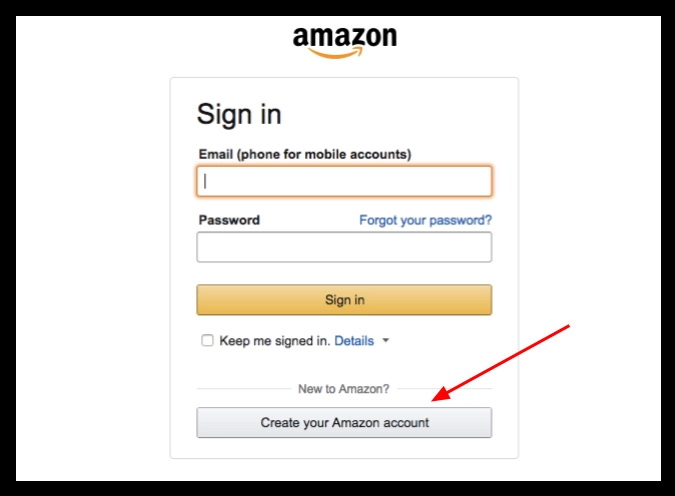
If you don’t have an account already, this is the first thing you’ll see when you try to purchase a product on Amazon.
Now that we’ve got this concern out of the way, let me show you what a great abandoned-cart email looks like.
Amazon is a prime example of consistent abandoned cart emails. If you’ve ever added products to your cart, initiating but never finishing checkouts, it’s not long before emails start to hit your inbox.
We’ve always been amazed by Amazon’s ability to get us to purchase items left in our carts, so we started with those emails. Surprisingly, their abandoned cart emails are just simple reminders rather than big marketing ploys.
This is an example:
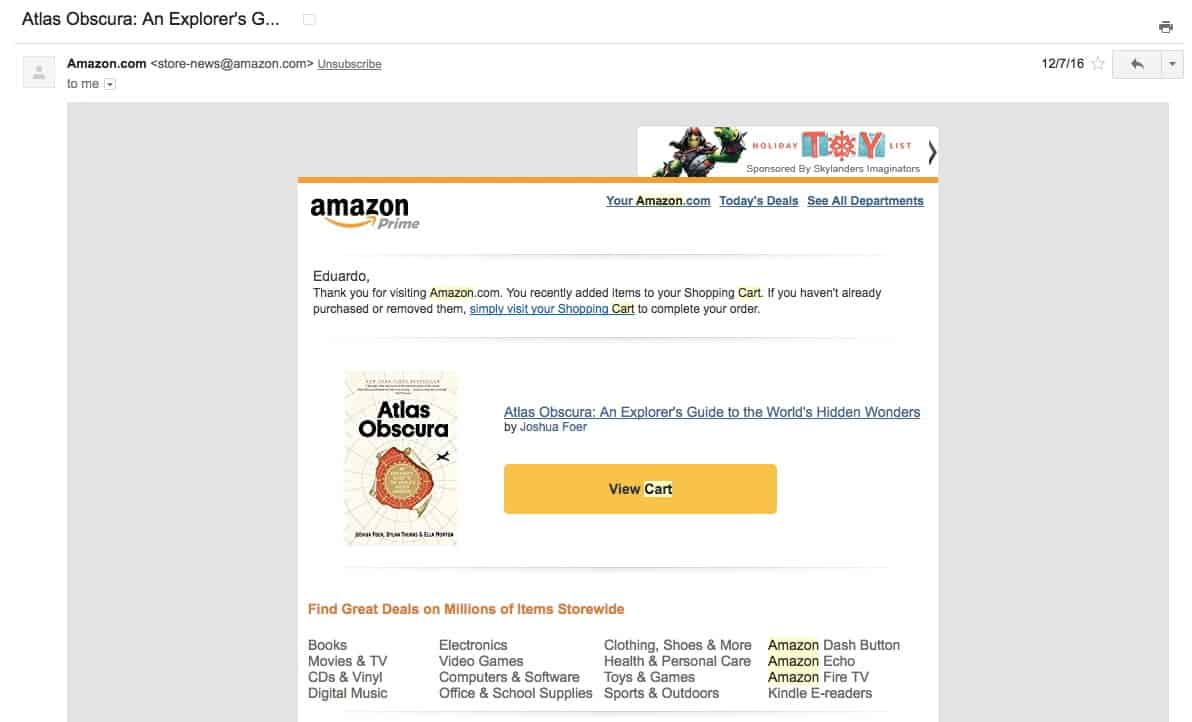
There are several important highlights about this email:

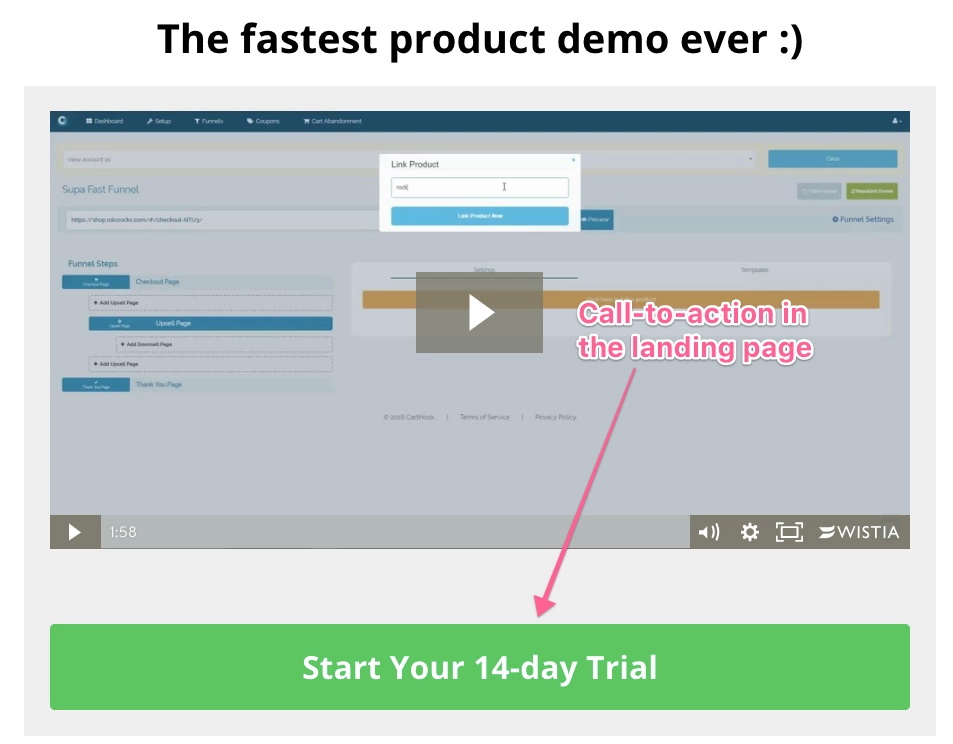
For another great example, let’s review Carthook:
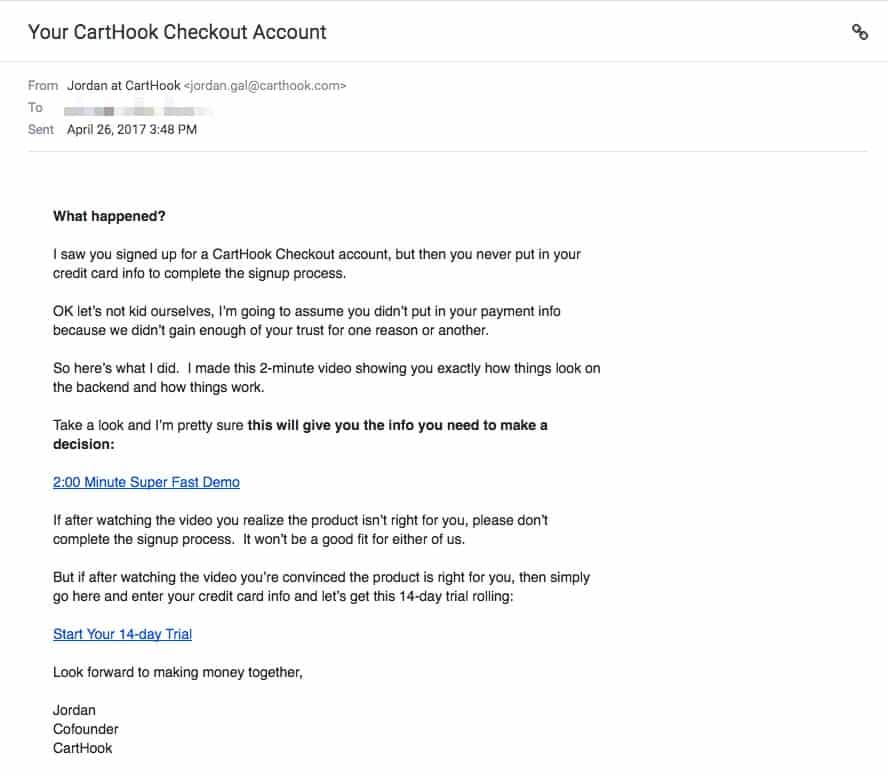
Though it may look like a simple, run-of-the-mill email, my quick analysis of the copy revealed the greatness of this abandoned-cart email:
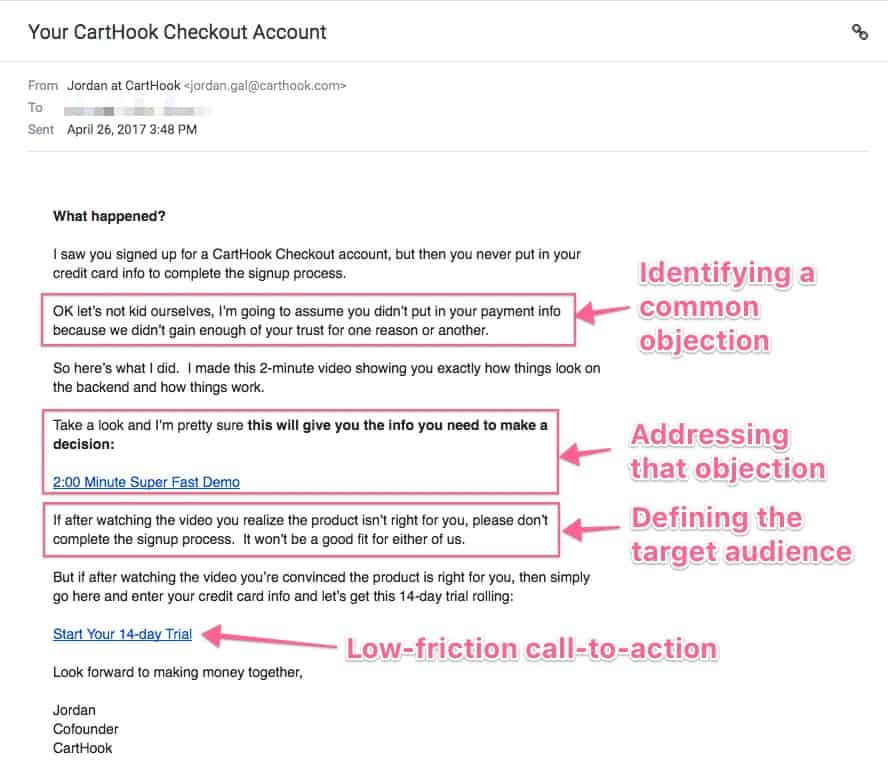
This email follows a typical user journey in just a few paragraphs:
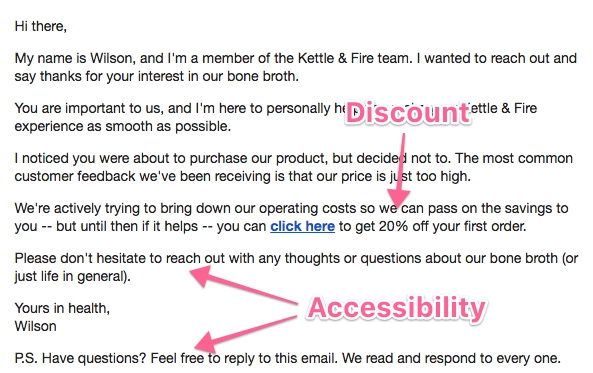
Let’s continue reviewing interesting abandoned-cart emails. Now it’s Kettle and Fire’s turn on the hot seat.
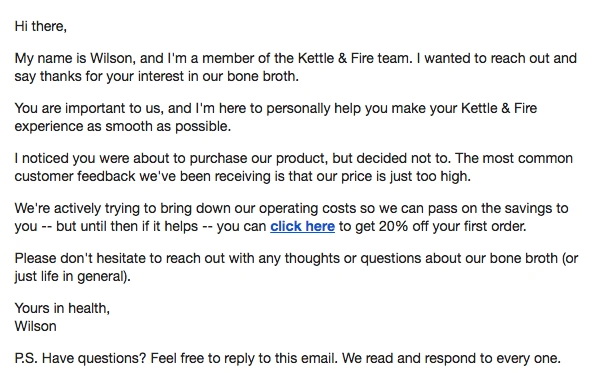
This email retains many of the elements mentioned in the first two examples, but a few additional elements make it highly effective. Were you able to spot them?
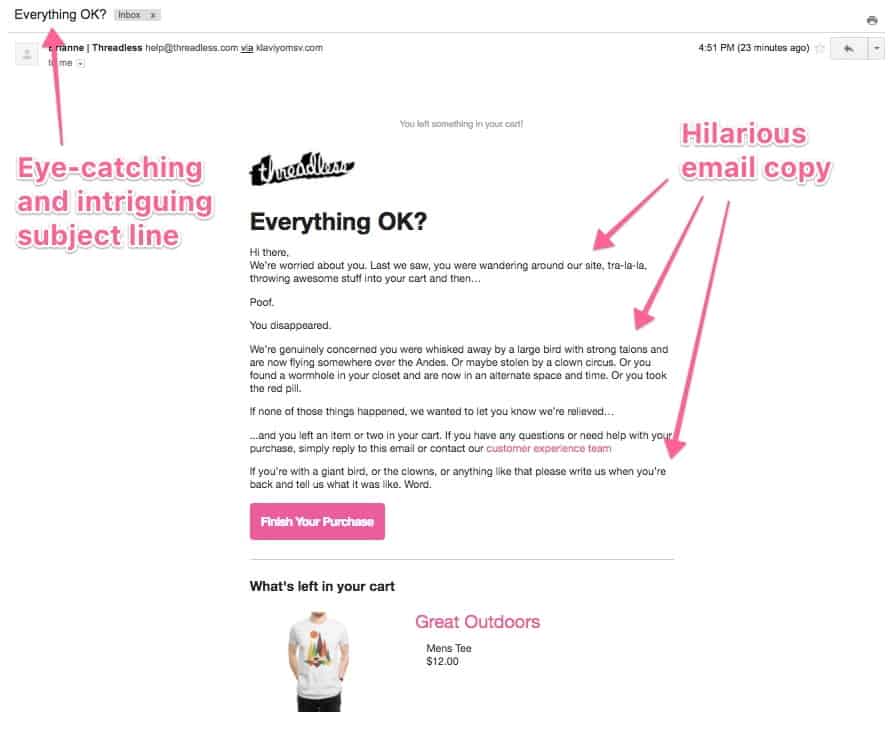
Now, we’ll show you a great email from the dozens we’ve reviewed.
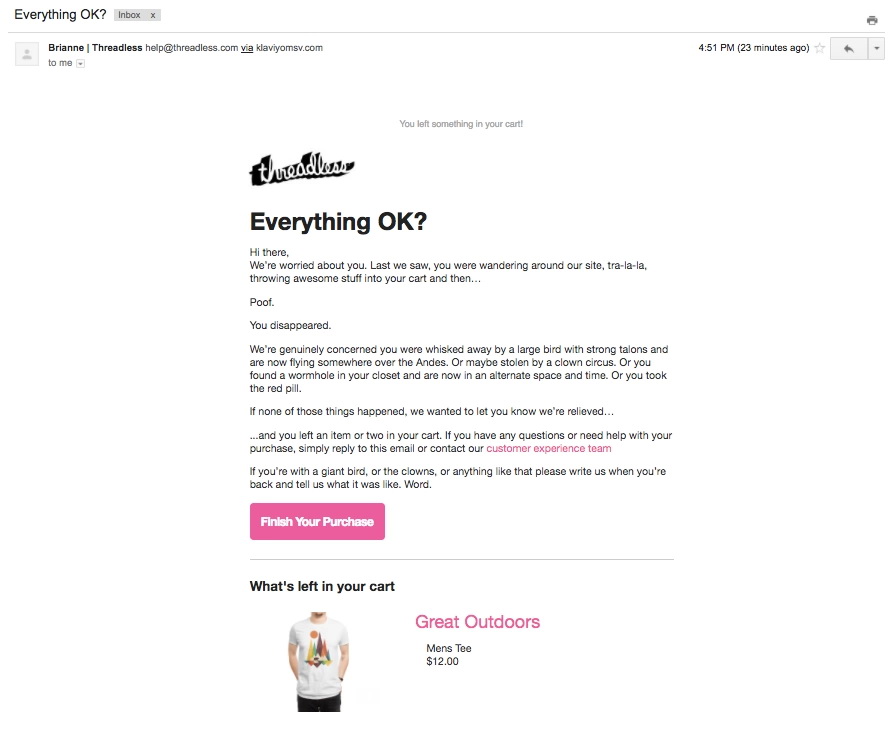
This email includes several elements we’ve already mentioned, but it also has the best email copy of all of the emails we’ve reviewed.
Are you thinking about getting started? After analyzing all of these emails, we summarized our key takeaways that you can use to implement these tactics in your own business.
If you decided to just skim over this article for best practices, this list includes the must-haves when writing your own abandoned-cart email:
You can use our customizable template to set up your own cart-abandonment email. Just copy and paste this content into your email service provider (ESP) and be on your way!
NOTE: The phrases between [square brackets] are meant to be filled by you or substituted by the appropriate merge fields from your ESP.
This email should get straight to the point. Just address customers’ most frequent concern about your product, and give them a way to complete their purchase.
When to send: Between 1 hour and 1 day after the visitor starts the checkout process. Give people some time to complete their purchase, so don’t send this email immediately after they join your list.
Subject line option #1: I think you forgot something
Subject line option #2: Did you forget something?
Email body copy:
Hey [first name]!
! I noticed you were thinking about purchasing [name of your product] but left before completing your order.
Many potential customers mention [most common concern about your product].
I wanted to reach out personally, just in case you felt that way too, to let you know [answer to the most common concern].
If you want to complete your purchase and [product value proposition] just click the link below.
Click here to get [name of your product]
If you have other doubts or questions, I’d be happy to answer them—just reply to this email and I’ll get back to you.
Looking forward to seeing you around!
[Your name]
While every industry and product is different, these emails should work for most situations. If you’re just getting started with cart-abandonment emails, these templates will help you get up and running in a few hours.
However, systems and processes can always be improved once they’re applied to a specific situation. If you decide to use these templates, we recommend that you regularly track their performance and look for ways to optimize open-and-click rates using industry-specific techniques and copywriting styles .
These are just a few ideas you might consider:
This tutorial will cover the exact step-by-step process to implement an abandoned-cart email for your Teachable online course.
You will need:
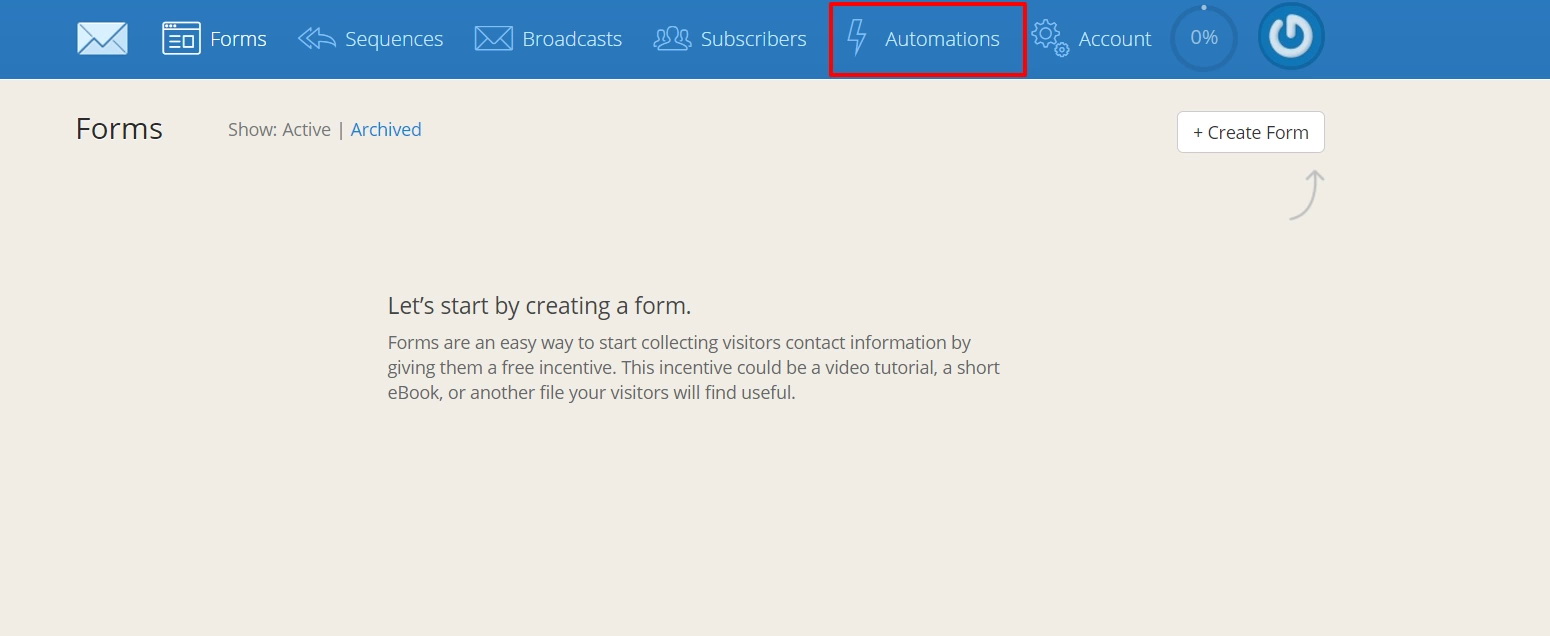
1. First, we’ll need to connect your Teachable and ConvertKit accounts. Log into ConvertKit and click Automations in the top bar.
Then, select Teachable from the Integrations list.
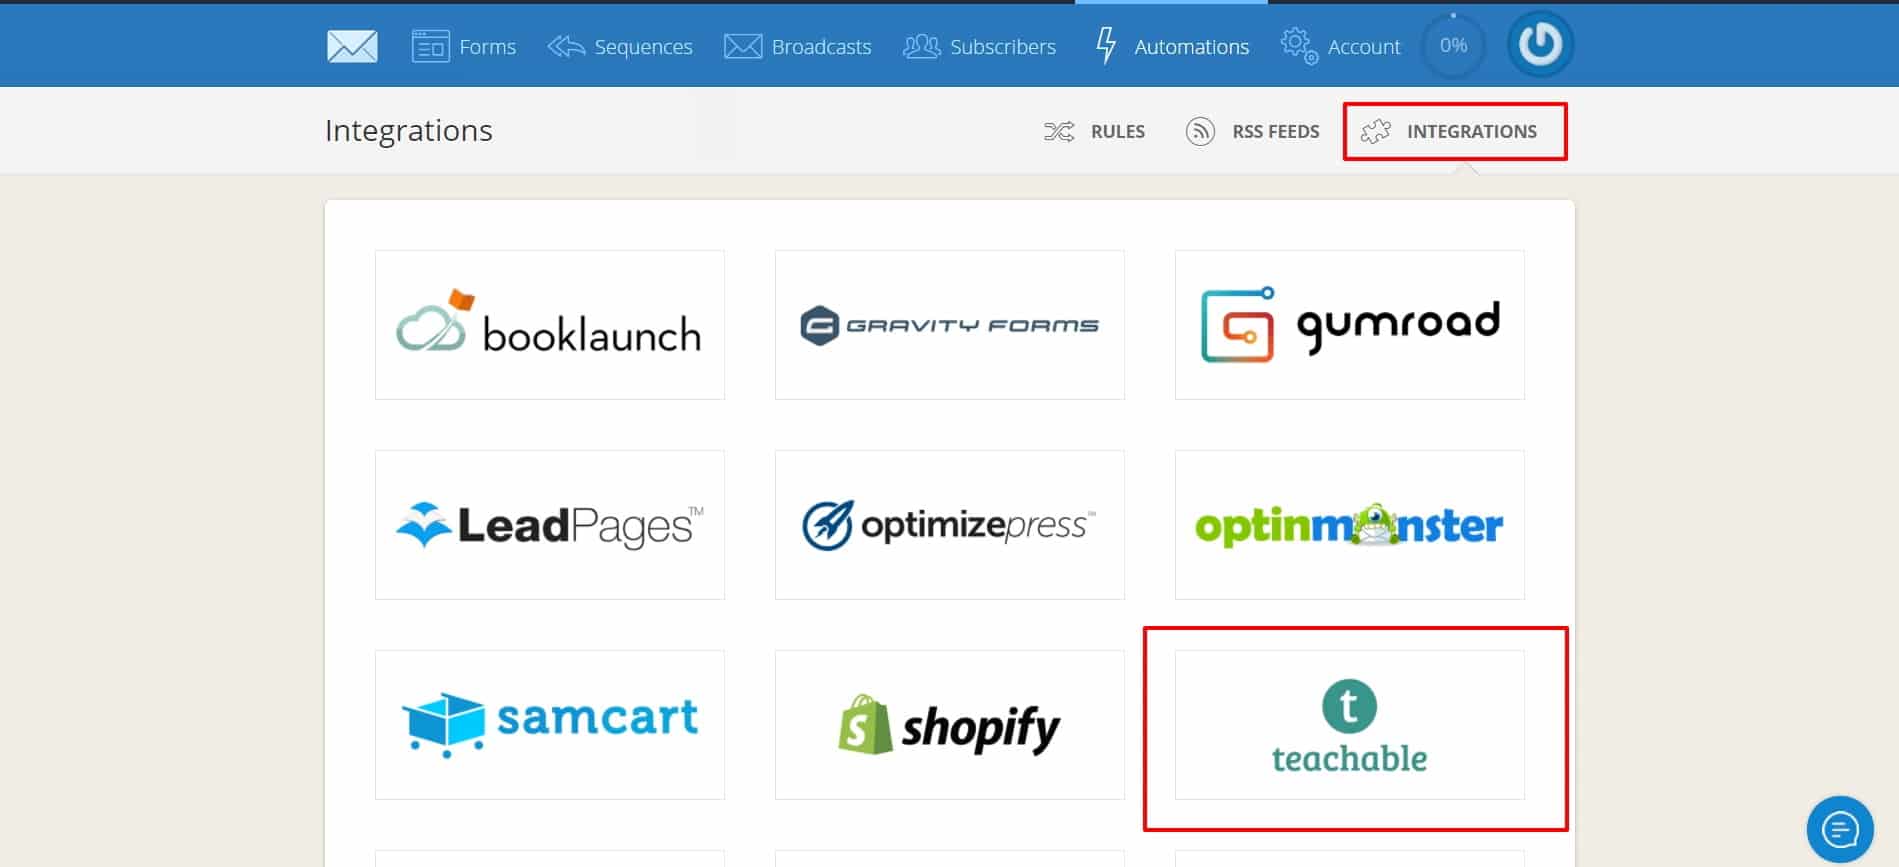
Add the URL of your Teachable school and click Next.
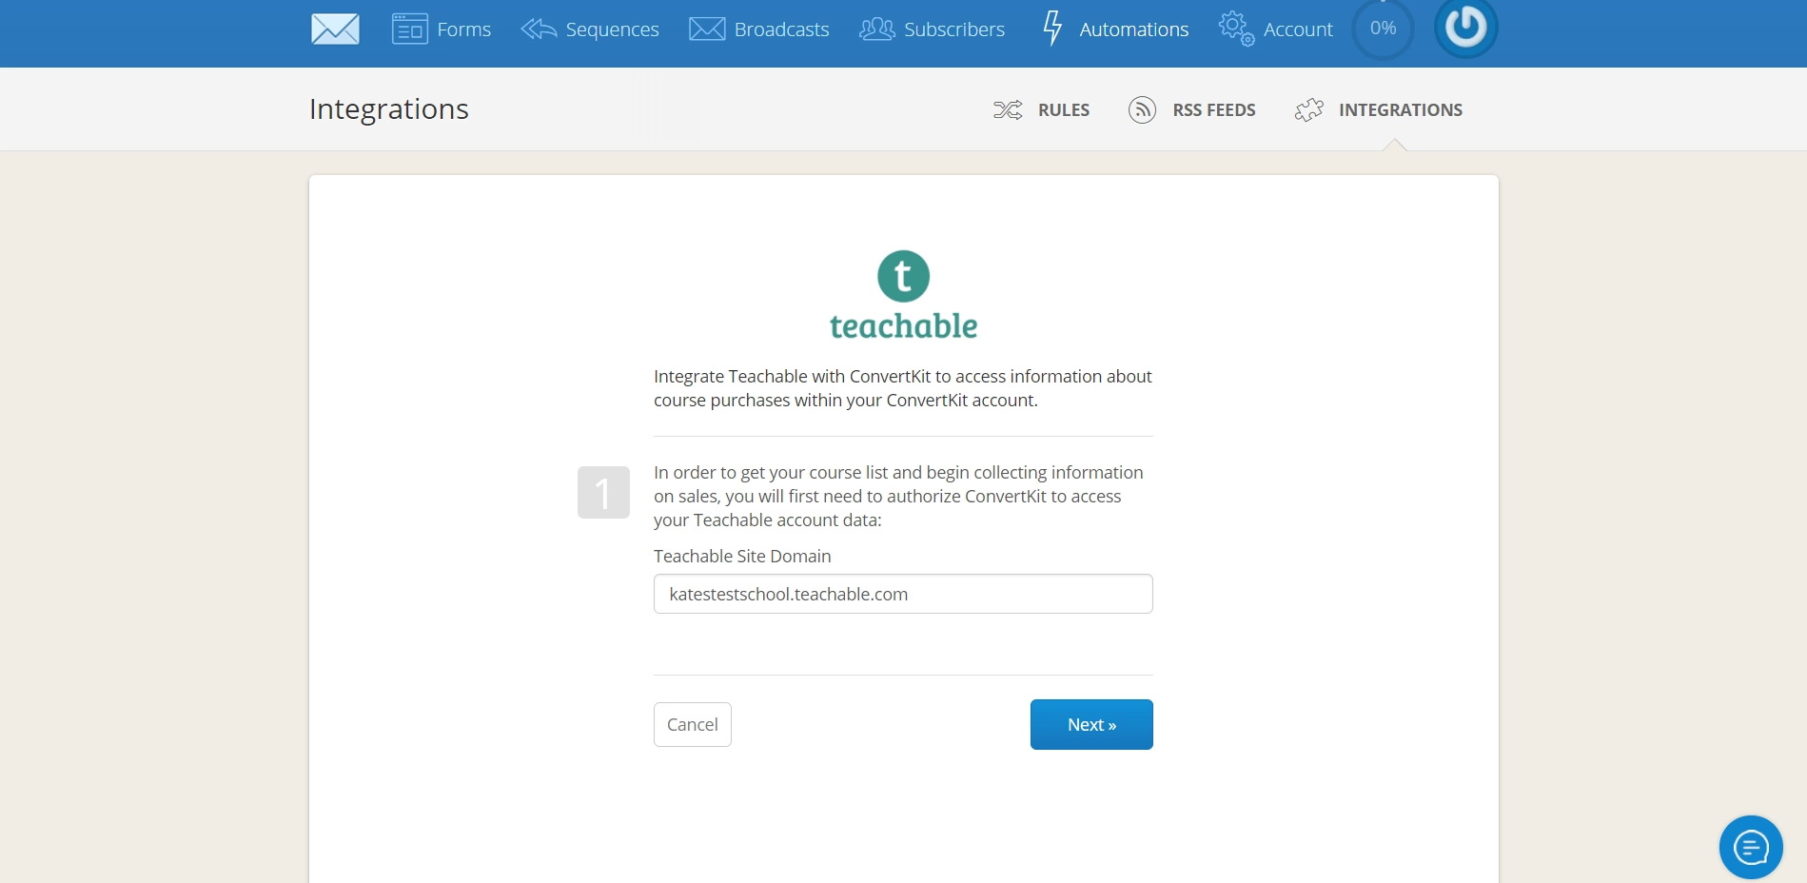
After this, your accounts should be connected.
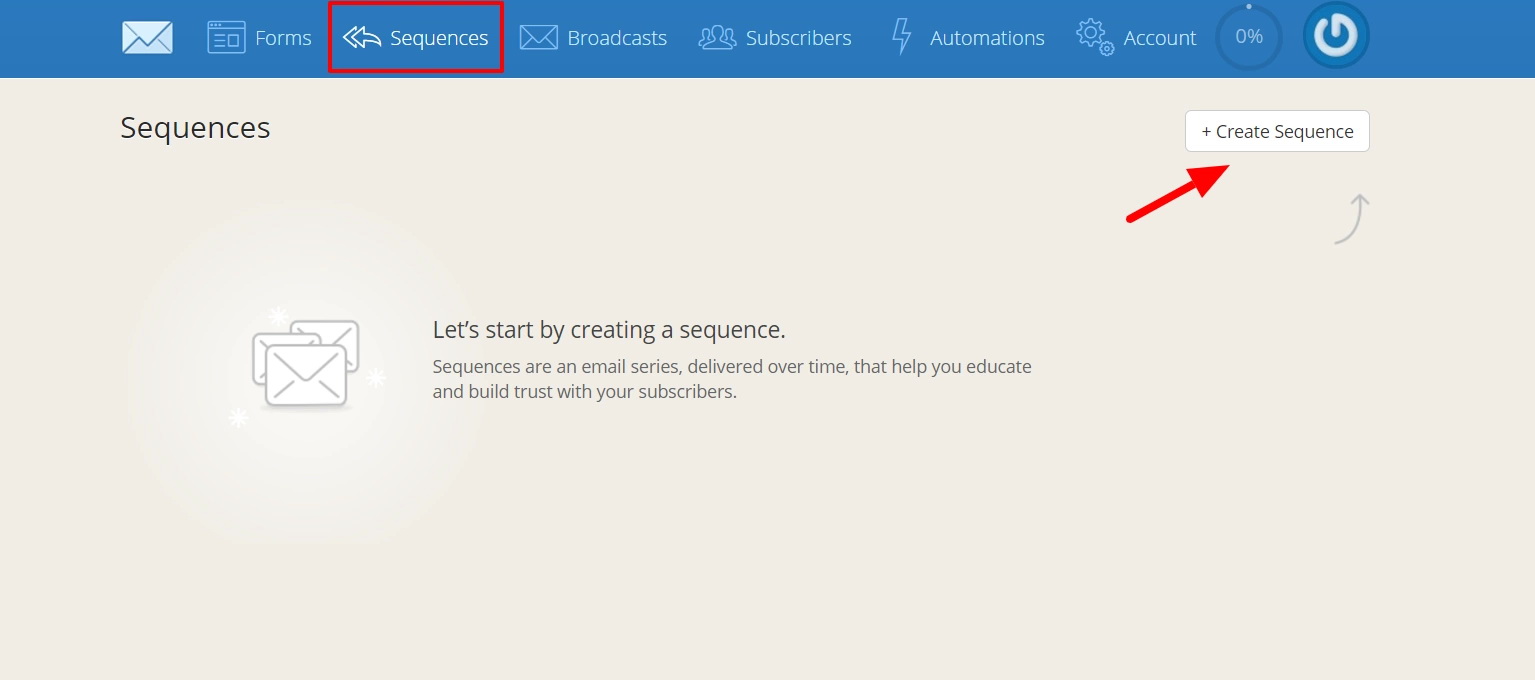
2. Write your emails and create a ConvertKit sequence (set up cadence, delivery dates, etc). Call it “Abandoned cart sequence.”
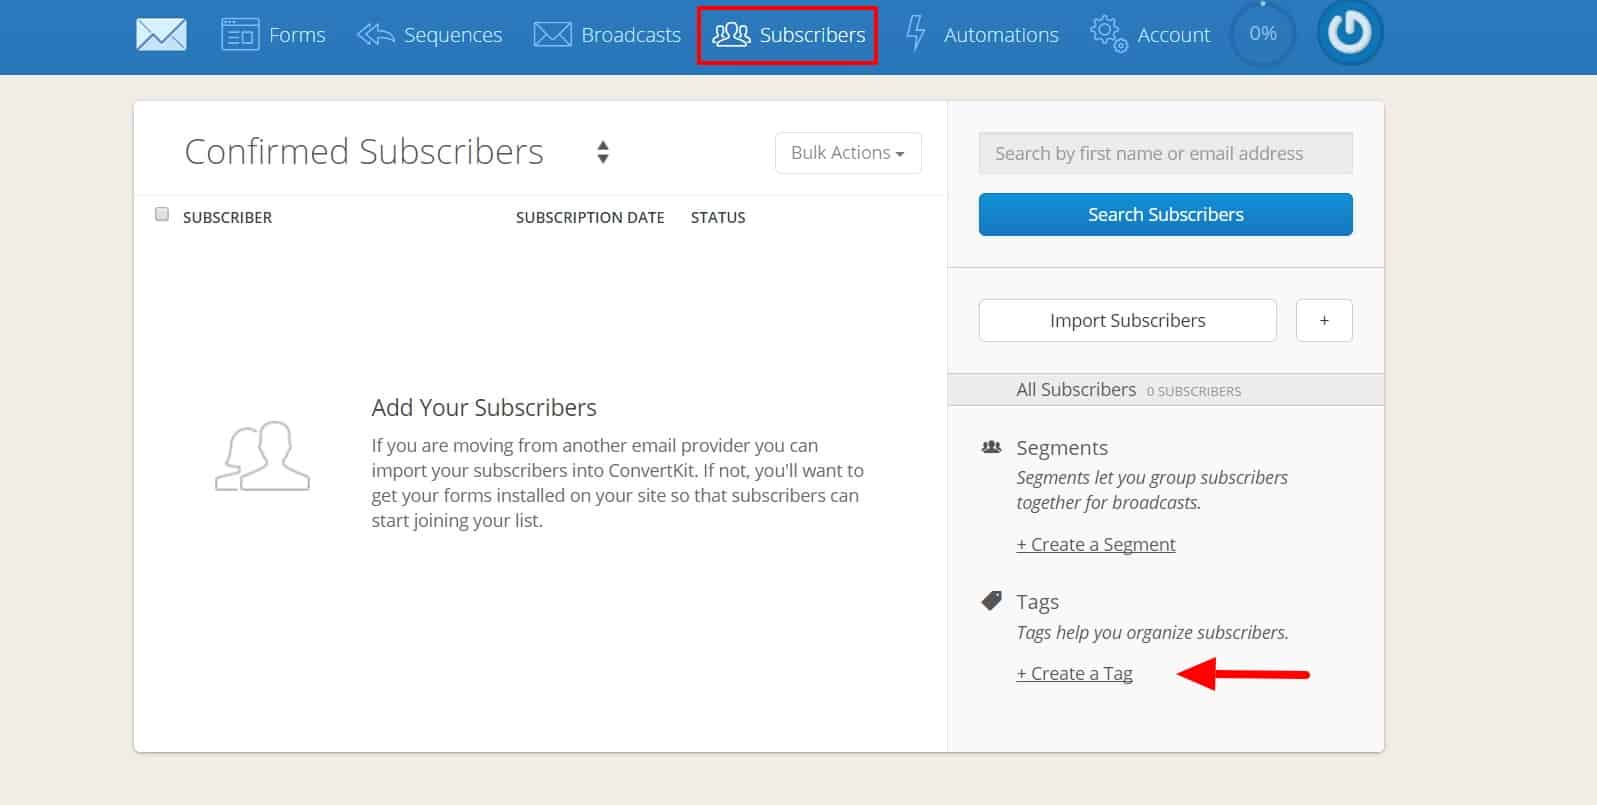
3. Under the Subscribers tab in Convertkit, add two tags: Signup and Purchase. We’ll use these tags in our next two steps.
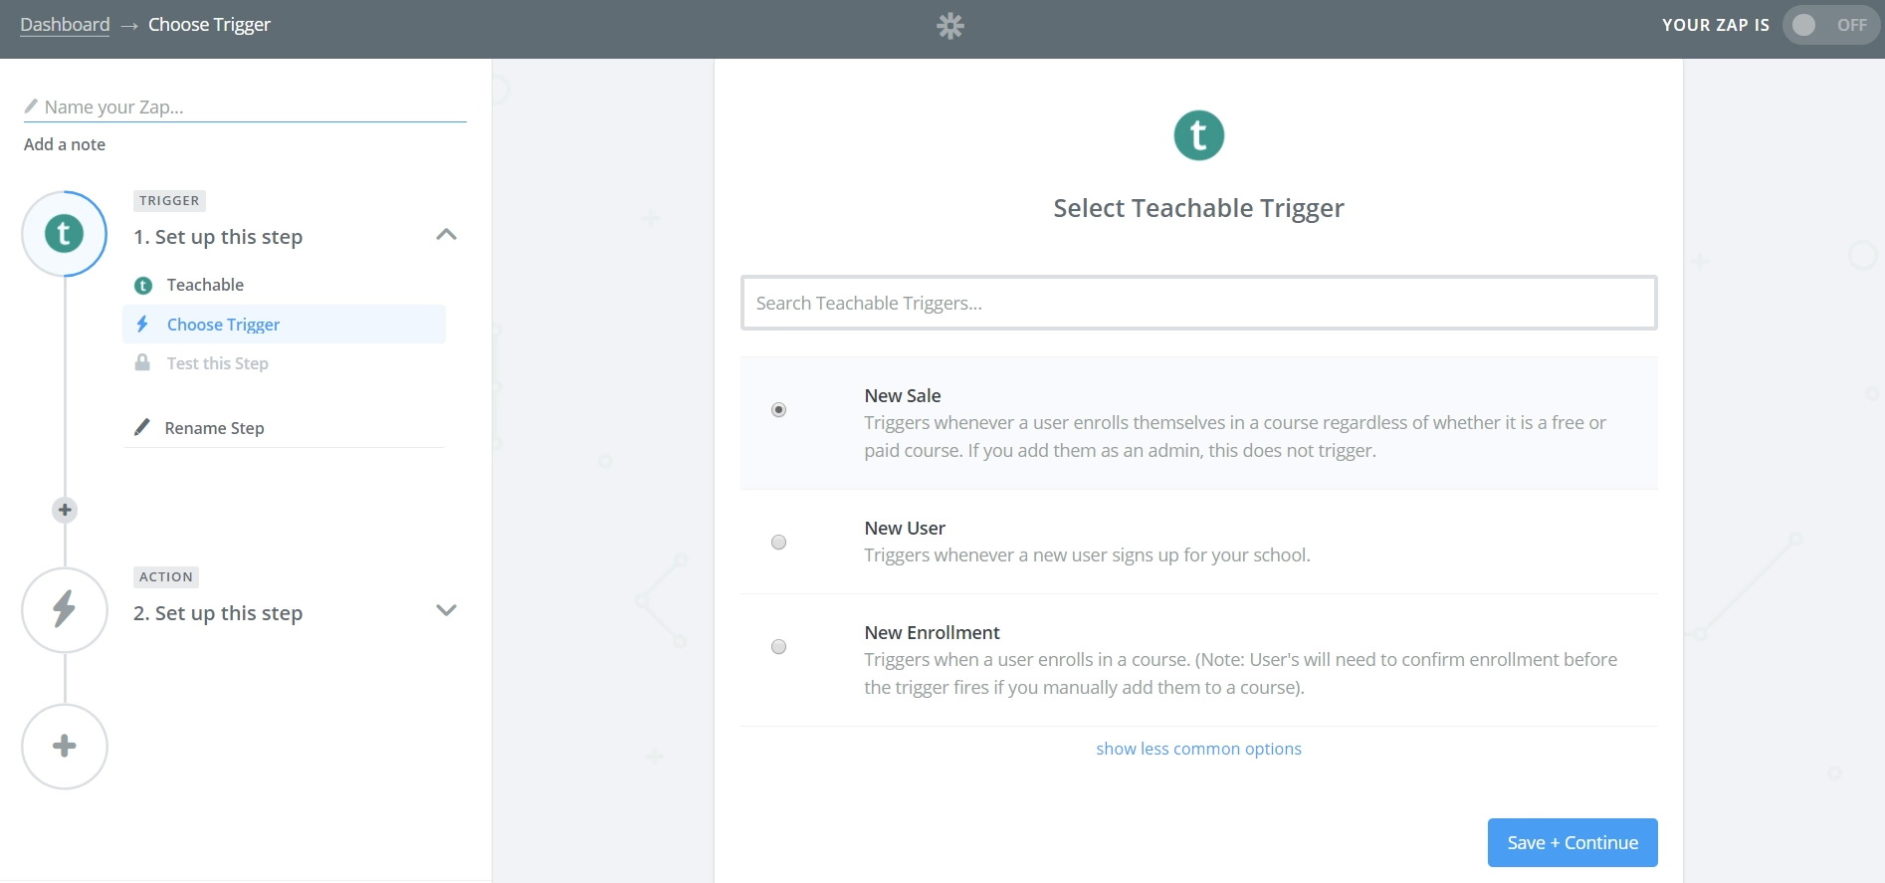
4. Now, head over to Zapier and click Make a Zap! This zap will add new Teachable signups to the Signup tag in ConvertKit. The trigger step is simple enough: Choose Teachable as the trigger app and New User as the trigger.

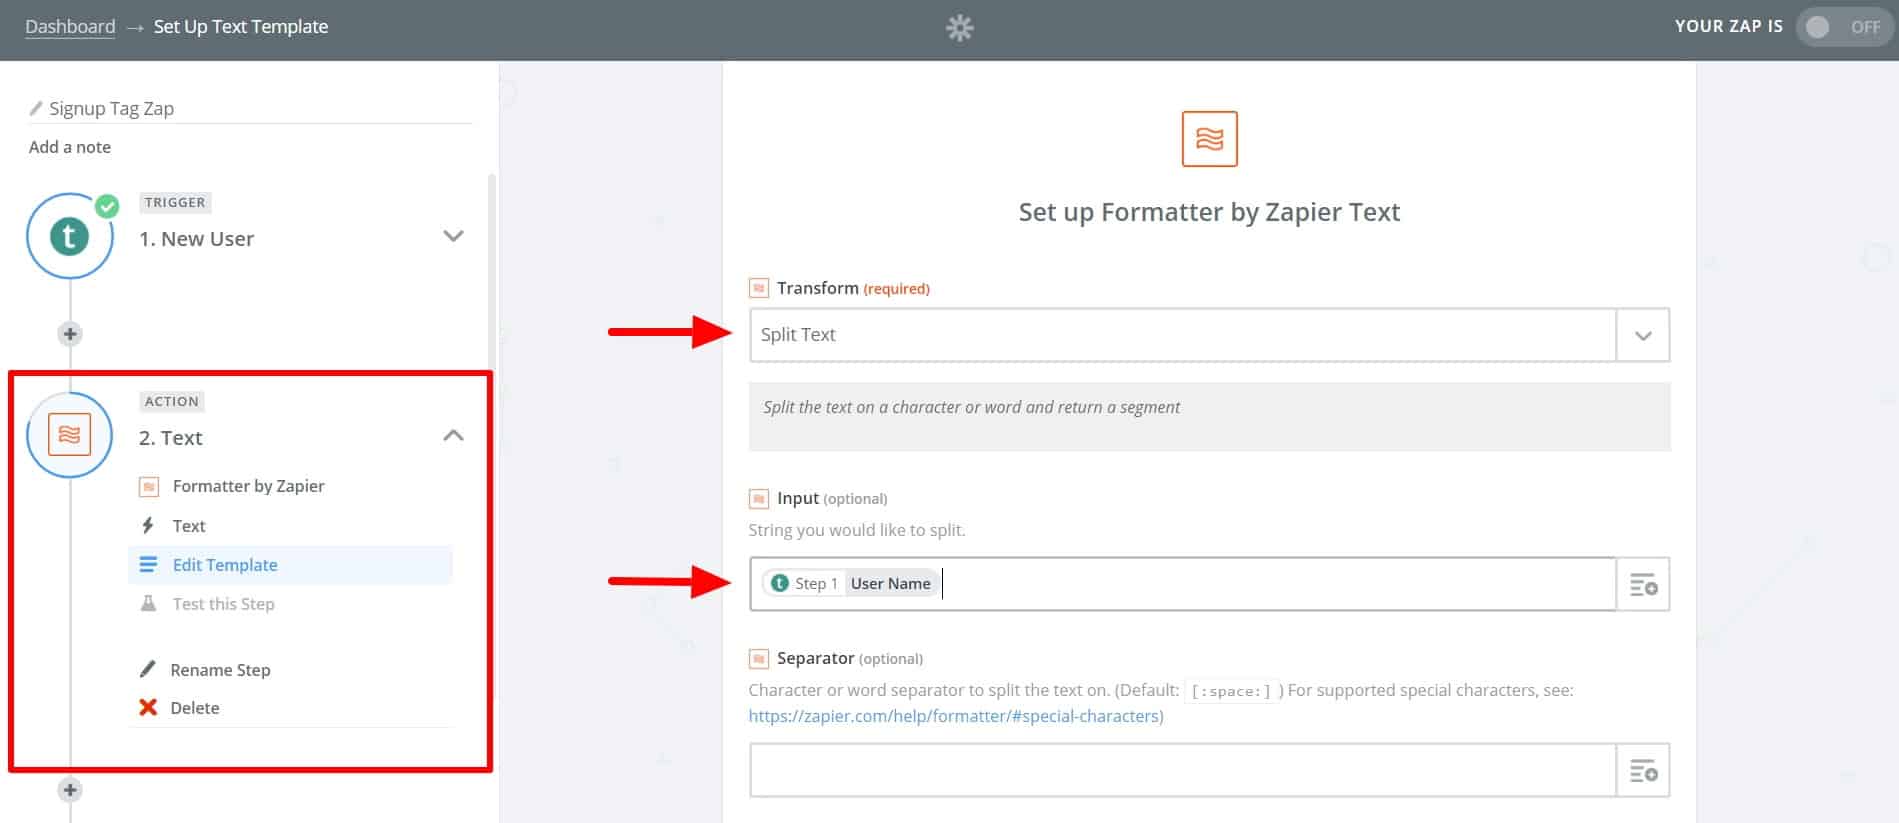
5. (OPTIONAL) Before proceeding to your main action step, you might want to address one logistical issue. Since Teachable only stores full names, rather than separate first and last names, you’ll need to add two intermediary Zapier actions if you want to automatically split full names into first and last, for correct processing through ConvertKit.
This step is optional because you could always set up your emails with a generic standard greeting that doesn’t address the customer by name (i.e. “Hey there!”), bypassing the issue of needing to isolate the first name. That might be a good option if you don’t have or want a paid Zapier plan, since on the free plan you can only set up Zaps of three steps or fewer.
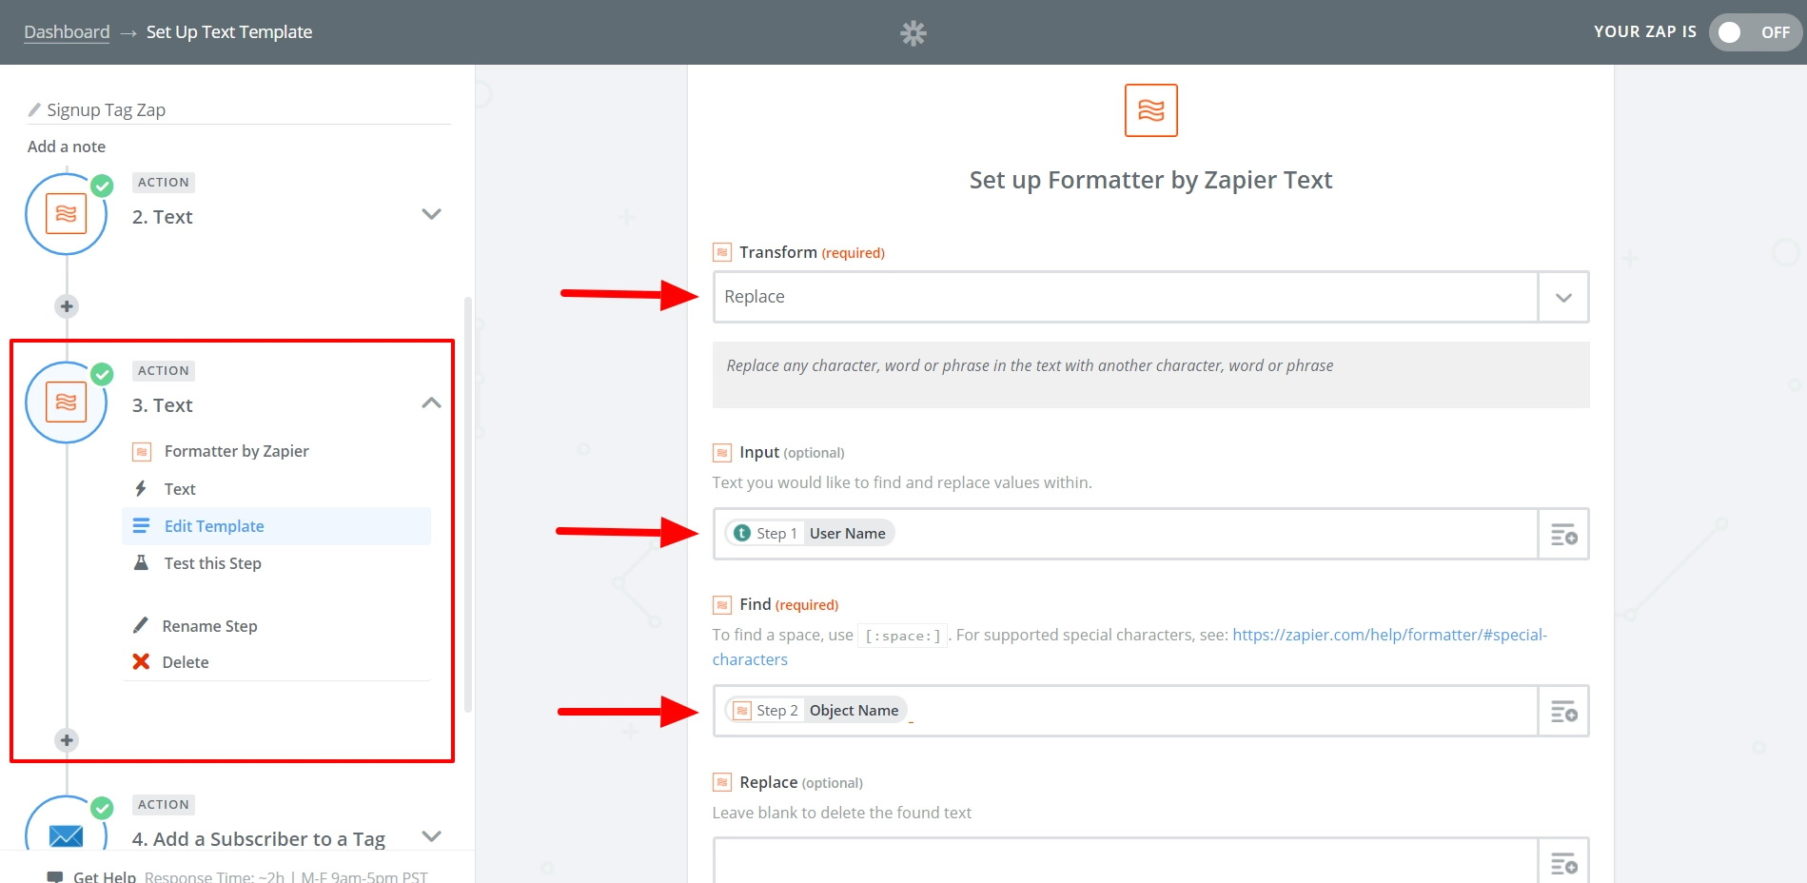
If you do want to separate the names, add two action steps using the formatter action app, following the directions in this Knowledge Base article. Add them as steps 2 and 3, in between your step 1 trigger and your step 4 main action.
The completed step 2 action—which will split out the first name—should look like this:
The completed step 3 action—which splits out the last name—should look like this:
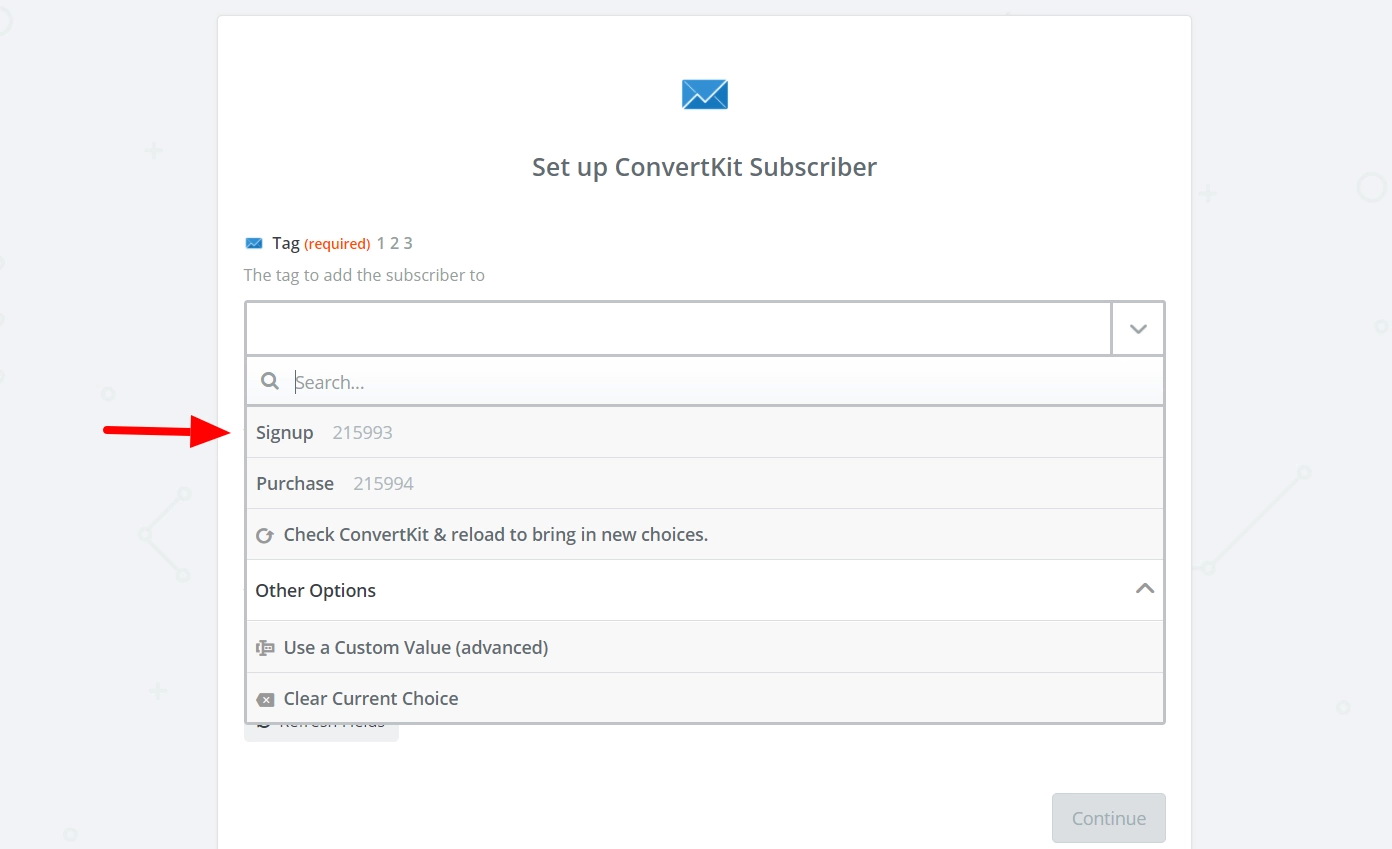
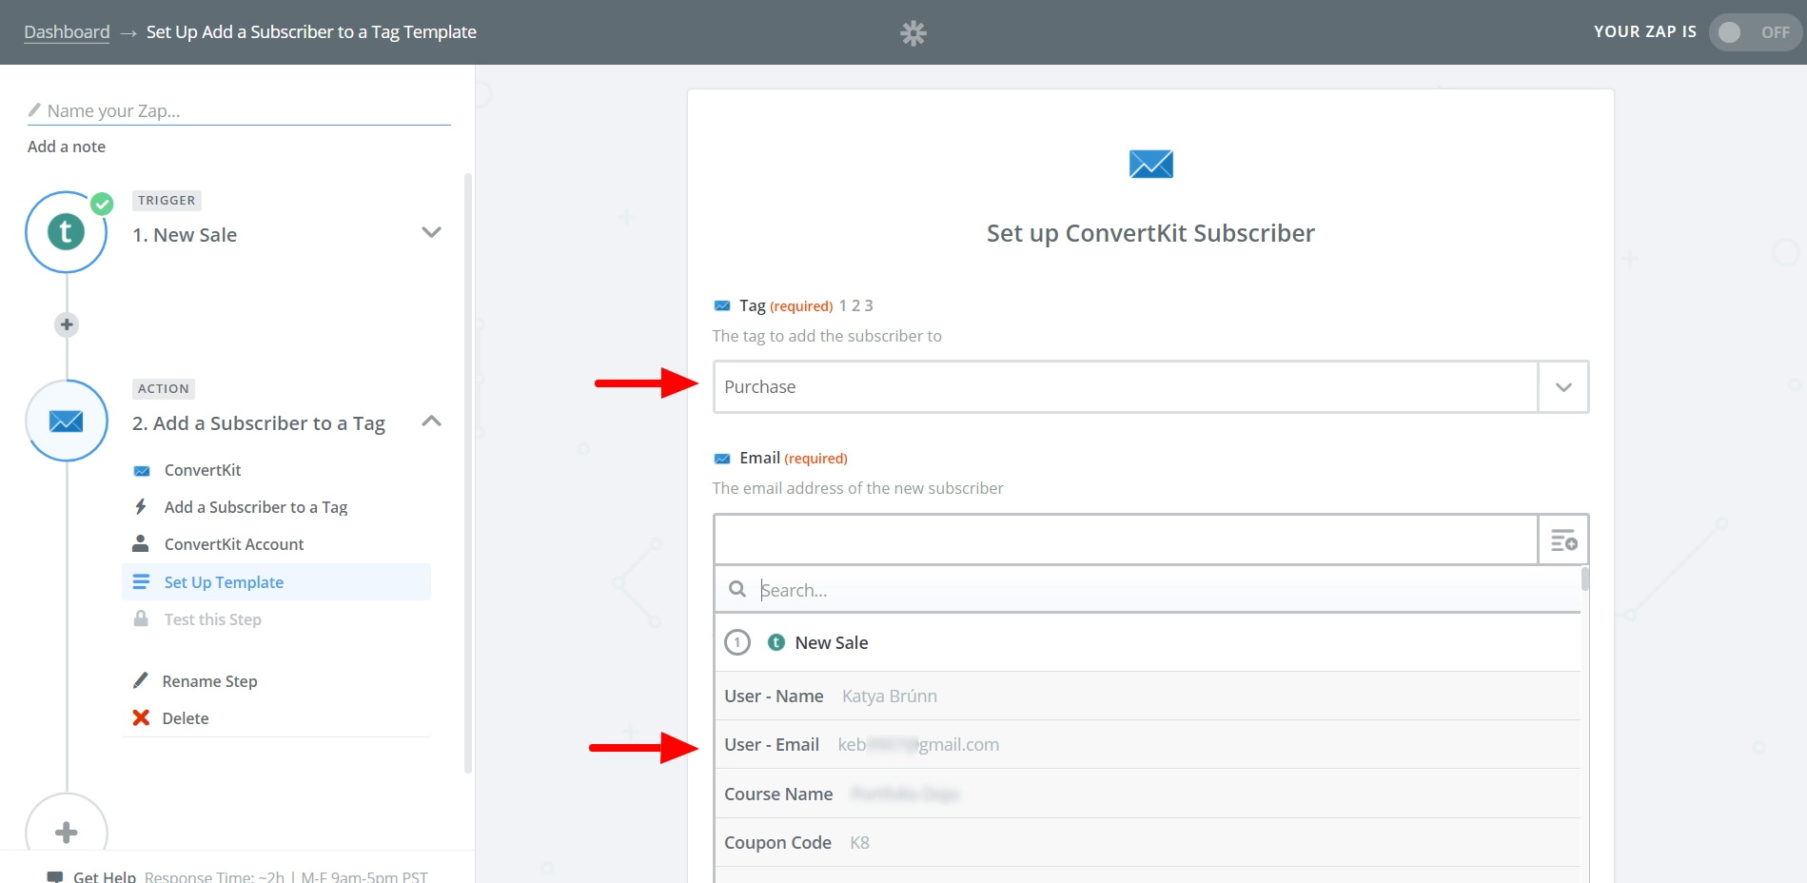
6. Now, proceed to your main action step, choosing ConvertKit as the action app with Add a Subscriber to a Tag as the action.

After this, you’ll be prompted to connect your ConvertKit account (if it isn’t already connected). You can do this with your ConvertKit API key and API secret key, both found on your ConvertKit account page.
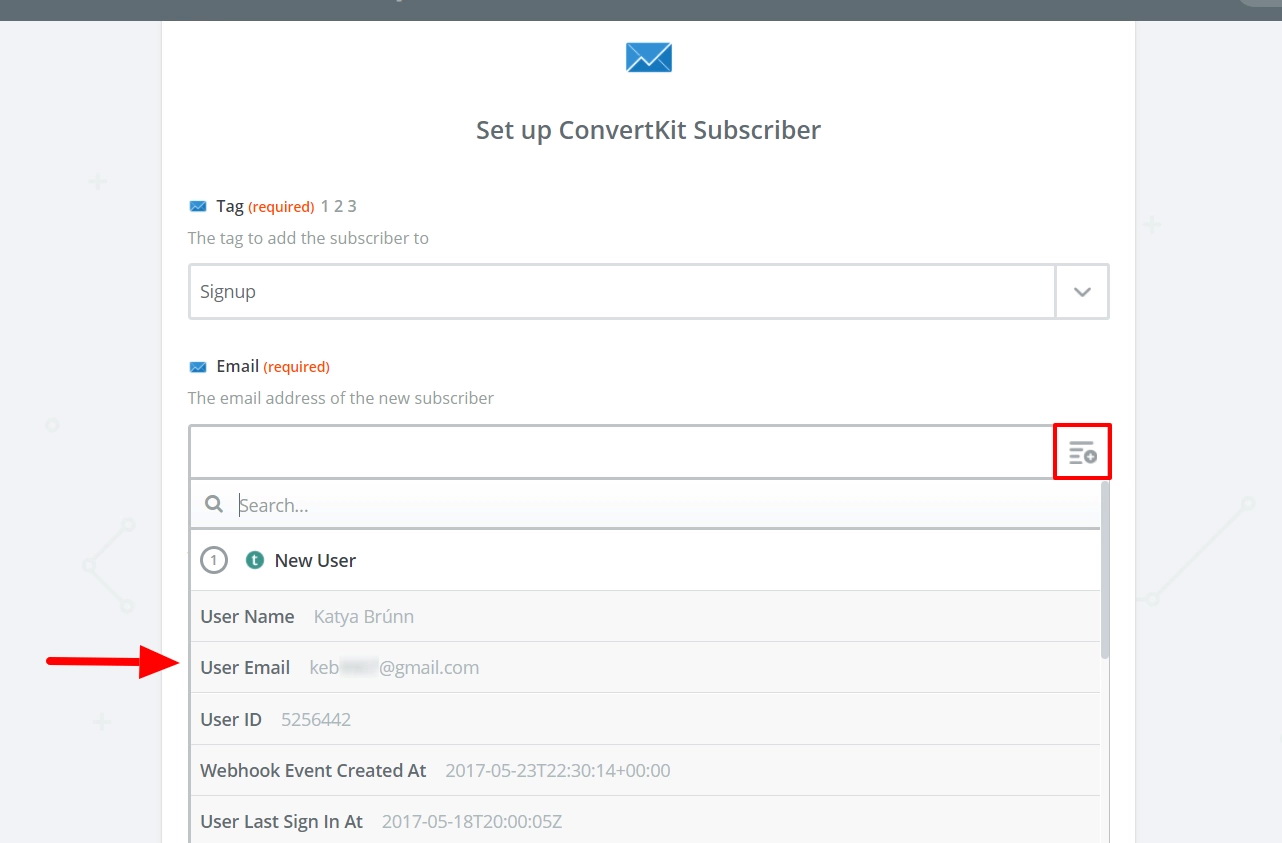
Once the accounts are connected, continue setting up your action. First, select Signup as the tag from the first dropdown menu.
In the Email field, click the box to the left and select the User Email from your New User step.
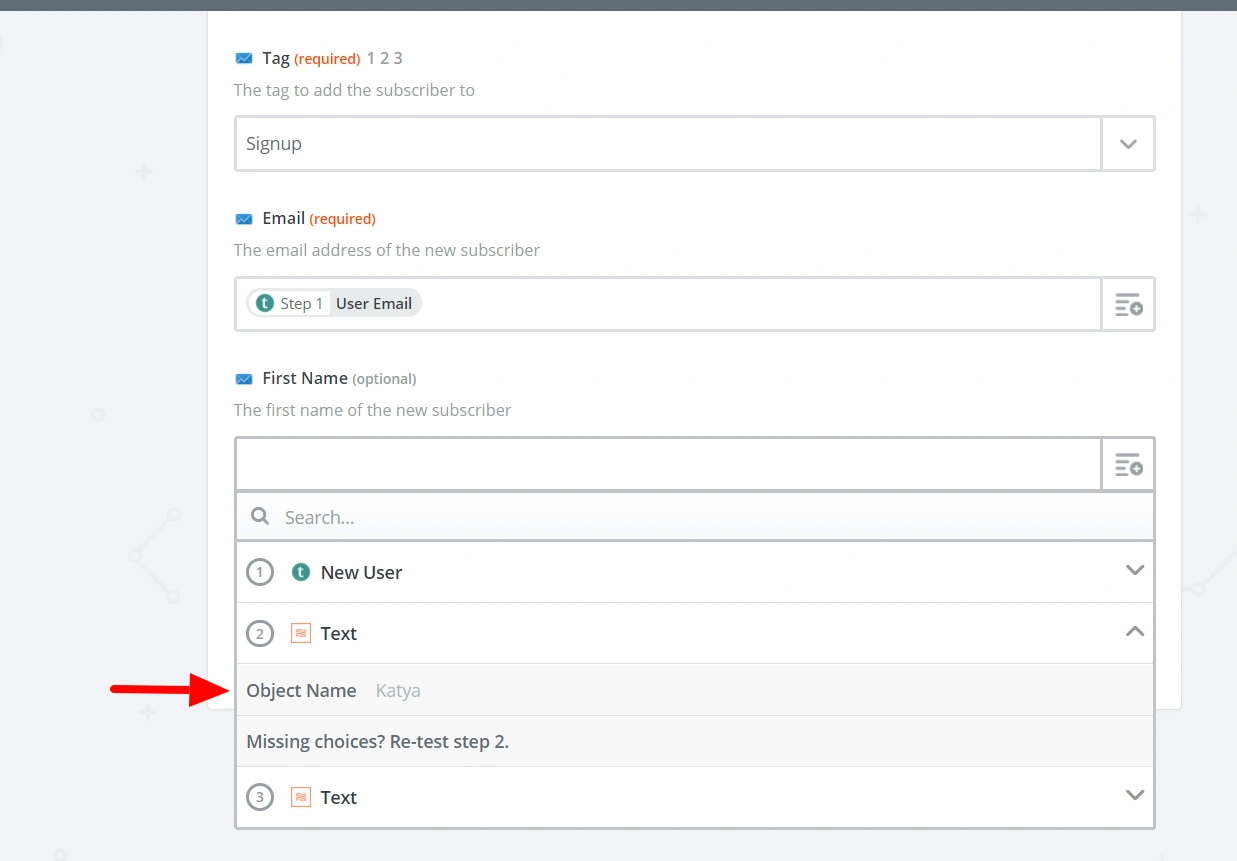
For the third field, you could leave it blank. If you did step 5, choose the Object Name from step 2 (the separated first name).
Now, you can test your Zap. If everything is working correctly, name it and turn it on.
7. Don’t leave Zapier just yet—we need to create a second Zap. This Zap will add new purchases to the Purchase tag in ConvertKit. Choose Teachable as the Trigger app again; this time, the trigger will be New Sale.
8. (OPTIONAL) Like with the first Zap, if you want to address students by their first name, repeat the two Formatter actions from step 5.
9. Again, your main action will be to Add a Subscriber to a Tag, using ConvertKit as the action app. Set up the template so the tag is Purchase and the email is the User Email from step 1.
Once you’ve completed the template, test your Zap, name it, and turn it on.
10. Finally, we’re going to return to ConvertKit to subscribe tagged Signup users to your abandoned-cart email sequence (and unsubscribe purchasers). We’ll do this by creating two automations.
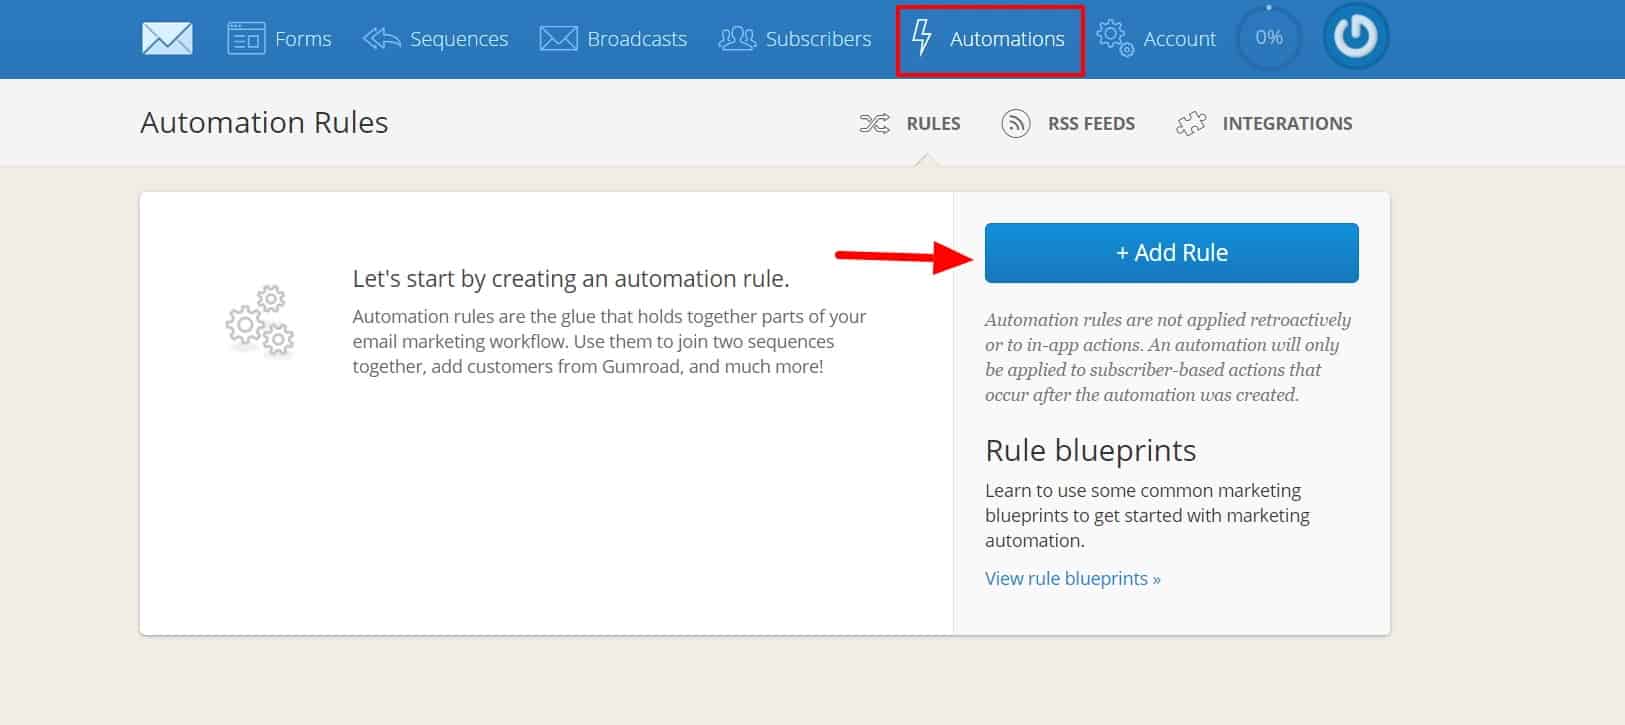
Navigate to the Automations tab and click Add Rule:
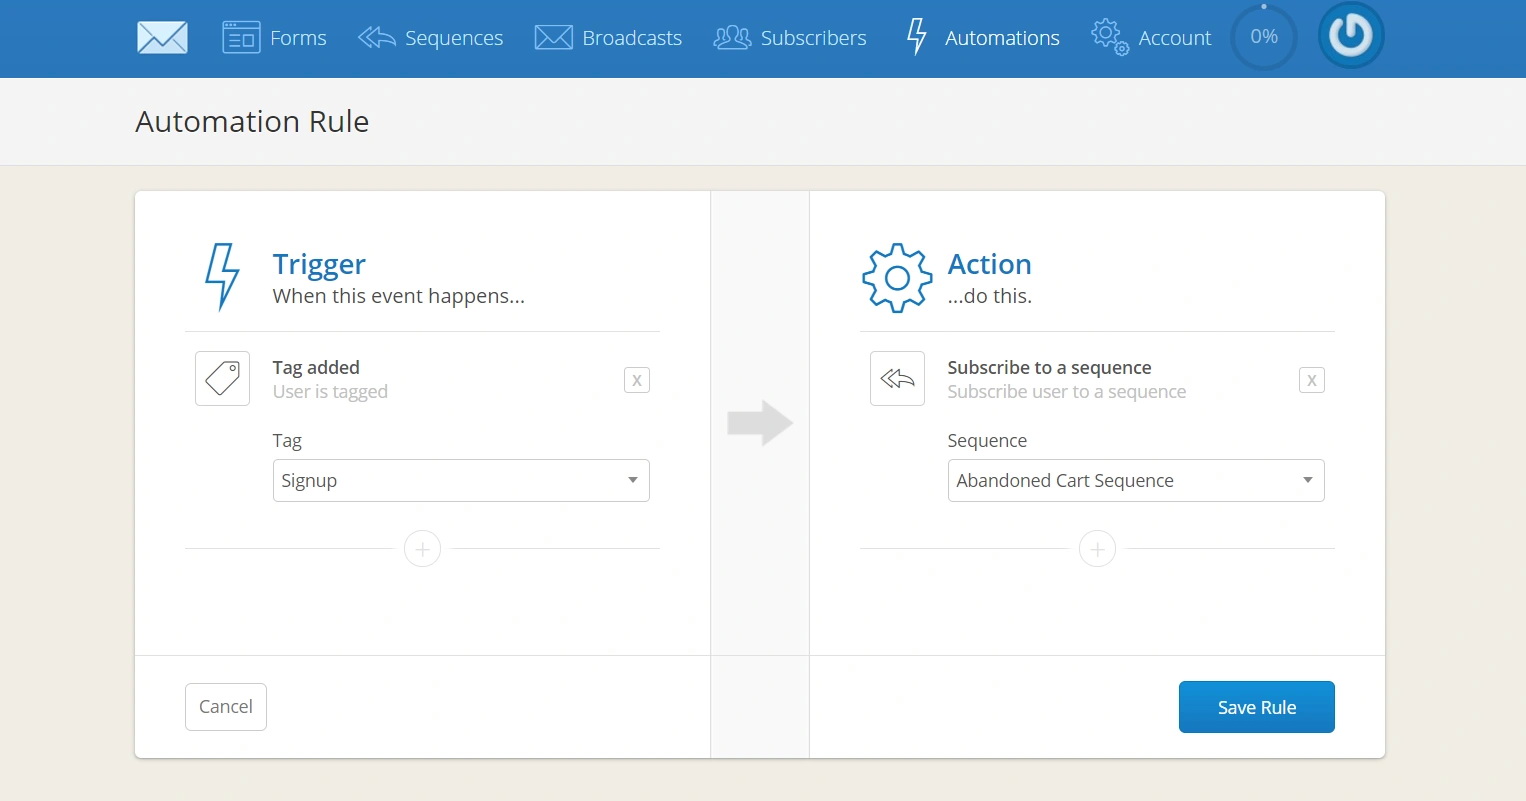
Automations work similarly to Zaps, with a trigger and an action. For your first automation, select Tag Added (Signup) as the trigger, and Subscribe to a Sequence (Abandoned Cart Sequence) as the action. Click Save Rule when done.
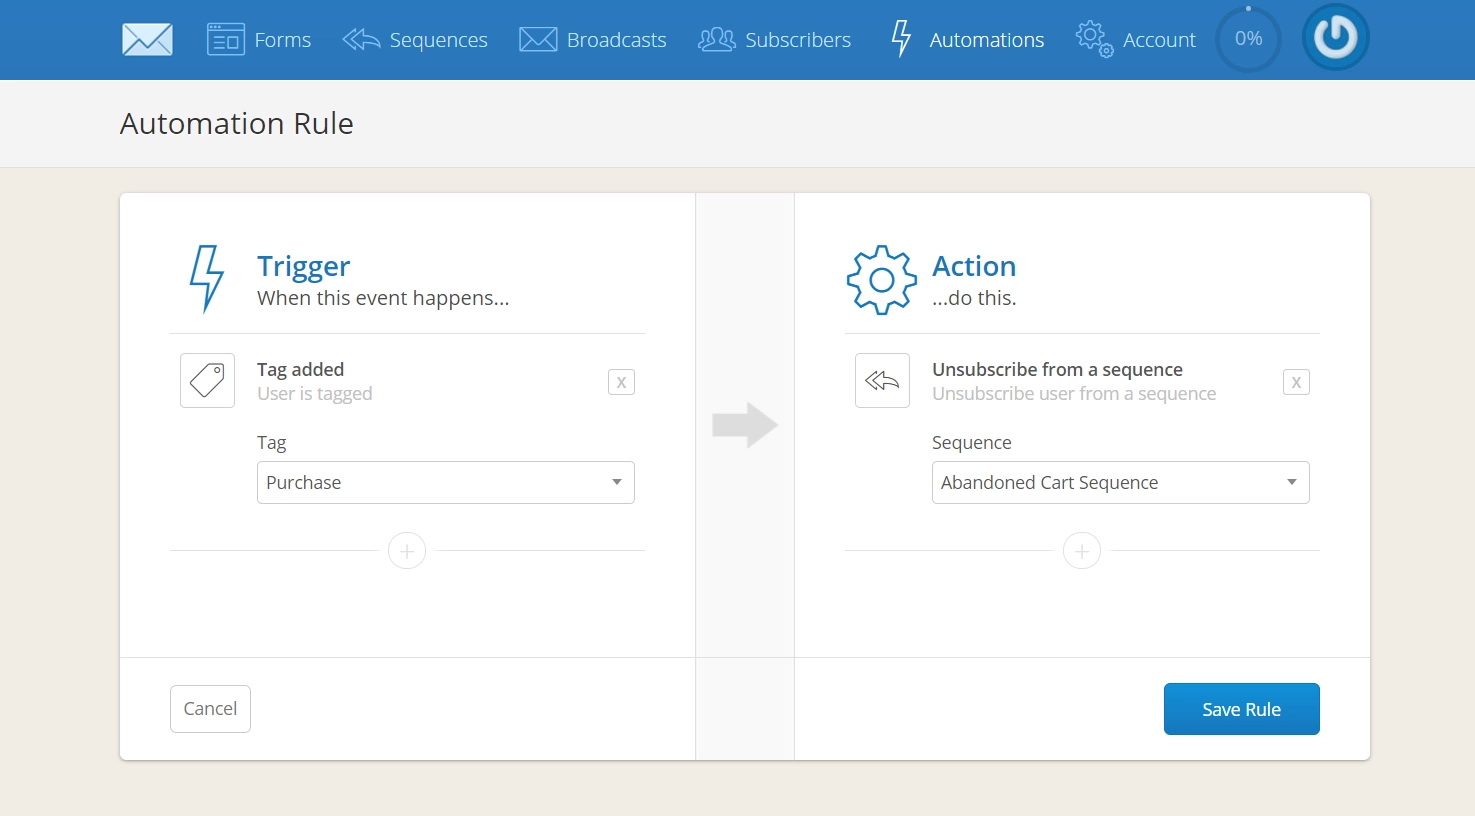
11. Your second automation will unsubscribe any new users who have made a purchase. Select Tag Added (Purchase) as the trigger, and Unsubscribe from Sequence (Abandoned Cart Sequence) as the action.
That’s it!
You’re all set. Anyone who creates an account on your Teachable course during the checkout process, but abandons their cart before making a purchase, will receive emails you’ve created specifically to remove their barriers to purchase and increase conversions.