
You don’t need months to launch a successful online course, digital product, or coaching program.
In this guide, we’ll break down the five simple steps you need to take to start selling on Teachable,, so you can get up and running quickly.
With only one to two hours per day, you can go from an idea to a fully functioning online course, digital download, or coaching offer in a single week.
Or you can work on all of these steps at once and knock them out in a single day if you choose.
{{trial-component="/blog-shortcodes/blog-cta"}}
Understanding Teachable and how it works
Teachable is the education-first platform for modern entrepreneurs, founders, creators, and business owners.
Whether you’re looking to diversify your online income streams, scale your business effectively, or package your expertise into high-value digital products, Teachable provides the tools you need to build, host, manage, and sell—all while integrating directly with your existing tech stack.
Think of us as your behind-the-scenes business growth partner, handling the tech, sales, and automation so you can focus on what you do best.
With Teachable, you can:
- Monetize in multiple formats – Courses, coaching, memberships, digital downloads, and even corporate training.
- Seamlessly accept payments – Offer flexible pricing models like subscriptions, payment plans, and Buy Now, Pay Later (BNPL).
- Plug and play with your favorite tools– Teachable integrates with powerful tools like Google Analytics, Mailchimp, LinkedIn Insight Tag, and more—so you can track, sell, and scale with ease.
- Scale on your terms – Whether you’re selling to individuals, entrepreneurs, or businesses, Teachable helps you grow at your own pace.
More than 150,000 business owners, educators, and creators use Teachable to power their online businesses and reach millions of students worldwide.
Now, let’s walk through the exact steps to build, launch, and sell your first digital product on Teachable—starting right now.
The five steps to start selling on Teachable
Launching your digital product is simple with Teachable. Follow these five steps to go from idea to income fast.
- Set up your Teachable school – Create your account, customize your branding, and configure your payment settings so you're ready to start selling.
- Establish pricing and checkout – Choose a pricing strategy, enable teachable:pay to offer a more complete sales experience with options like subscriptions and Buy Now, Pay Later (BNPL), and optimize your checkout page for conversions.
- Create and upload your first digital product – Structure your course, coaching program, or digital download, then upload your first piece of content to start building your offer.
- Build a streamlined sales system for your digital product – Leverage Teachable’s no-code tools to build a high-converting sales process that clearly presents your offer, establishes trust, and maximizes conversions.
- Market your digital product – Generate demand with email, social media, affiliates, and live events, and start selling before launch.
Let’s dig deeper into each of these steps together.
Step 1: Set up your Teachable school
Your Teachable school is your home base—the foundation of your digital product business. This is where you'll customize your school’s branding and prepare to accept payments. In just a few steps, you’ll have a professional, fully functional school ready for your first students.
Create your Teachable account (5 minutes)
If you haven’t already, sign up for Teachable. This will give you access to our course-building tools, payment processing, and student management features—everything you need to start selling.
Choose a school name and customize your branding (20 minutes)
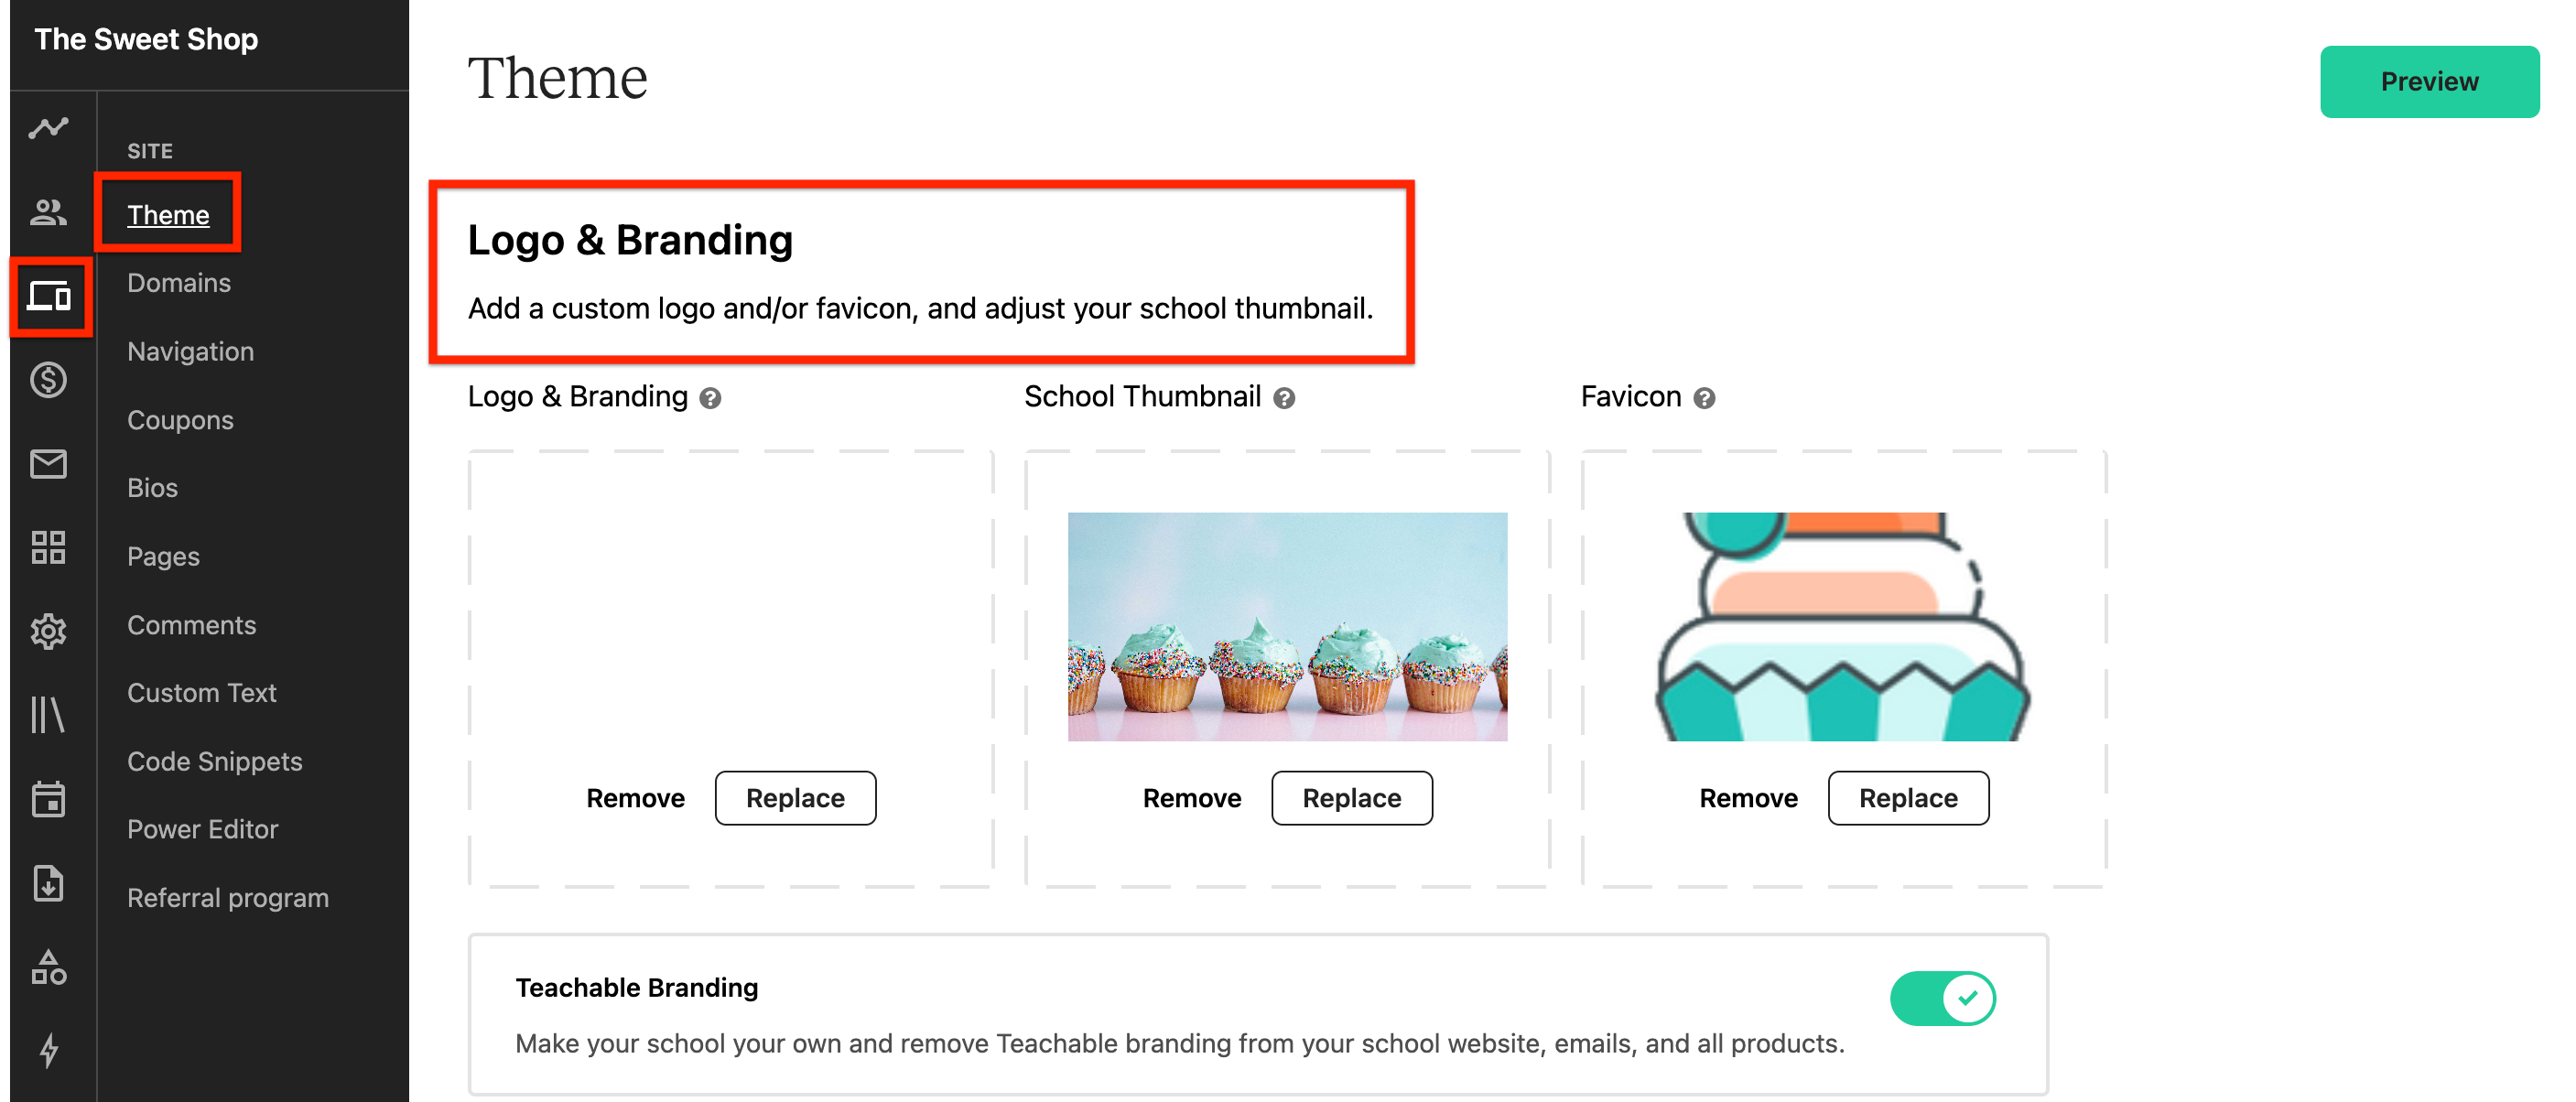
Your school name is the foundation of your brand on Teachable. Choose a name that aligns with your business, expertise, or audience. You can always update it later if needed.
Once your school name is set, customize your branding by:
- Uploading your logo and selecting brand colors to match your business identity.
- Editing your homepage layout to create a strong first impression.
- Setting up your navigation menu to make it easy for students to find your courses.
You can customize your logo and branding at any time by modifying your school theme.
Set up your domain (15 minutes)
Your domain is a key part of building a professional brand. While Teachable provides a free subdomain (e.g., your-school.teachable.com), connecting a custom domain (e.g., yourbusiness.com) boosts credibility and creates a seamless experience for your students.
How to set up your domain in 15 minutes or less:
- Choose your domain option:
- Stick with Teachable’s free subdomain (quickest setup).
- Use a custom domain (recommended for a polished brand experience).
- Purchase a domain (if you don’t have one) through a provider like GoDaddy, Bluehost, or Google Domains.
- Connect your domain to Teachable:
- Update your DNS settings with your domain provider.
- Add a CNAME record pointing your custom domain to Teachable.
- Go to Site > Domains in your Teachable admin and add your domain.
- Make it your primary domain: If you have multiple domains, set your custom domain as primary so all visitors are directed there.
Domains may take up to 24-48 hours to fully connect. If you experience delays, double-check your DNS settings or check out this full support guide for more.
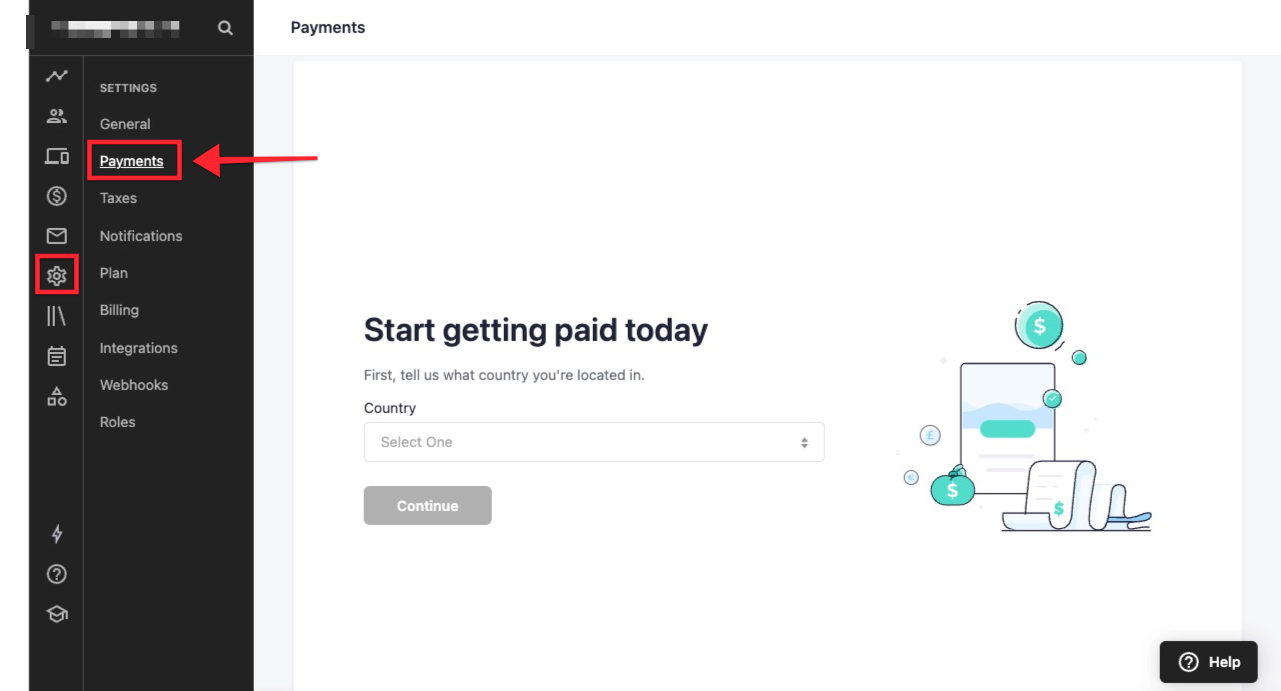
Set up your payment gateways with Teachable Pay (15 minutes)
Note: It’s essential that you complete this step before you can start selling. Without a payment gateway, students won’t be able to purchase your products, and you won’t be able to get paid.
Teachable Pay is the fastest and most seamless way to process payments on Teachable. It allows you to:
- Accept credit cards, PayPal, and Buy Now, Pay Later (BNPL) directly through your Teachable checkout.
- Automate payouts, tax compliance, and financial reporting so you can focus on growing your business.
- Choose a payout schedule that works for you: daily, weekly, or monthly.
How to set up teachable:pay
- Navigate to Settings > Payments in your Teachable Admin.
- Select Set up Teachable Pay and enter your business details (individual or company).
- Provide your banking information and verify your identity.
- Select your preferred payout schedule.
- Complete the setup and check your confirmation email to ensure everything is active.
Activate Teachable BackOffice to add PayPal and Buy Now Pay Later options to your checkout (optional, but recommended)
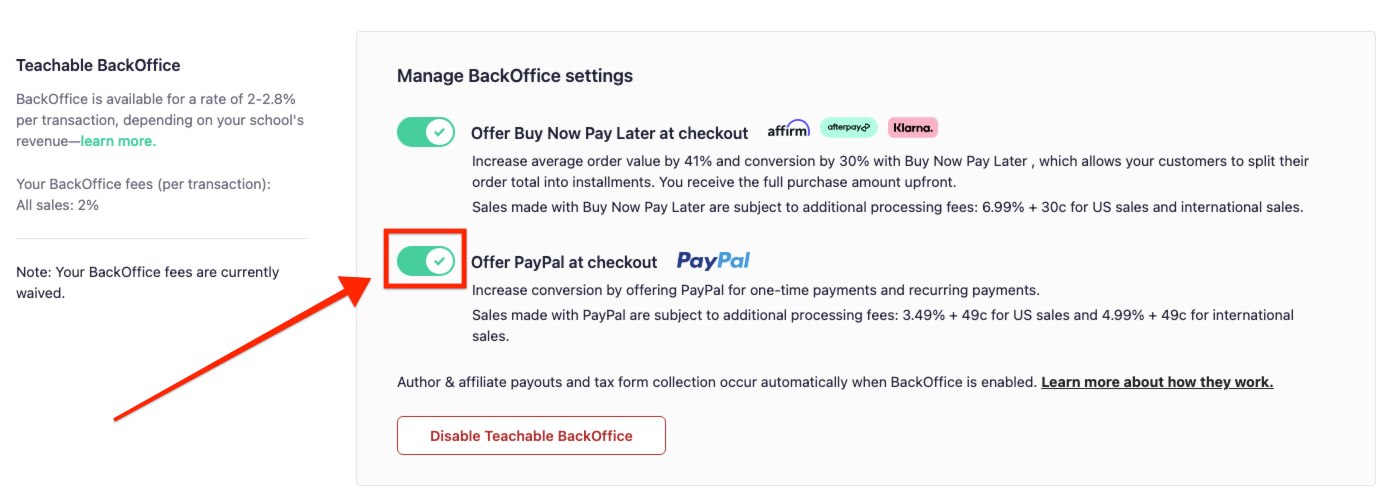
PayPal is a trusted payment method that can increase conversions by giving students an easy way to pay. To enable PayPal:
- Go to Settings > Payments and connect your PayPal Business account.
- Once activated, students will see PayPal as a checkout option.
BNPL allows students to split their payments into multiple installments, making high-ticket products more accessible. For example, a product priced at $200 could be split into 4 even payments of $50, making it much easier for your student to purchase immediately.
To enable it:
- Make sure teachable:pay is enabled in your payment settings.
- Toggle on Buy Now, Pay Later in the checkout settings.
- This feature can increase your average order value by 41%.
Here’s an additional quick support article around setting up your payments on teachable:pay.
Step 2: Set up payments, pricing, and checkout
Now that your Teachable school is set up, the next step is to configure pricing and checkout settings. This process allows you to test payment functionality, experiment with pricing strategies, and get familiar with the Teachable checkout system—before your actual product is live.
At this stage, you don’t need to have a fully built product. Instead, you’ll create mock or placeholder products to set up pricing, test different checkout options, and ensure everything works smoothly when you're ready to sell.
Create a mock product to test pricing (15 minutes)
Before setting up pricing, you’ll create a temporary mock product that allows you to explore different pricing models without needing a finished course or download.
- Go to Teachable Admin > Products and click Create Product.
- Select a Course, Coaching, or Digital Download as your placeholder.
- Name it something simple, like Test Course or Mock Digital Download.
- Click Save and Publish to move forward with pricing setup.
Now, you can experiment with different pricing options:
- One-time purchase – Best for standalone courses and downloads. ($27-$97 for mini-courses, $197+ for premium courses).
- Payment plans – Ideal for higher-ticket offers ($297+) by breaking up payments over time.
- Subscription model – Great for memberships, coaching programs, or ongoing access.
To set up pricing:
- Navigate to the Pricing tab within your mock product.
- Select your preferred pricing model and enter placeholder pricing details.
- Save your changes—these settings can be updated later for your real product.
This step allows you to see how pricing displays on your checkout page and adjust it before launch.
Customize your checkout page (20 minutes)
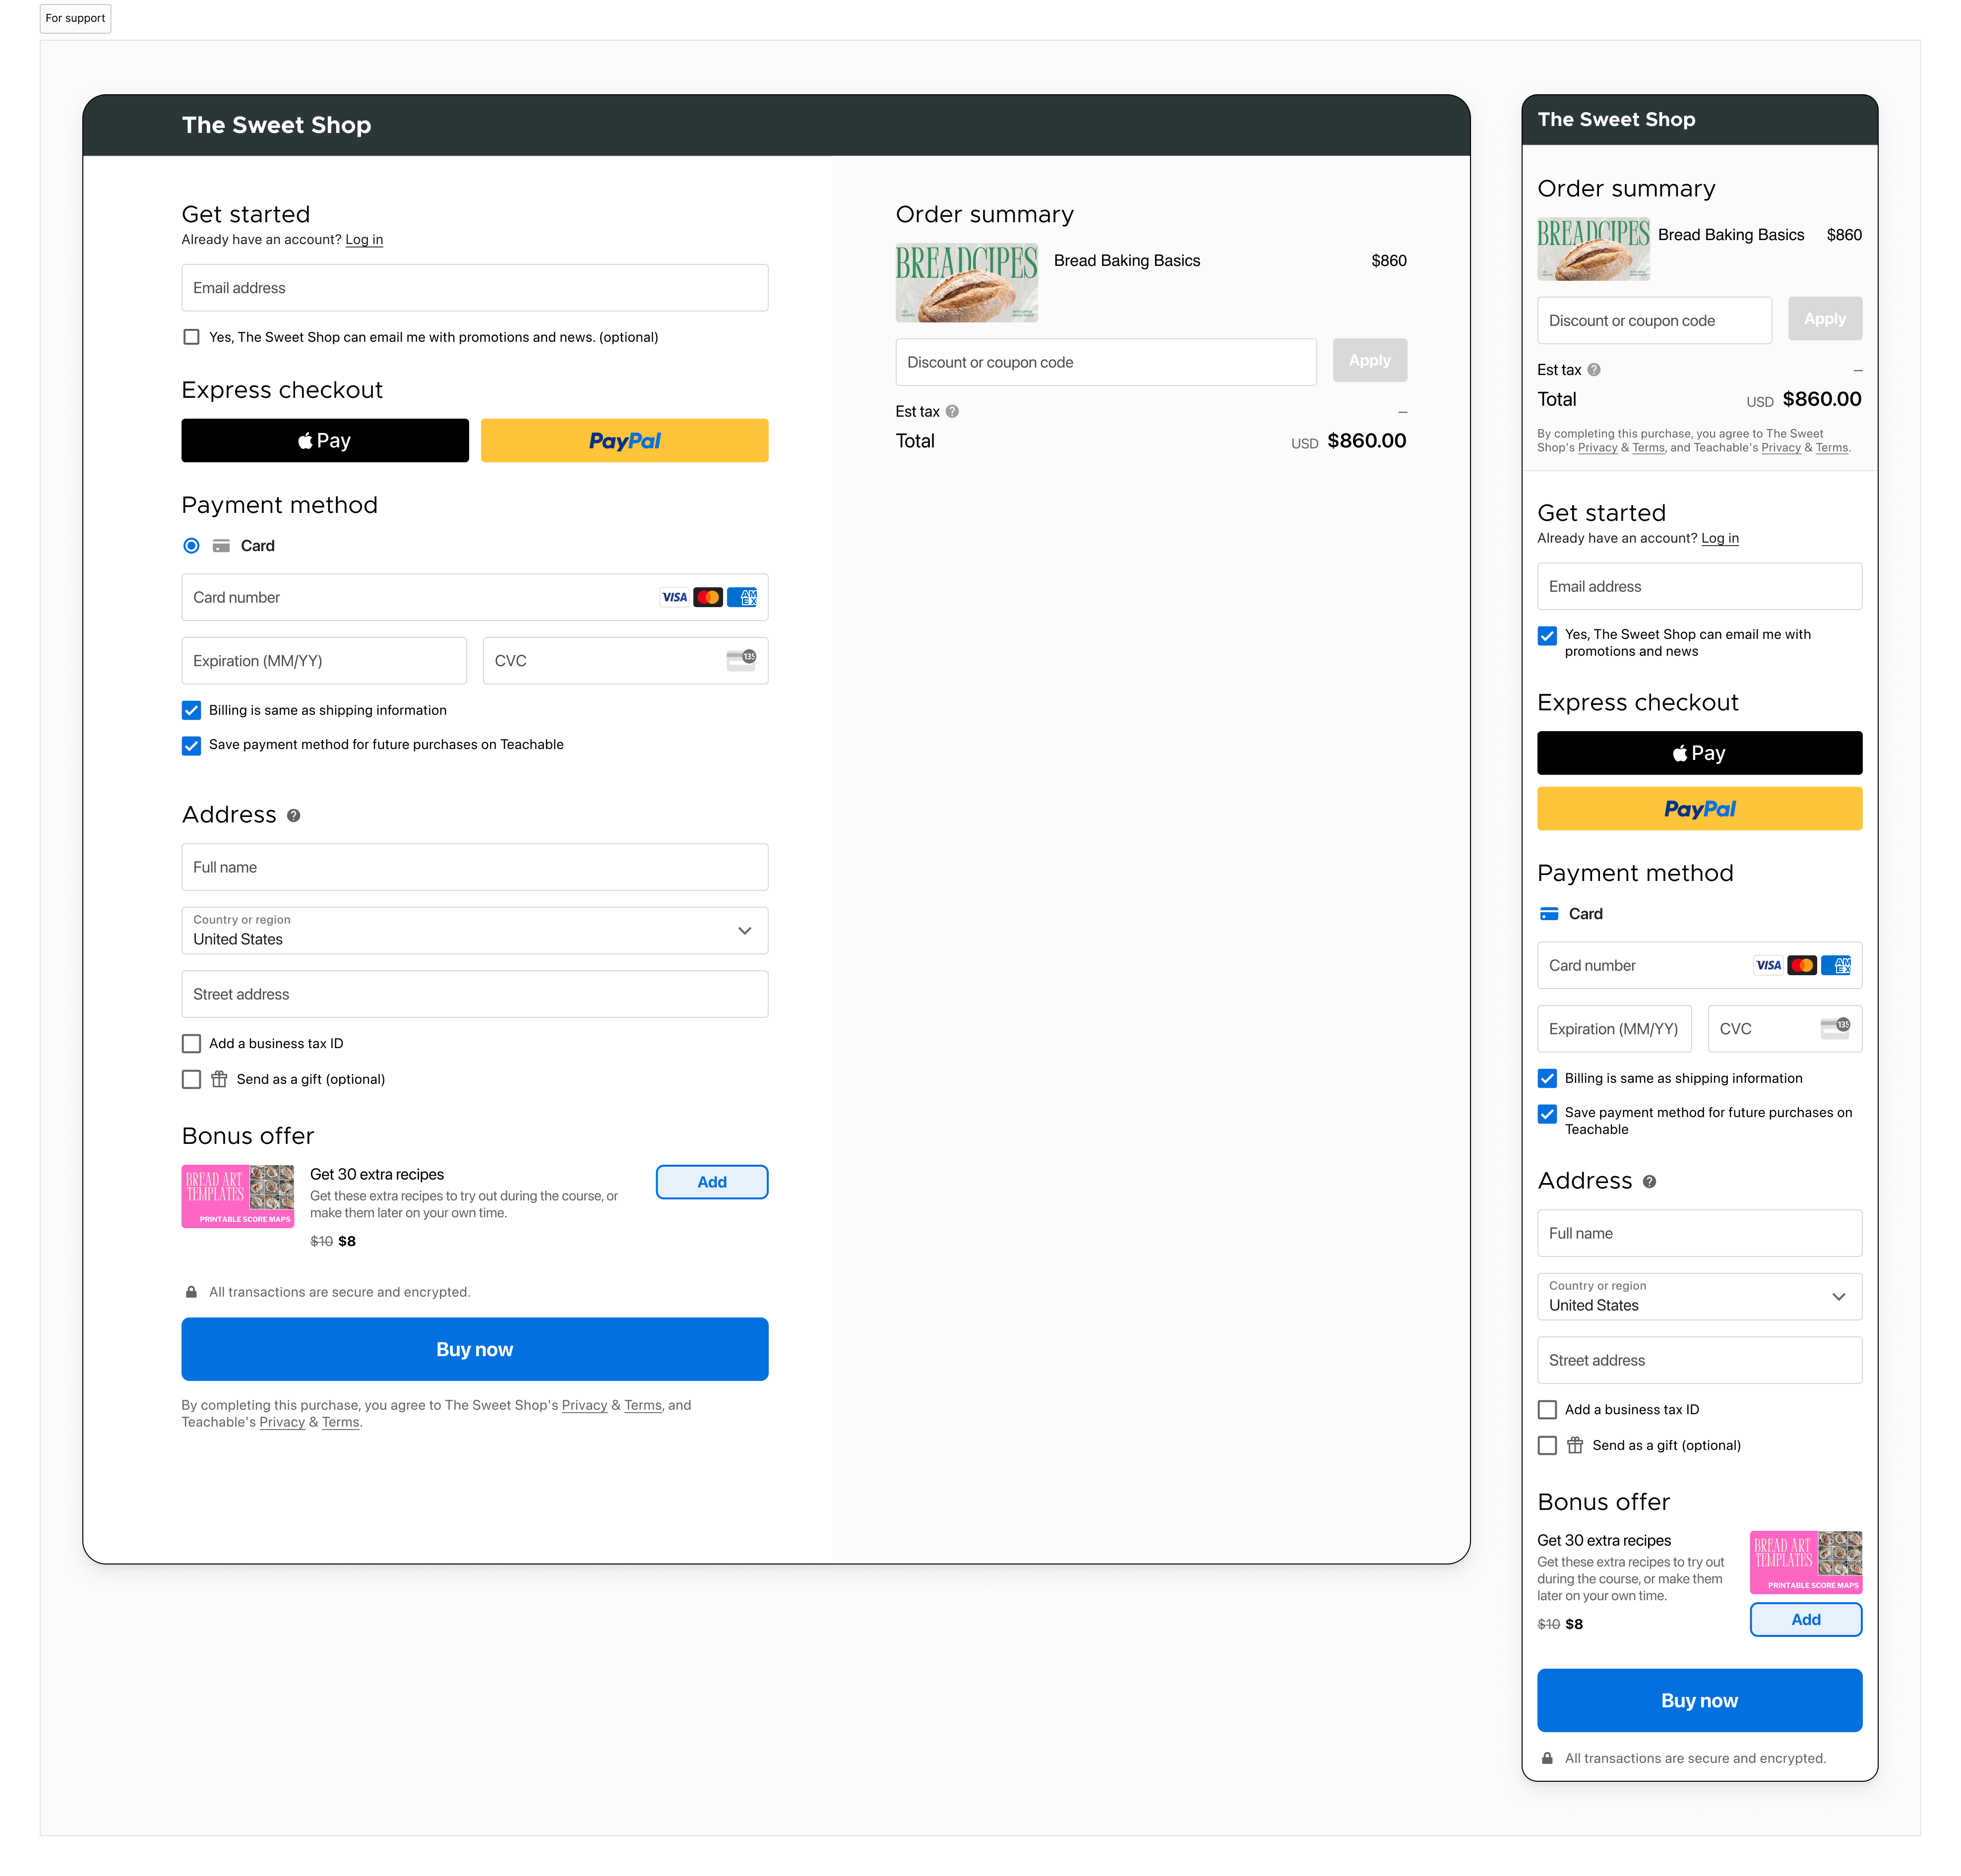
Your checkout page is where students make their purchase decisions. Even for your mock product, setting this up helps you learn how to optimize the sales experience before your real product goes live.
To edit your checkout page:
- Navigate to Settings > Checkout in your Teachable admin.
- Customize key elements to improve clarity and trust, including:
- Bullet points highlighting product benefits (even if it's a placeholder).
- Testimonials or mock social proof for testing.
- A money-back guarantee or refund policy (if applicable).
- Buy Now, Pay Later (BNPL) toggle for installment options.
By setting up and previewing this page now, you’ll know exactly how your real checkout page will look and function before launch.
Learn more with our support guide around checkout pages.
Run a test purchase (20 minutes)

Before launching your product, run a test transaction to experience the full checkout process as a student.
We recommend testing the checkout page so it’s easy to navigate, coupon codes apply correctly, and payment processing works smoothly.
Running a test purchase will also help you to see what your experience looks like from a student’s perspective.
How to perform a test purchase:
- Create a 100% off coupon:
- Go to Site, select Coupons, then School Coupons, and click Add New Coupon.
- Choose Bulk Single Use coupon and generate a one-time 100 percent discount coupon.
- Download the coupon code to apply at checkout.
- Here’s a full guide on how to create and use coupons on Teachable.
- Copy your checkout link:
- Go to your mock product’s Pricing tab.
- Copy the checkout page link and paste it into a new browser window.
- Complete a test purchase:
- Open the checkout link in an incognito/private browser window.
- Enter and apply the 100% off coupon code.
- Click “Buy Now” and complete the purchase and simulate a real purchase.
If you want to make sure your payment processing is functioning properly, set up a temporary $1 pricing plan and complete a purchase. Once confirmed, you can refund yourself using your Teachable admin.
Step 3: Create and upload your first digital product
Now that your Teachable school and payment system are set up, it’s time to get to the fun part: create the actual product you’ll be selling.
Whether you’re launching a course, digital download, or coaching offer, this step ensures you have something valuable for your audience.
Don’t worry about making it perfect—your goal is to get a minimum viable product (MVP) ready for your first sale on Teachable. You can always refine and add more content later.
In many cases, you can start with a rough outline before fully developing your product.
Many successful creators validate their ideas by testing, marketing, and even pre-selling their product before all content is finalized. Some have generated five-figure pre-sales before officially launching.
Here’s how you can get started in under an hour.
Decide on your first MVP digital product (10 minutes)
Choose one of the following two simple product types to get started quickly:
- Mini-course – A short, focused training (1-3 lessons) on a specific topic.
- Best for sharing expertise without creating a full course.
- Can include videos, PDFs, or worksheets.
- Allows you to launch and iterate based on student feedback.
- Digital download – A resource like a workbook, checklist, or template.
- Best for quick, actionable learning.
- Ideal for repurposing existing content (slides, guides, spreadsheets).
- Can serve as a low-cost entry point to a full course or coaching offer.
If you’re unsure, start with a digital download since it requires minimal setup. You can always expand into a mini-course later.
Set up your product in Teachable (10 minutes)
Once you’ve chosen your product type, create it inside Teachable:
- Go to Teachable Admin > Products and click Create Product.
- Select a product type: Course or Digital Download.
- Name your product (you can change this later).
- Set a price or make it free to attract early buyers.
- Save and publish so you can start adding content.
For digital downloads, upload your file as a resource that students can access immediately.
Upload essential content (20 minutes)
Your product doesn’t need to be fully complete to start selling. Upload at least one piece of content so students get immediate value.
For mini-courses, add:
- A title and thumbnail to establish branding.
- An outline with three to five lessons using Teachable’s AI tools.
- One video, PDF, or worksheet as a starting point.
For digital downloads, upload:
- A PDF, template, or workbook students can download immediately.
To add content in Teachable:
- Navigate to the Course Curriculum (for mini-courses) or the Product Setup (for digital downloads).
- Click Add New Lesson and give it a title.
- Upload a video, PDF, or worksheet to deliver value immediately.
- Save your changes and preview your product from a student’s perspective.
By the end of this step, your first digital product will be fully created. Now, it’s time to develop a sales-ready publishing plan and marketing system to start attracting and selling to students.
Step 4: Publish your first product
Creating a great product is only half the equation—having a system in place to sell it is just as important.
A great sales system is more than the sum of its parts; it’s a structured way of getting potential students to understand what you offer, see its value, and feel confident about making a purchase.
Teachable provides multiple options to help you create a seamless sales experience, whether you’re looking for a quick launch or a fully customized approach.
Select the right sales page option for your product (10 minutes)
Before you start driving traffic to your offer, you need a sales page that presents your product in a compelling way. Teachable gives you two options:
- Product detail page (currently in development) – This is a fast and simple way to start selling. It is automatically generated when you enable it in the course setup guide, pulling key product details, pricing, and a checkout button into a clean layout. This option works well for creators who want a quick setup without designing a custom sales page. Currently, it is only available for courses, with plans to expand to other product types.
- Custom sales page – If you want more control over branding, messaging, and layout, you can build a custom sales page. Teachable’s page editor allows you to add testimonials, videos, FAQs, and more to create a high-converting landing page.
To choose the best option for your product:
- If you want to start selling quickly, select the product detail page in your course setup guide. This page is automatically created and requires minimal adjustments. You can preview it, copy the link, and share it immediately.
- If you prefer a custom approach, create a new sales page from the Pages section in Teachable. Use the page editor to add sections, images, testimonials, and custom branding.
Optimize your sales page (20 minutes)
Whether using a custom sales page or the product detail page, you can customize your page to the look and feel you desire.
Product detail page
For a quick setup, the product detail page generates a structured sales page automatically. While it does not offer full customization, it allows for:
- Editing course title, description, and thumbnail directly from the course settings.
- Selecting which pricing plans to display.
- Toggling course curriculum preview to give potential buyers a look inside.
- Using the rich text area to add additional marketing messages.
- Enabling search engine discoverability so the course can appear in Google search results.
- Copying the product detail page URL to use in promotions.
Custom sales page
For those who want full control over their layout, Teachable's sales page editor allows for detailed customization. You can:
- Use Teachable AI to quickly generate a complete sales page with pre-written content.
- Add compelling headlines and clear descriptions to highlight key benefits.
- Include testimonials to build trust with potential buyers.
- Show pricing details with clear calls to action for each plan.
- Enable enrollment caps to create urgency if space is limited.
- Test all links and buttons to confirm everything is working as expected.
- Copy your page URL for use in promotions.
Set up additional sales tools (15 minutes)
A sales page is one part of the process. Teachable offers additional tools to strengthen your sales system:
- Coupons – Create discounts to encourage sign-ups and track promotion performance.
- Abandoned cart emails – Remind potential students who visited the checkout but didn’t complete the purchase.
- Order bumps and upsells – Adding additional products can increase revenue by offering additional products at checkout (if you have the content already prepared).
- Affiliate marketing – Allow partners to promote your product in exchange for a commission.
These tools help increase conversions by making the buying process smoother and offering incentives to take action.
Test your sales system (10 minutes)
Before promoting your sales page, run a quick test to confirm that everything is working as expected:
- Open the page from a student’s perspective and check for clarity.
- Click all links and buttons to confirm they lead to the right place.
- If using a checkout page, complete a test transaction to confirm the process works.
Once these steps are complete, your sales system is ready. Now, it’s time to drive traffic and start making sales.
Step 5: Market your digital product
Having a great product and a strong sales system in place sets the foundation, but making sales requires reaching the right people and grabbing their attention. Whether you already have a following or are starting from scratch, there are multiple ways to promote your product and attract buyers.
Announce your product and generate early sales (20 minutes)
Getting the word out early can help you generate momentum before your official launch. Share your offer across different platforms to warm up your audience:
- Collect email leads directly on Teachable and send them using your favorite email provider – Use the Email Lead Form block to capture email addresses from potential buyers. Leads are stored in your Users > Leads list and can be connected to ConvertKit, Mailchimp, or Zapier for automated follow-ups.
- Email your audience – If you already have an email list, send an announcement campaign using Teachable’s email integrations. Teachable also allows you to segment leads and track conversions.
- Share on social media – Post short-form videos, behind-the-scenes content, and launch announcements. Add a link to your Teachable sales page or checkout page in your bio or posts to drive traffic. You can also add your Teachable products to Linktree for increased visibility.
- Reach out to warm leads – Contact past clients, current prospects, your existing network, and community members who may be interested or who may know someone else who would benefit from your digital product.
- Engage in online communities you’re already a part of – Share your expertise and provide value in relevant groups or forums where potential customers might be looking for solutions.
- Host a free live training or webinar – Use Teachable’s Zoom integration to introduce your course topic and invite attendees to enroll.
- Use affiliate marketing – Partner with micro-influencers, peers, or past students who can promote your course in exchange for a commission.
- Offer an early-bird incentive – A limited-time discount or exclusive bonus can encourage people to take action sooner.
If you don’t have an audience yet, consider reaching out to peers, past clients, or industry contacts who may be interested. Partnering with a micro-influencer or affiliate can also help expand your reach.
Optional: Use a pre-sale strategy to validate demand (20 minutes)
A pre-sale allows you to start selling before your product is fully completed. This not only helps generate early revenue but also provides valuable feedback from students before your official launch.
To run a pre-sale:
- Make sure your product page is set up correctly – Use a sales page or product detail page (as we discussed in step 5) with clear messaging about when content will be available.
- Create a pre-sale pricing plan – Offer a discounted rate for early adopters who sign up before the full launch.
- Outline what buyers will receive – If your content isn’t complete, provide an overview of what’s coming and when it will be delivered.
- Communicate with pre-sale buyers – Send updates to keep them engaged while they wait for the full course.
Convert leads into paying students (20 minutes)
Not everyone buys the first time they see your offer. A structured follow-up system can turn interested leads into customers.
Here are some of the marketing moves you can take to convert more of your audience into customers:
- Run a three-part email sequence – Teachable integrates with Kit and Mailchimp to automate an email campaign:
- Product announcement – Highlight key benefits and what students will learn.
- Reminder email – Share testimonials, answer FAQs, or showcase a case study.
- Final call-to-action – Create urgency by reminding leads of an expiring bonus or discount.
- Track and retarget engaged leads – Use Teachable’s sales analytics to identify visitors who viewed your sales page but didn’t purchase. Send them a follow-up email or run a retargeting ad through Meta Pixel, TikTok Pixel, or Google Tag Manager (all of which integrate with Teachable).
- Encourage referrals with Teachable’s Student Referral Program – Offer a discount to both the referrer and their friend when someone enrolls through a referral link. Set this up under Site > Referrals in your Teachable admin.
- Use countdown timers and urgency-based marketing – Limited-time bonuses or discounts can increase conversions. Display these on your Teachable sales page or mention them in your email follow-ups.
Track Performance and Adjust Your Marketing Strategy (15 minutes)
Once sales start coming in, monitoring performance helps identify what’s working and what needs improvement. Teachable’s Sales Analytics Dashboard provides key data points to help guide decisions.
- Check conversion rates – The dashboard shows the total number of transactions, along with the percentage of visitors who completed a purchase. If conversions are low, adjusting pricing, sales page content, or adding an order bump might help.
- Monitor revenue trends – Sales trends can highlight the best-performing products and the impact of promotions. The dashboard also tracks average transaction value (ATV) to see how pricing strategies are influencing sales.
- Review coupon performance – The Coupons section provides insights into which discount codes drive the most sales. If a promotion underperforms, consider testing different incentives.
- Analyze refund rates – If refund percentages are high, customer feedback can help pinpoint concerns with content, pricing, or expectations set during marketing.
- Track free-to-paid conversions – If a free resource, webinar, or lead magnet is part of the sales funnel, the Free-to-Paid Conversion section shows how many users move from free content to a paid offer.
With this data, adjustments can be made to sales pages, pricing, and promotional strategies to improve sales outcomes. Teachable’s analytics tools make it easy to track progress and refine marketing efforts over time.
Start selling with Teachable today
Launching a digital product doesn’t have to take months of planning, expensive software, or complicated tech. With Teachable, everything you need is in one place—from setting up your school and accepting payments to building a sales system and tracking performance.
By following these five steps, you can turn an idea into a live, revenue-generating product in a matter of days. Whether you’re starting from scratch or expanding an existing business, Teachable gives you the flexibility to monetize your expertise on your terms.
Now, the next move is yours. Set up your Teachable school, start creating, and take the first step toward building a new income stream today. Start for free and see how quickly you can launch.

Tags:


