Do you want to venture into making YouTube videos but you’re unsure how to edit them? Well we have a quick and easy guide to help you learn how to edit your videos, even if you’re a beginner. We’ll also cover what are the best free tools to use and how to make your videos more engaging. You can use YouTube to grow your audience and help introduce your courses to potential students too.
The easiest and most straightforward way to edit your videos is through the video editing software in your Youtube Studio. You can easily upload videos and edit them directly on YouTube before posting them to your channel, which is super convenient.
One thing to note is that this editing tool is basic, only giving you these video editing options:
- Cut and trim the footage
- Blur faces or objects in the video
- Add audio
- Add an end screen to your video
- Place info cards
Here is a quick walk-through of how the YouTube Studio video editor works:
{{entrepreneur-component="/blog-shortcodes/blog-popup"}}
How to edit with YouTube Studio video editor
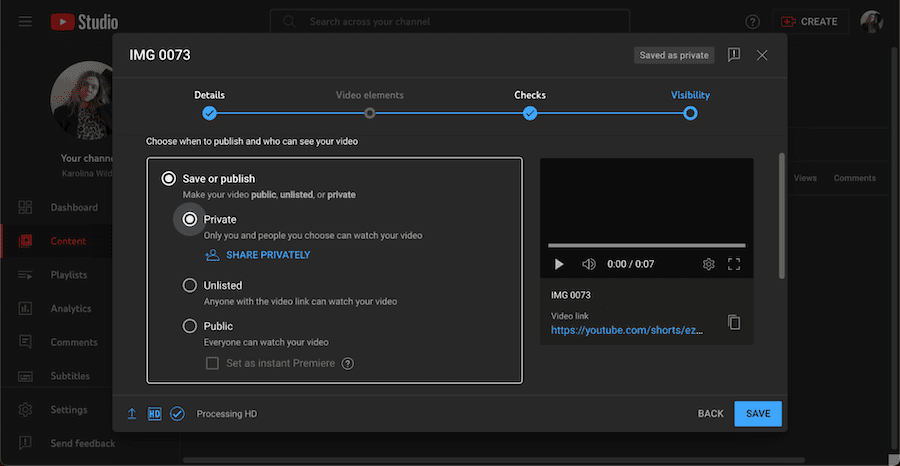
Step 1: Upload your video to YouTube and set it to Private or Unlisted:
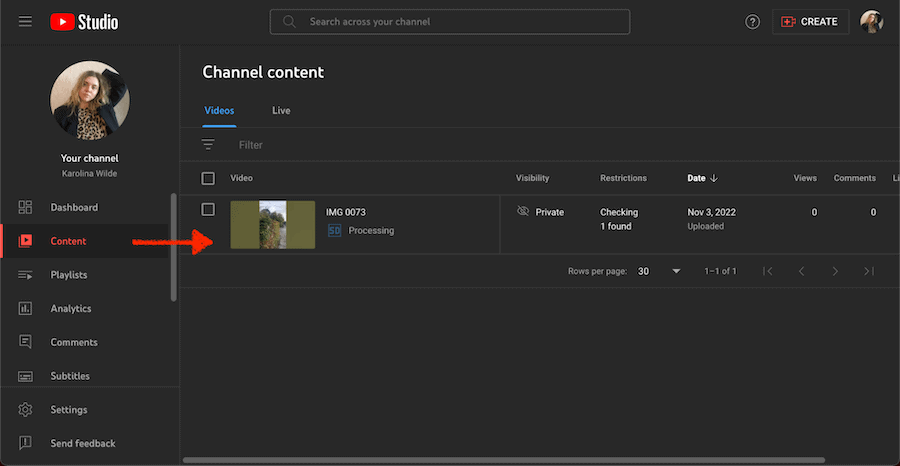
Step 2: Go to Content in your YouTube Studio and find the video you want to edit:
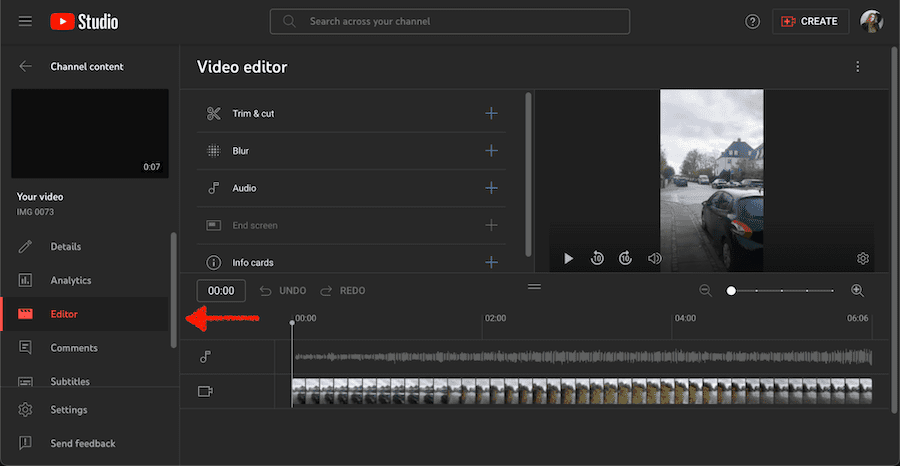
Step 3: Then click on the Editor to start the editing process:
Step 4: If you want to trip and cut the video, select Trim & cut from the options menu. Then, select the New Cut to get started. If you want to cut a certain part of the video, then drag the red bar markers to the middle of your video where you want to cut:

And if you want to trim the video at the start or end, use the blue bar markers to drag it back and forth.
Step 5: If you want to blur something in the video, click on Blur. This will give you two options to choose from – Face blur or Custom blurs:

With Face blur, the editor will automatically detect faces in the video footage and give you the option to blur them. For the Custom blurs, you’ll have the option to choose which part of the video you want to blur:
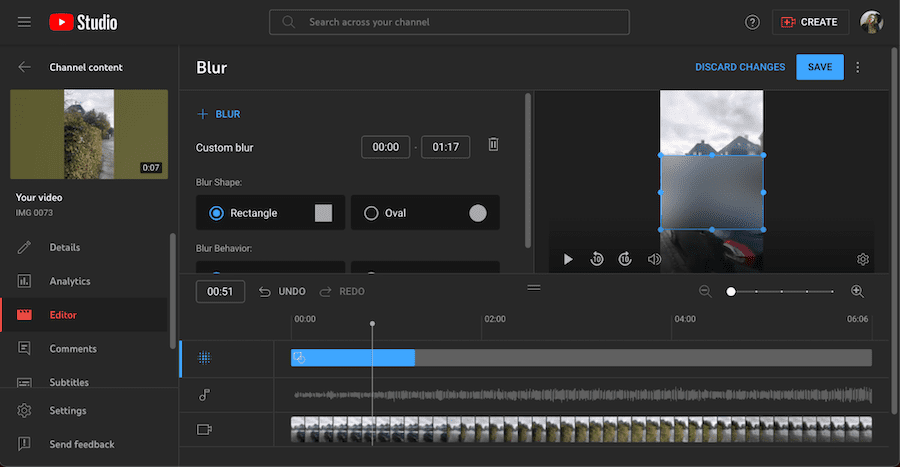
You can adjust the shape and size of the blur and also choose whether it’s static or if it should follow an object in a video.
Step 6: Enhance your video and add audio. To do that, click the Audio option on the editing menu. Here you have a ton of different sounds to choose from that are free to use on your videos:

Step 7: When you’re done with the edits, click Save and wait for the video to be processed.
Best video editing software for YouTube
If you’re just starting out and dipping your toe into video editing, a free option might be all that you need. If you want other free video editing software options that are not YouTube Studio video editor, we have three great alternative recommendations:
iMovie
For all Mac users, the best free video editing software is iMovie. It’s a native app that all Mac OS users have access to, no matter which device they’re using.
This app has all the basic video editing tools you might need:
- You can add text and sound effects
- Allows 4K quality video exports
- A video filter library to help you change the look of the video footage
- Trim and cut your video with ease
- Syncs with multiple devices, giving you the opportunity to edit the same video on your MacBook, iPad, and iPhone.
VideoPad
This is a free professional video editing software that’s available for Mac OS and Windows users. It has tons of features to help you edit your videos:
- Add music, sound effects, and text
- Play with overlays and transitions to make your video more entertaining
- Export your videos to YouTube directly or Google Drive
- Change the color of the video content to fit your vision better
If you are looking for more advanced video editing options, you’ll want to look into other software. But for beginners, who are just looking to get started, VideoPad is a great solution.
Windows Video Editor
Equivalent to iMovie for Mac OS users, Windows Video Editor is for Windows users. This software is available to all users who have Windows 10 and up. You have all the basic video editing tools you need:
- Video cropping and trimming
- Add audio, texts, and sound effects
- Play around with filters to enhance the colors of your video footage
- Apply 3D video effects to make your videos more interactive
How to edit YouTube videos on iPhone or Android
There are a plethora of apps that allow you to edit a video right on your phone. Here are three best free options to help you create professional videos just with your phone:
iMovie
For Mac OS users, iMovie also has an app that allows you to edit videos directly on your phone. It has all the same features as the desktop version. You can trim and cut the video, add texts and overlays, edit the sound and add sound effects. Also, you have the option to play with the greenscreen and apply filters to adjust the color of the video.
Adobe Premiere Rush for Video
Adobe Premiere Pro is a great video editing software for computers, and Adobe Premier Rush for Video is the phone-friendly version of this software that you can get for free.
It has all the basic video editing tools to allow you to produce high-quality, professional-looking videos with your phone alone. You can trim, cut, flip and mirror video clips, and add images and overlays to the videos with ease.
What’s also cool about Adobe Premier Rush is that it has a feature that allows you to film pro-quality videos through the app directly. And the app also has a royalty-free sound library so that you can choose the best music for your videos.
InShot
InShot is one of the best video and photo editing apps on the market. It has a ton of free and paid features that allow you to make basic video edits like trimming and cutting. And it also has many more advanced features which help you create high-quality, engaging videos with all sorts of different effects.
Tips for editing YouTube videos
We have a few essential tips to help you learn how to edit YouTube videos that will grow your channel faster:
1. Always include branded intro and outro
Intros and outros in your YouTube videos are great tools to help you build a brand with your channel. It helps your channel to stand out, and people will remember you better if your intro catches their attention at the very start.
Always keep your intros short and snappy, no longer than 30 seconds. Use a custom music sound from the royalty-free library YouTube has and be consistent with it throughout your videos. In your outro, include shoutouts to your subscribers and invite them to watch another video and subscribe to your channel.
2. Engaging thumbnails are the key
Thumbnails are one of the most important parts of your videos. It’s essentially the first thing people see, and the quality of your thumbnails will determine if people will click on your video and watch it. So, spending time crafting a perfect thumbnail is essential for success.
The great news is that you can create a high-quality, eye-catching thumbnail yourself using free design tools like Canva. Always make sure your thumbnails are exciting, stand out amongst other videos and give people a nice sneak peek of what to expect in the video.
3. Find ways to entertain
YouTube algorithm pays attention to your retention rate. Retention rate is the measure that shows how many people watched your video to the very end. It’s a key metric to help you grow your channel.
One way to improve your retention rate is to find ways to make your videos entertaining, even if you’re talking about a serious topic. The best way to do it is with the help of editing. You might want to keep the information in your videos snappy, delivered in bite-size pieces to the viewers.
Another editing trick you might want to try is to provide visual entertainment to the viewer. If you are talking about a product in a video, include clips of a close-up of the product, or you using the product and record sound over the footage to make the video more dynamic. It’s easy to do without a fancy home recording studio setup. You can record video and audio clips even with your phone!
4. Practice makes it perfect
If you practice something often, you’ll eventually get better and better at it. And this applies to video editing as well. When you first start editing your videos for YouTube, it might take more time and be harder than you expect. Be positive and keep practicing. It will become easier with time!
Also, consistency with your video editing and uploading videos will pay off in more ways than having better video skills. As you grow your channel, you’ll be able to get sponsored on YouTube, with brands reaching out to work with you on collaborations.
So, keep practicing your video editing skills and promote your YouTube channel consistently.
FAQ: How to edit YouTube videos
Now, let’s answer some of the most frequently asked questions people have about how to edit YouTube videos.
Can you edit a video on YouTube?
Yes, absolutely! YouTube has a built-in video editing tool available for all creators, completely free of charge. You can access it through YouTube Studio, and it has enough video editing tools to allow you to create high-quality, simple videos without experience.
Youtube Studio video editing tool allows you to:
- Blur certain parts of the video
- Cut and trim the footage
- Add the end screen
If you want more advanced editing tools like adding text, overlays, tuning colors, and using the green screen, then you’ll want to use more advanced video editing tools like iMovie (free) or Adobe Premiere Pro (paid).
What do YouTubers use to edit their videos for free?
Mac users swear by the iMovie video editor, which is free software available for all Apple users. It has a majority of video editing tools that allow creators to create high-quality, professional-looking videos for free. And the best part is that it’s super easy to use, even for beginners.
iMovie’s alternative for Windows users is the Windows Video Editor. While this video editor is more basic than iMovie, it can also be used to edit videos, crop and trim them and add captions and text where needed. So, if you want a free tool that has all the video editing basics, Windows Video Editor is a good option.
Join more than 150,000 creators who use Teachable to make a real impact and earn a real income.


