
Teachable is your home base to create, market, and sell online courses. With a Teachable subscription, you can host and deliver your course content, process payments and student enrollments, and get help with your taxes and finances. Teachable gives you the tools to provide your students an engaging, intuitive learning experience without the administrative headaches.
Before we dive into how to upload your course content, create your sales page, and set up your payment gateway, let’s start from the beginning of your course creation process: creating your homepage.
Connecting your website to Teachable
As an online business owner, chances are you have a core business you’ve developed over the last few years and a website you’ve dedicated hours to building. Now, you want to expand your business with online courses.
If that sounds like you, keep reading.
To illustrate the steps involved in building your homepage, we’ve created an example we’re calling Teachabrand—a made-up brand consulting business. Using this example, we’ll show you how an established brand should set up a homepage.
Let’s assume the creators of Teachabrand already created a main brand website (teachabrand.com). They hired website designers and developers to build it for them, and it’s the page with which most of their audience are already familiar. The Teachabrand team wants their consulting work to remain the focus of their website. So, instead of confusing their consulting clients by creating another website, they set up a custom subdomain: courses.teachabrand.com. Here, they can host the online courses portion of their business.
Here’s how to set up and connect a custom subdomain:
If you don’t want to create your own custom subdomain, Teachable offers a standard subdomain (example.teachable.com) to all members for free. If you want to connect a custom root domain (like teachabrand.com) directly to your school, here are more advanced steps to guide you through the process.
Update your navigation
Now that you have your course subdomain all set up and pointed at your Teachable site, let’s do some additional customizing. Your homepage will use the default page template that comes with any Teachable account. However, you can change what your homepage is by going to Site > Navigation in your school.
Under Homepage Settings, you have the flexibility of choosing what your audience sees based on their logged-in state. Choose among:

- Sales pages: The main landing page for each course or coaching product
- Custom site pages: Additional landing page you can create
- Course directory: An index page that shows a list of all your courses
Take courses.teachabrand.com. The homepage is set to the course directory, so the audience can see the full list of courses that are available. If you’re still developing your course content, you can create a simple custom site page as a landing page to let your audience know your courses are coming soon.
Link back to your website
Much like Teachabrand did, think of Teachable as an extension of your website and your business! In both teachabrand.com and courses.teachabrand.com, the navigation is customized to help customers go back and forth. While it’s definitely not necessary, depending on your audience, it can be a helpful guide.
Here’s how you can customize your navigation:

- Go to Site > Navigation of your school admin
- Under Navigation Bar, you’ll find what is currently listed in your navigation
- Hit Add Link to add an option to allow your visitors to return to your website
- Edit the text to “Back to Home” and add your website URL
- Choose whether you want it to open in a new tab and who will be able to see this
- Hit Add Link
- Drag and drop to reorder your navigation
Now, you have your Teachable homepage connected to your main website.
Creating your homepage on Teachable
If you’re starting your online business with Teachable and do not have an existing website, we have you covered. On Teachable, your homepage functions as your main website, so you don’t need to purchase other web-hosting platform subscriptions.
Your homepage serves two main purposes: The first is to share who you are, and the second is to serve as a storefront for the courses you’ll be offering.
Set up your homepage
Every Teachable site comes with a default templated homepage to help you get started. To edit and customize the page, you’ll use blocks to upload a variety of content to your page—such as text, images, buttons, etc.
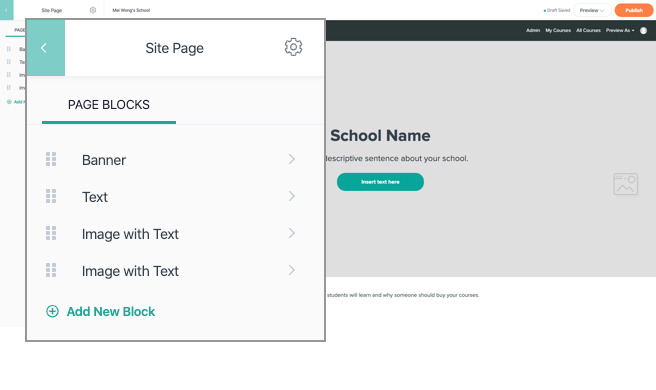
Under Admin > Site > Pages, the template comes with the following page blocks already added:
- Banner
- Text
- Image with Text (Right)
- Image with Text (Left)
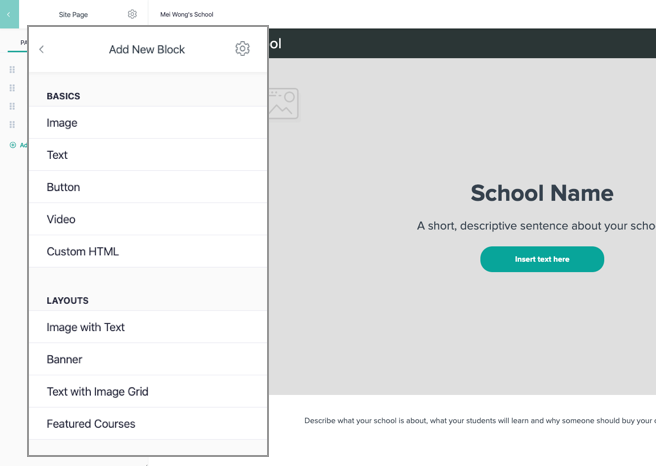
You can edit these blocks by uploading your brand assets, description, and information. If there are any content blocks you don’t find useful, you can delete them. If you want to further customize your homepage, you can add these blocks:
- Image
- Button
- Video
- Custom HTML
- Text with Image Grid
- Featured Courses
Here is a demo on how to build your Teachable homepage:
Choose your theme and style
Your brand is your business. That’s why we made sure that you’re able to fully customize the look and feel of your homepage with your business logo, fonts, and color schemes.
Here’s how you customize your site-wide designs:
- Update your site logo. The recommended image size is 250px by 60px in JPG or PNG. Once uploaded, your logo will appear on the top left corner of your site’s navigation bar.
- Add your favicon. This is the small icon that appears on browser tabs.
- Choose your site-wide font. This font will be used across all your pages and courses.
- Update your site colors. Teachable offers preset palettes, but you can always update with your own brand colors.
Once you’ve made these edits, go back to Site > Pages to access your courses homepage and preview the changes you’ve made.
Edit your homepage settings
Before you go live with your homepage, there are a few final things to do. In the page editing experience, you’ll notice a gear icon on the top right of the editing column; clicking that will take you to your page’s settings. From there, you can edit:
- Your navigation bar. You can decide whether you want to show the navigation or the footer, and if you would prefer to have a colored or transparent navigation bar.
- URL. Update your courses homepage link to your liking.
- Page title. This is important because the page title is displayed on search engine pages as the clickable headline. A descriptive and accurate page title can help improve page SEO and usability.
- Page description. This is also important as it’s the content that appears under the page title in search engine results. This is the short snippet people can read to understand what your page is about when they find you via Internet search.
Go live with your Teachable site
Before you go live, make sure everything looks the way you want it to. To check this, go to Site in your school and hit Preview. Once you’re ready, hit Publish.
{{homepageguide-component="/blog-shortcodes/blog-popup"}}
Are you ready?
Now your homepage is all set up. There is no one way to do this, so do what feels right for your business and online courses. If you have any additional questions on how to set up your domains or page, here are additional resources to help you.
When you’re ready for the next step, here’s how you can set up your product sales page.

Tags:


