Thank you! Your submission has been received!
Oops! Something went wrong while submitting the form.
MENU
Now that you have your website and homepage set up on Teachable, you’re ready for your sales page. Consider the courses homepage your storefront—an overview of who you and your team are, your offerings, and your brand. If your homepage is the storefront, think of the sales page as promoting individual products. Ahead, we’ll show you how to create and customize a sales page on Teachable.
When you create a course, there are three pages that are auto-created: a sales page, a thank you page, and a checkout page. You can access the sales page in Course > Pages > Edit Sales Page.
The Sales Page comes with a default template:
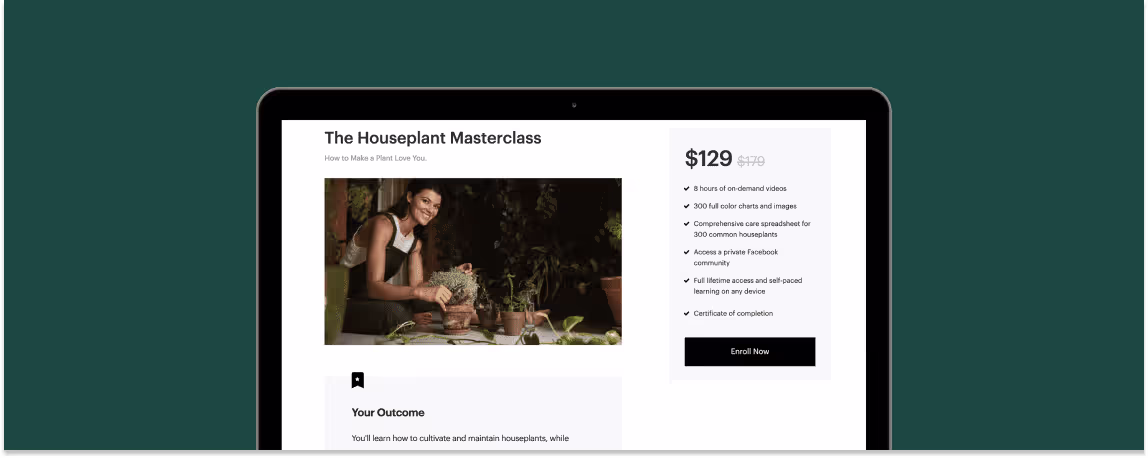
Take a look at Teachabrand: Beginner Branding. This is what the sales page template looks like once you’ve added and uploaded your content. Remember, this template is just a guide to help you get started. If there’s additional content you want to add, you can drag and drop the order of any of the blocks, delete them, or add new ones as you see fit.

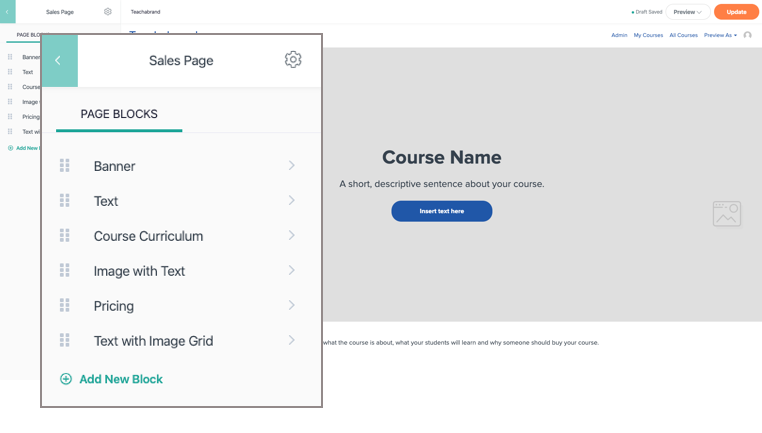
You’ll also have other blocks you can use to add your content:
Our page editor makes it easy for you to drag and drop new content blocks in different formats to highlight the outcome of your course, testimonials, FAQs, and more. To find out which elements are most important to use, check out our article on how to build a powerful sales page.
You may have noticed that on the Beginner Branding sales page, there is a note that says: “This course is not open for enrollment.”
This message will be automatically added at the bottom of the sales page if you have not yet set up a pricing plan for your course.
While you won’t be able to drive sales without a pricing plan, you will have the ability to create demand. Knowing that there is an audience looking for your course will further incentivize you to finish creating your product. Plus, it validates your course topic and the time investment you’re making. The best way to find out how much interest there is in your course before you launch it is to gather email addresses from potential customers.
Depending on which email service provider you have, you can embed a signup form into your sales page with a custom HTML block. Add it to the bottom of the page with additional custom text: “Want to be the first to know when this course opens?”
You can see an example at the bottom of the Beginner Branding sales page.
Pro tip: You can delete all your pricing plans to trigger this same note to reappear after you’ve opened for enrollment and sold your courses. This can be best used if you are running cohort-based courses.
At Teachable, you can offer four different types of pricing plans for your course: free, one-time purchase, subscription, and payment plans. To access a course’s pricing, navigate to Course > Pricing.
Free course
By adding a free pricing plan, you’ll offer your course to interested students for free. There is no cost, but they’ll need to sign up for an account with your Teachable site to fully access your course. Free courses are sometimes use to prove to potential customers that you have high-value content to offer them. By providing them with free, valuable content before you launch a paid course, you can build a relationship with your audience, so they get more comfortable with your curriculum layout and teaching style.
Plus, you’ll have access to your students’ email address and be able to upsell them on other courses or services you offer in the future.
One-time purchase
With one-time purchases, students can fully access your course by paying a singular amount. If you’d like to test your offering, you can experiment by offering multiple pricing options with this type of plan.
Let’s look at an example. Here, you see multiple pricing tiers—each with a different offer package. To differentiate each pricing tier, you’d add a description for each tier like so:
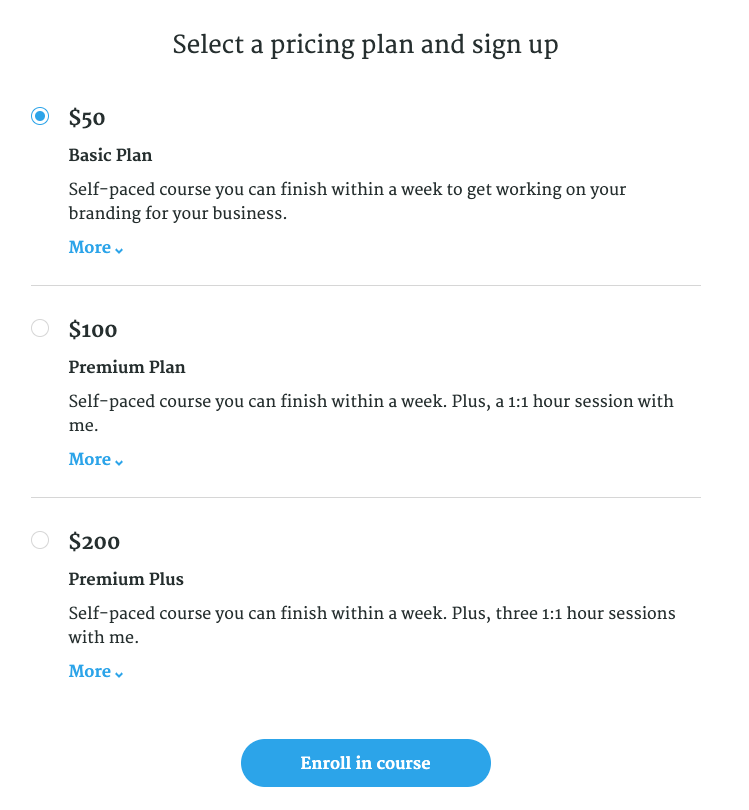
You’ll be able to set your own price to the nearest dollar, as well as the names of each tier that will appear on the sales page. For example, you can name the tiers Bronze, Silver, and Gold, or Beginner, Intermediate, and Advanced.
Want to create a membership plan with regularly updated course content? Choose the subscription pricing plan to keep your students enrolled and coming back for more. By paying for a subscription, your students will have access to your course as long as they continue to pay their weekly, bi-weekly, monthly, quarterly, bi-annual, or annual fee.
When you build your flagship course (your core product), you’ll want to sell it at a premium price. You’ve spent hours researching, developing content, and making visual upgrades. This is the bread and butter of all your course offerings and your hard work is worthwhile.
Some of your audience will be able to pay the cost up front, while others may need some support. You can set up a payment plan over a set number of months and establish how much customers need to pay during this period. For example, instead of paying $1,000 up front, you can require two monthly payments of $500 each.
Pro-tip: To incentive your audience to pay up front, offer a one-time purchase pricing plan for $1,000 and a separate payment plan option for $1,200.
With a sales page and pricing plan set up, you can even start pre-selling your course. Not only will this help you validate your course idea, you’ll also be able to gauge demand and gain an understanding of what your audience wants to learn from you. Most importantly, it saves you from creating a course that no one wants.
Before you pre-sell, make sure that you’re able to commit to delivering your course as you’ve advertised. You want to create a trusted relationship with your audience. It’s important that you have time between your presale and course launch to finish writing the content. If that time pressure isn’t for you right now, you can still use the sales page to capture leads.
{{salespage-component="/blog-shortcodes/blog-popup"}}
As your sales page is helping you generate an early email list, we’ll dive into how you can upload your content and create your first course.