Thank you! Your submission has been received!
Oops! Something went wrong while submitting the form.
MENU

Now that you have your website and homepage set up on Teachable, you’re ready for your sales page. Consider the courses homepage your storefront—an overview of who you and your team are, your offerings, and your brand. If your homepage is the storefront, think of the sales page as promoting individual products. Ahead, we’ll show you how to create and customize a sales page on Teachable.
When you create a course, there are three pages that are auto-created: a sales page, a thank you page, and a checkout page. You can access the sales page in Course > Pages > Edit Sales Page.
The Sales Page comes with a default template:
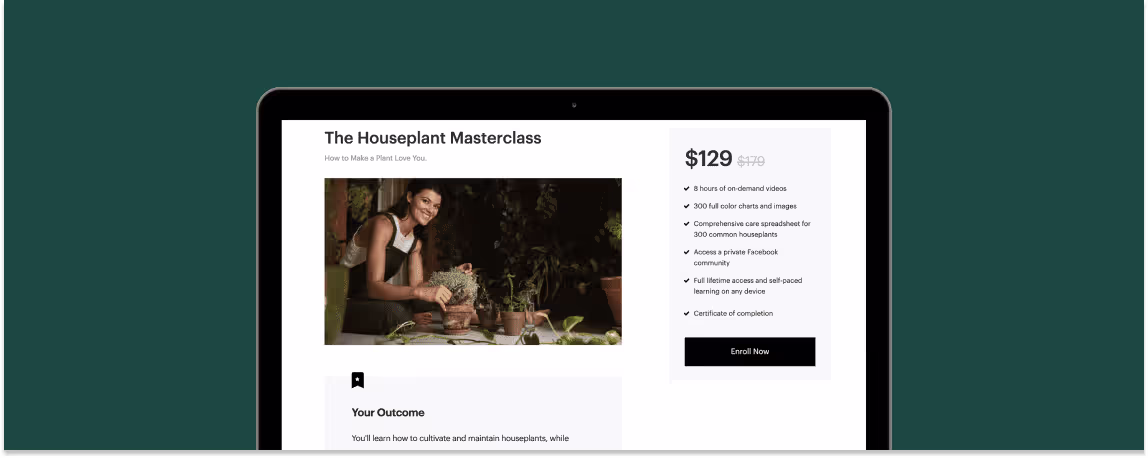
Take a look at Teachabrand: Beginner Branding. This is what the sales page template looks like once you’ve added and uploaded your content. Remember, this template is just a guide to help you get started. If there’s additional content you want to add, you can drag and drop the order of any of the blocks, delete them, or add new ones as you see fit.

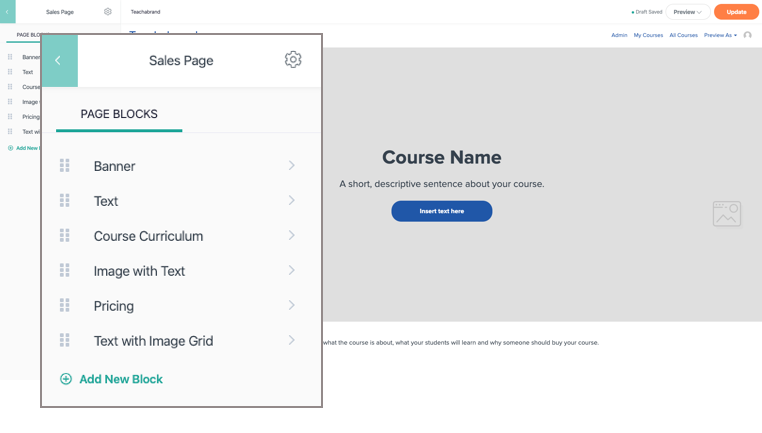
You’ll also have other blocks you can use to add your content:
Our page editor makes it easy for you to drag and drop new content blocks in different formats to highlight the outcome of your course, testimonials, FAQs, and more. To find out which elements are most important to use, check out our article on how to build a powerful sales page.
You may have noticed that on the Beginner Branding sales page, there is a note that says: “This course is not open for enrollment.”
This message will be automatically added at the bottom of the sales page if you have not yet set up a pricing plan for your course.
While you won’t be able to drive sales without a pricing plan, you will have the ability to create demand. Knowing that there is an audience looking for your course will further incentivize you to finish creating your product. Plus, it validates your course topic and the time investment you’re making. The best way to find out how much interest there is in your course before you launch it is to gather email addresses from potential customers.
Depending on which email service provider you have, you can embed a signup form into your sales page with a custom HTML block. Add it to the bottom of the page with additional custom text: “Want to be the first to know when this course opens?”
You can see an example at the bottom of the Beginner Branding sales page.
Pro tip: You can delete all your pricing plans to trigger this same note to reappear after you’ve opened for enrollment and sold your courses. This can be best used if you are running cohort-based courses.
At Teachable, you can offer four different types of pricing plans for your course: free, one-time purchase, subscription, and payment plans. To access a course’s pricing, navigate to Course > Pricing.
Free course
By adding a free pricing plan, you’ll offer your course to interested students for free. There is no cost, but they’ll need to sign up for an account with your Teachable site to fully access your course. Free courses are sometimes use to prove to potential customers that you have high-value content to offer them. By providing them with free, valuable content before you launch a paid course, you can build a relationship with your audience, so they get more comfortable with your curriculum layout and teaching style.
Plus, you’ll have access to your students’ email address and be able to upsell them on other courses or services you offer in the future.
One-time purchase
With one-time purchases, students can fully access your course by paying a singular amount. If you’d like to test your offering, you can experiment by offering multiple pricing options with this type of plan.
Let’s look at an example. Here, you see multiple pricing tiers—each with a different offer package. To differentiate each pricing tier, you’d add a description for each tier like so:
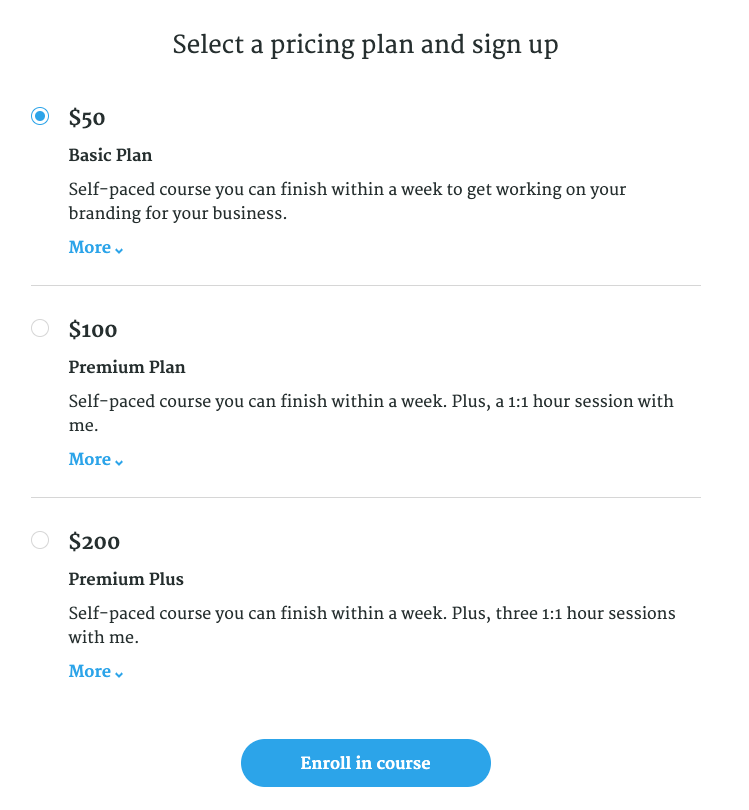
You’ll be able to set your own price to the nearest dollar, as well as the names of each tier that will appear on the sales page. For example, you can name the tiers Bronze, Silver, and Gold, or Beginner, Intermediate, and Advanced.
Want to create a membership plan with regularly updated course content? Choose the subscription pricing plan to keep your students enrolled and coming back for more. By paying for a subscription, your students will have access to your course as long as they continue to pay their weekly, bi-weekly, monthly, quarterly, bi-annual, or annual fee.
When you build your flagship course (your core product), you’ll want to sell it at a premium price. You’ve spent hours researching, developing content, and making visual upgrades. This is the bread and butter of all your course offerings and your hard work is worthwhile.
Some of your audience will be able to pay the cost up front, while others may need some support. You can set up a payment plan over a set number of months and establish how much customers need to pay during this period. For example, instead of paying $1,000 up front, you can require two monthly payments of $500 each.
Pro-tip: To incentive your audience to pay up front, offer a one-time purchase pricing plan for $1,000 and a separate payment plan option for $1,200.
With a sales page and pricing plan set up, you can even start pre-selling your course. Not only will this help you validate your course idea, you’ll also be able to gauge demand and gain an understanding of what your audience wants to learn from you. Most importantly, it saves you from creating a course that no one wants.
Before you pre-sell, make sure that you’re able to commit to delivering your course as you’ve advertised. You want to create a trusted relationship with your audience. It’s important that you have time between your presale and course launch to finish writing the content. If that time pressure isn’t for you right now, you can still use the sales page to capture leads.
{{salespage-component="/blog-shortcodes/blog-popup"}}
As your sales page is helping you generate an early email list, we’ll dive into how you can upload your content and create your first course.
Teachable is your home base to create, market, and sell online courses. With a Teachable subscription, you can host and deliver your course content, process payments and student enrollments, and get help with your taxes and finances. Teachable gives you the tools to provide your students an engaging, intuitive learning experience without the administrative headaches.
Before we dive into how to upload your course content, create your sales page, and set up your payment gateway, let’s start from the beginning of your course creation process: creating your homepage.
As an online business owner, chances are you have a core business you’ve developed over the last few years and a website you’ve dedicated hours to building. Now, you want to expand your business with online courses.
If that sounds like you, keep reading.
To illustrate the steps involved in building your homepage, we’ve created an example we’re calling Teachabrand—a made-up brand consulting business. Using this example, we’ll show you how an established brand should set up a homepage.
Let’s assume the creators of Teachabrand already created a main brand website (teachabrand.com). They hired website designers and developers to build it for them, and it’s the page with which most of their audience are already familiar. The Teachabrand team wants their consulting work to remain the focus of their website. So, instead of confusing their consulting clients by creating another website, they set up a custom subdomain: courses.teachabrand.com. Here, they can host the online courses portion of their business.
Here’s how to set up and connect a custom subdomain:
If you don’t want to create your own custom subdomain, Teachable offers a standard subdomain (example.teachable.com) to all members for free. If you want to connect a custom root domain (like teachabrand.com) directly to your school, here are more advanced steps to guide you through the process.
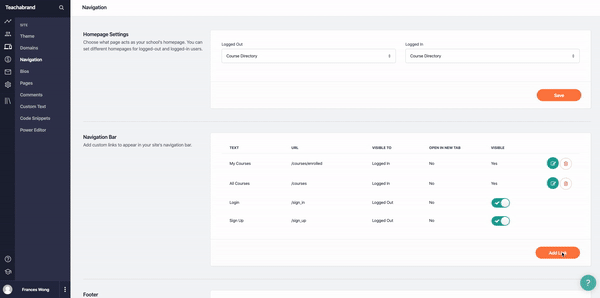
Now that you have your course subdomain all set up and pointed at your Teachable site, let’s do some additional customizing. Your homepage will use the default page template that comes with any Teachable account. However, you can change what your homepage is by going to Site > Navigation in your school.
Under Homepage Settings, you have the flexibility of choosing what your audience sees based on their logged-in state. Choose among:
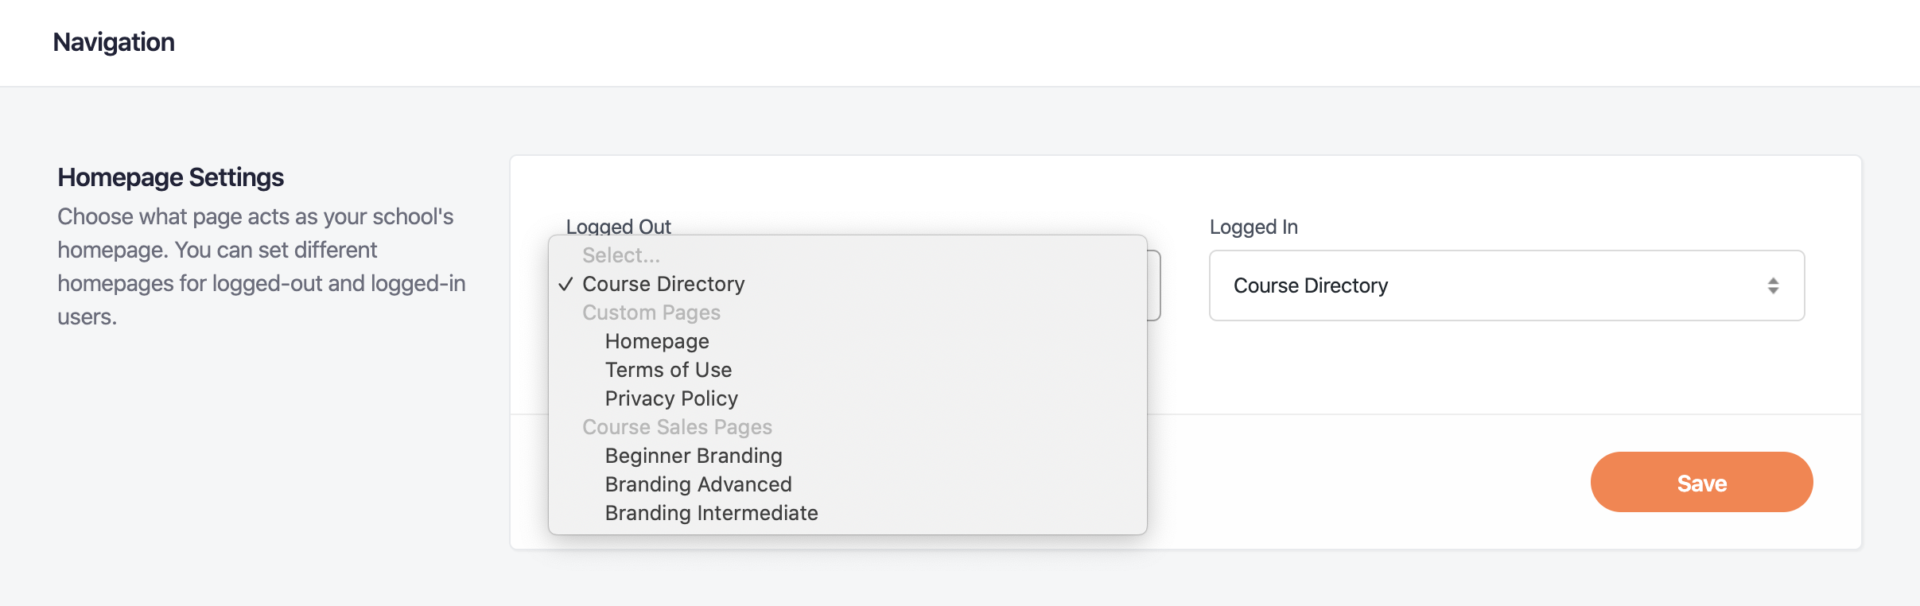
Take courses.teachabrand.com. The homepage is set to the course directory, so the audience can see the full list of courses that are available. If you’re still developing your course content, you can create a simple custom site page as a landing page to let your audience know your courses are coming soon.
Much like Teachabrand did, think of Teachable as an extension of your website and your business! In both teachabrand.com and courses.teachabrand.com, the navigation is customized to help customers go back and forth. While it’s definitely not necessary, depending on your audience, it can be a helpful guide.
Here’s how you can customize your navigation:
Now, you have your Teachable homepage connected to your main website.
If you’re starting your online business with Teachable and do not have an existing website, we have you covered. On Teachable, your homepage functions as your main website, so you don’t need to purchase other web-hosting platform subscriptions.
Your homepage serves two main purposes: The first is to share who you are, and the second is to serve as a storefront for the courses you’ll be offering.
Every Teachable site comes with a default templated homepage to help you get started. To edit and customize the page, you’ll use blocks to upload a variety of content to your page—such as text, images, buttons, etc.
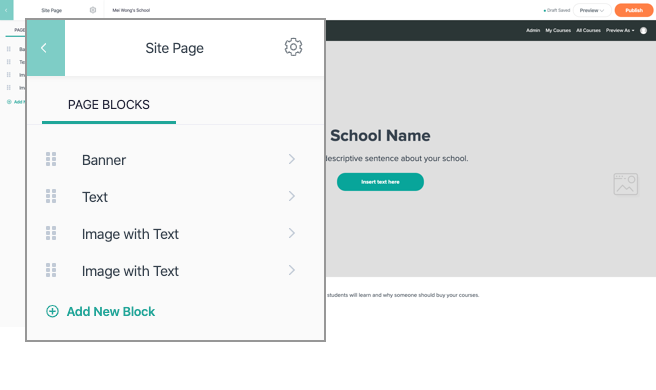
Under Admin > Site > Pages, the template comes with the following page blocks already added:
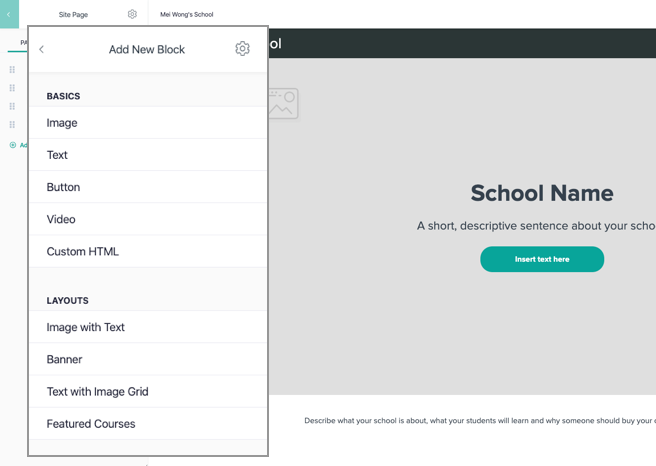
You can edit these blocks by uploading your brand assets, description, and information. If there are any content blocks you don’t find useful, you can delete them. If you want to further customize your homepage, you can add these blocks:
Here is a demo on how to build your Teachable homepage:
Your brand is your business. That’s why we made sure that you’re able to fully customize the look and feel of your homepage with your business logo, fonts, and color schemes.
Here’s how you customize your site-wide designs:
Once you’ve made these edits, go back to Site > Pages to access your courses homepage and preview the changes you’ve made.
Before you go live with your homepage, there are a few final things to do. In the page editing experience, you’ll notice a gear icon on the top right of the editing column; clicking that will take you to your page’s settings. From there, you can edit:
Before you go live, make sure everything looks the way you want it to. To check this, go to Site in your school and hit Preview. Once you’re ready, hit Publish.
{{homepageguide-component="/blog-shortcodes/blog-popup"}}
Now your homepage is all set up. There is no one way to do this, so do what feels right for your business and online courses. If you have any additional questions on how to set up your domains or page, here are additional resources to help you.
When you’re ready for the next step, here’s how you can set up your product sales page.
Get your business off the ground by creating and selling your coaching services. Coaching can be a valuable first product that builds your business or validates a course idea. It can also be a powerful partner to online courses. Whether you’re looking to move your established coaching program to Teachable or validate a course topic you’ve been pondering, we have the tools to support you.
We’ll walk you through how to create your first coaching product on Teachable and the different ways you can integrate it into your knowledge business.
Coaching is one of the two digital products you can currently offer to your students on Teachable. You can be a certified coach, software expert, tutor, or anyone with knowledge and experience who wants to help others in a one-on-one setting. With coaching, you have the opportunity to dig deep into what you know and tailor your lessons to an individual client. You also have the flexibility to package your coaching offerings in different ways—hourly, time-based, or via a membership. The choice is yours: It all depends on what type of coaching service you’re offering and who your audience is.
We’ve seen our creators use our coaching product in three main ways:
These are typically one-off sessions anyone can purchase to get a 30-minute feedback, consulting, or training session with you. This is typically created and offered to existing clients. You don’t need to put too much effort into selling these sessions because your audience already knows who you are and the expertise you offer.
For example, if your course is on starting a blog, you can offer quick consultations for keyword targeting strategies. Or, if you offer a writing course, you can offer feedback sessions during which you go over areas your client can improve in.
These are for topics that require a longer coaching relationship between you and your client. This might include four-week or even three month long coaching programs. For example, if your topic is on nutrition or accountability coaching, one session might not be enough to help you make the transformation for your client.
This is a little bit of a combination between the first two examples above. With experience, you bring additional value to your clients and eventually, you only have so much time you can offer one-on-one coaching. That’s when you charge your coaching product at a premium price (over $1,000) and require an application before you accept them as a new client. This ensures that they are committed to this transformation.
To create your coaching product, there are three main components you need to consider—how to accept clients, how to price your coaching package, and how to welcome your clients.
Coaching requires your dedicated attention and time, so it’s important to think about how you want to accept new coaching clients. On Teachable, we call the process of onboarding new clients the client intake flow. There are three different intake options you can choose from:
You can set up your client intake flow however you want. The choice is yours. The best intake option for your business depends the type of coaching product you’re offering and how much of your time you’d like to dedicate to selecting coaching clients.
When you’re crafting your package and price, you want to make it easy for your audience to say yes. Give your audience different options to choose from and make it clear what they can expect from each pricing plan.
By adding a free pricing plan, you are offering your coaching product to interested clients for free. There is no cost, but they’ll need to sign up for an account with your Teachable site to access your shared coaching space.
Free coaching sessions are often used to set up sales calls for other products or services you offer. It can also be used as a discovery call to get them to sign up for your coaching product. It allows prospective clients to get a little more comfortable with your coaching style, learn more about you, and get a peek at what you’re offering.
With one-time purchases, clients can access your coaching product by paying a singular amount. This is most commonly used for single sessions to offer your expertise. For example, you can offer a one-hour session to provide design feedback on a website. Or, if you’re a blogger, you can arrange a session with your prospective clients to help them plan and research their content calendar.
You can also use this pricing plan option to offer a coaching program that runs over several days or weeks (or however long you want to run it). Clients will pay an upfront fee for the coaching program you’re offering. Make sure you’re clear about what they can expect during this time frame—number of sessions, frequency of sessions, duration of each session, and anything that might be important.
Subscription pricing for coaching might be best used for coaching packages where you’re put on retainer. This means that as long as your client is paying for the subscription they can set up coaching sessions with you—how many and how often is still dictated by you!
You can also set up longer coaching programs using a subscription pricing model. Keep in mind that your clients can cancel before the program is over.
When you offer a big coaching program like an eight-week program, you’re likely to sell it a higher price. It’s a larger commitment for you and it’s likely structured to best support your client’s transformation. Some of your audience might not be able to pay the full cost up front, which is why it’s nice to have the flexibility to set up a payment plan for them. If your coaching program, for example, is eight weeks long, you can set up a payment plan of two smaller payments over the eight weeks.
Pro-tip: You can create more than one pricing plan for your coaching product. It can help you incentive your prospective clients to choose the one that offers a better deal. It can also help you test out which pricing plan option attracts your clients best.
You have the option to display a welcome message in the one-on-one private coaching space you share with your client on the enrollment date or on a fixed date. It is most common to use the enrollment date, as a fixed date is for more specific classes or webinars you might be offering.
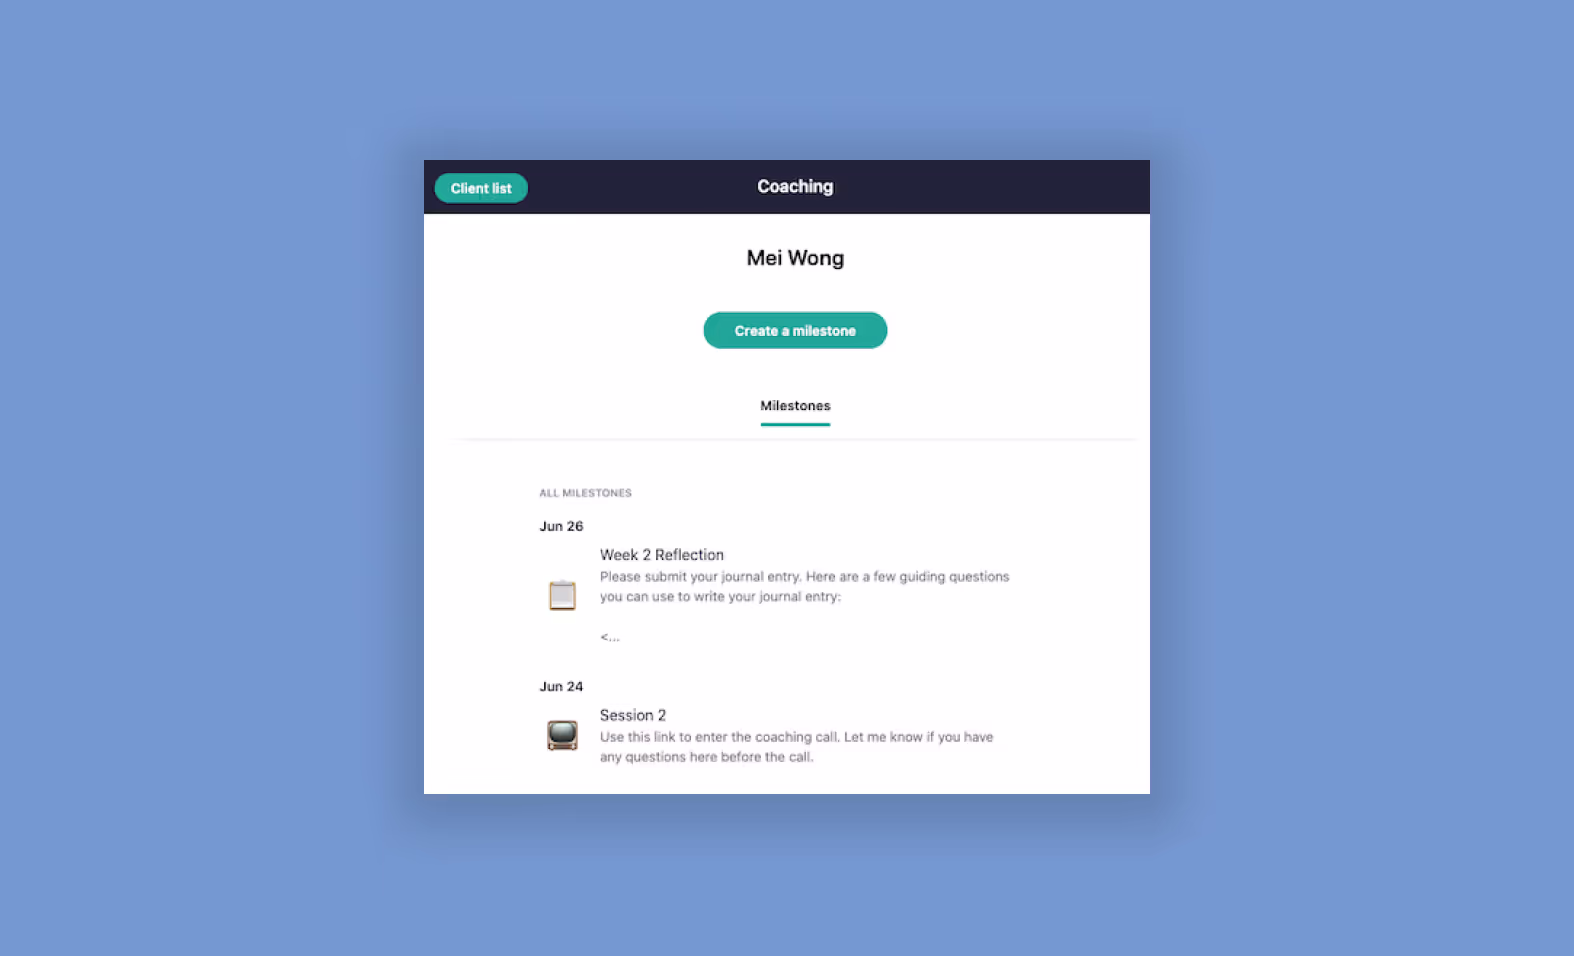
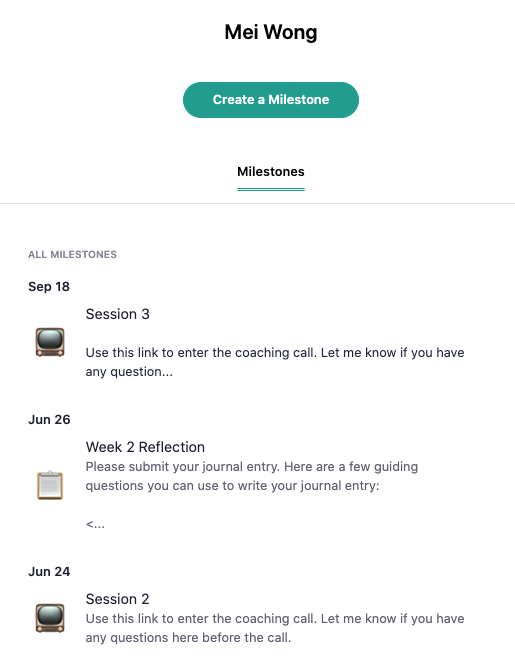
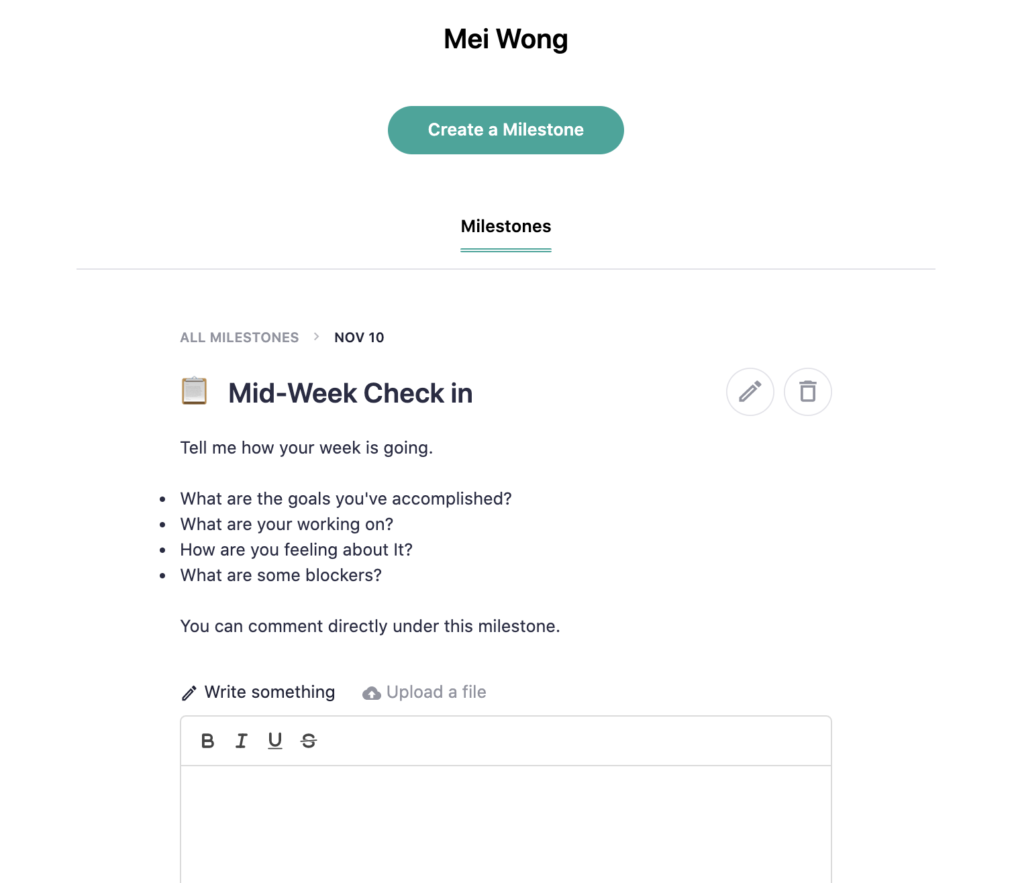
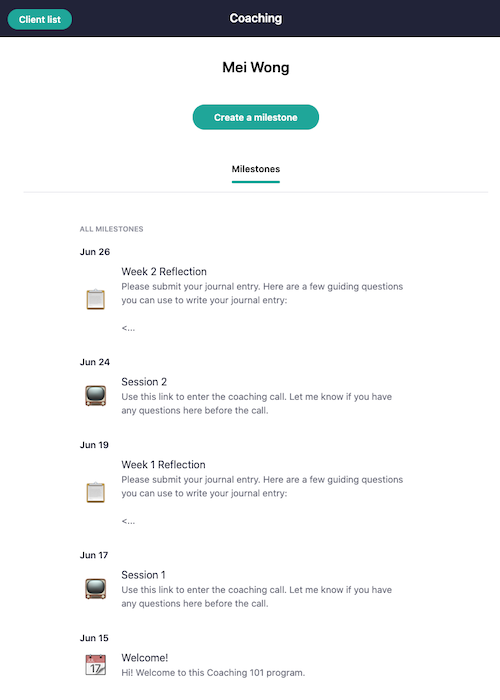
To create this welcome message, you’d create the first milestone. Milestones can be tasks, action items, check-in points, schedulers, or just a scheduled event. For the first milestone, many creators use it to welcome their clients, give them instructions on next steps, and reveal what they can expect.
These three key steps are what you need to create your first coaching product. It only takes five minutes to create your first product. Here’s a demo:
We’ve created a user experience that best matches how coaches reach and acquires a new client. That’s why every time you create a new coaching product, it auto-generates four pages:
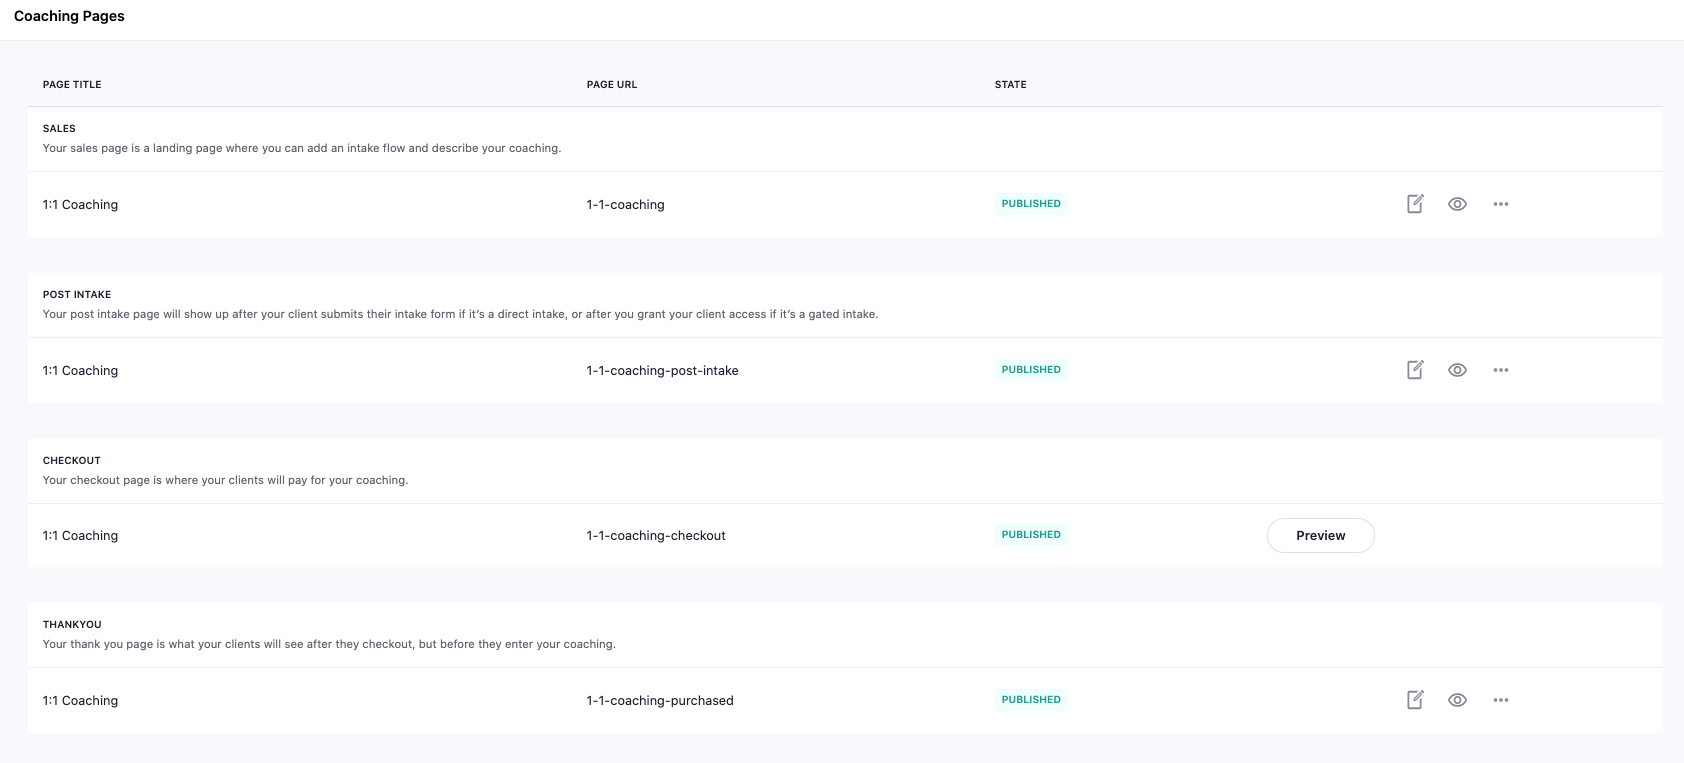
It’s important to customize your pages to have the right messaging, offer and branding to optimize conversions for your product.
Once they’ve purchased your coaching product, they land in your one-on-one coaching space where they’ll see your welcome milestone. If it is a quick consult, that might be the only milestone you need. On the other hand, if you are running a long coaching program, you may require check-ins, assign tasks, and schedule follow-up sessions.
Instead of relying on tagging each client individually in your inbox, you can use milestones in the one-on-one coaching space on Teachable. To keep track of your progress with your coaching clients, you can use milestones to create:
Create a milestone and share instructions in the description on what the assignment is and how they can complete it. You can either set the date to when you assign it and include when it is due, or you can set the date of the milestone to when the assignment is due. If you have worksheets or workbooks, you can upload it as a message for them to download.
Similarly, you can create a milestone for a client to check-in with you. This asks them to drop down their thoughts, progress, or anything else you’d like for them to journal. This is typically used between sections, so you and your client can track their progress.
The client can submit their entry directly under the milestone as a message. Once they have completed this entry, you’ll receive a notification and can respond directly in the private space as well.
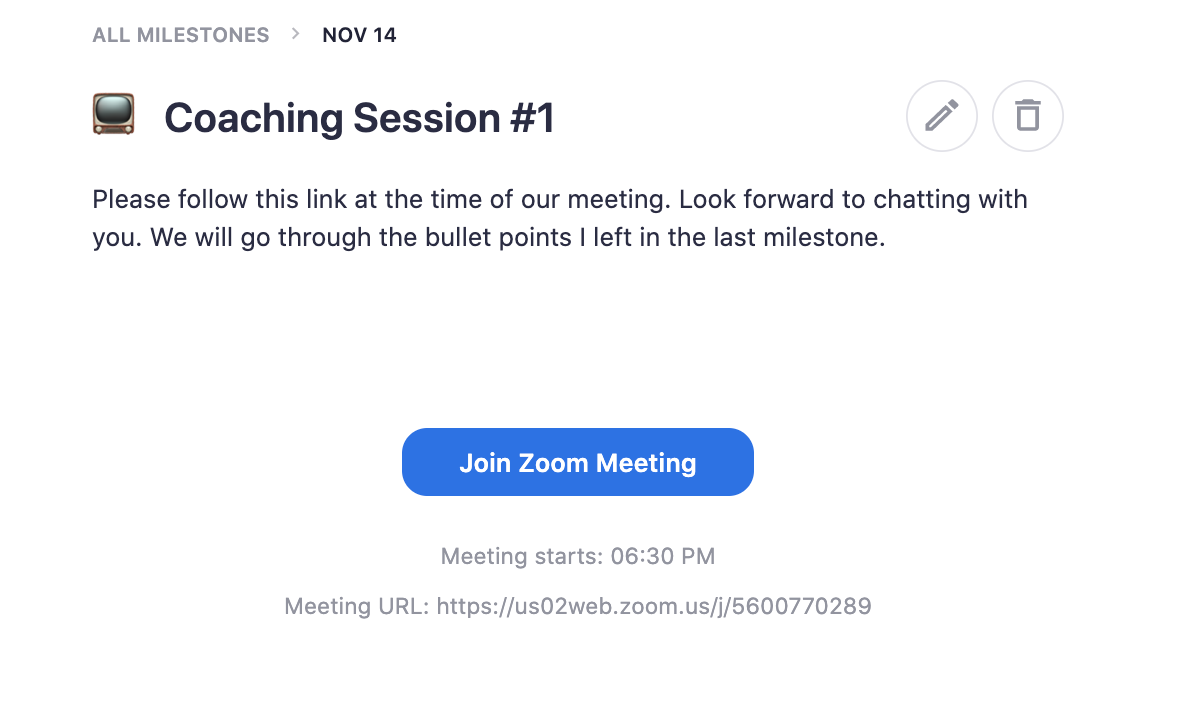
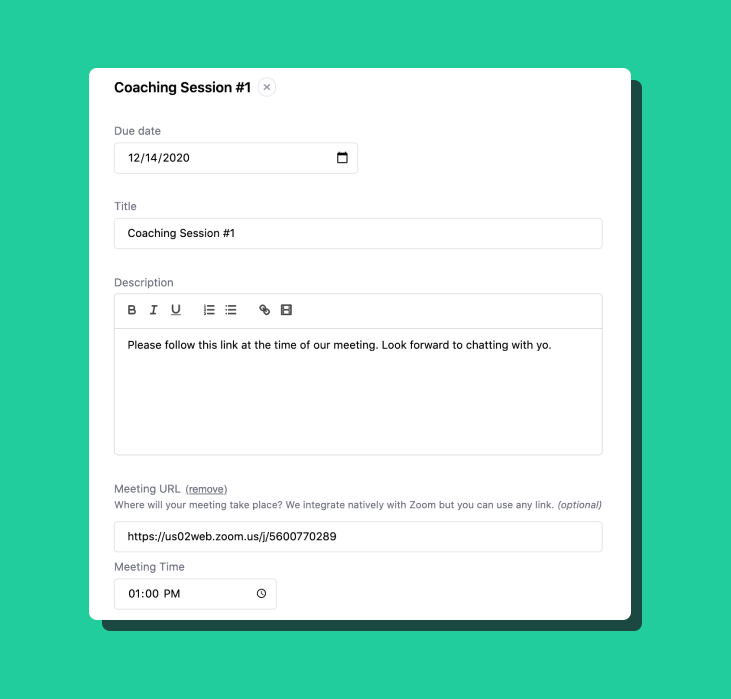
You can create a milestone with your availability scheduler so your client can immediately pick a time that works for them without needing additional back and forth emails. While you can use any scheduling link of your choice, we have a native integration with Calendly.
With a paid Calendly account, you can add in an API key to your Teachable account, and any scheduled meeting created using the scheduler will automatically create meeting milestones. These meeting milestones will include the title, description, and Zoom link.
Meeting appointment milestones are straightforward—the meeting milestone will indicate the date, time, and where (via a video conference link) the meeting will take place. At the time of the meeting, your client will just have to click on the button and it’ll take them to the video conference link to meet with you.
Keep in mind that you can save all of these recurring or commonly used milestones as a template. Once they are saved as a template, you can reuse them at any point for any client. Here’s a demo on how to create your milestone and save the template:
If you want to keep your coaching product a little more exclusive, you can keep it hidden, which is the default state. This means that people can only access the product and purchase if you give them the link to the sales page or check out page directly. If you want to offer this coaching product to any one who visits your site, you can hit the “Make visible” button and it’ll immediately be available under your directory.
{{coursecurriculum-component="/blog-shortcodes/blog-popup"}}
Now your coaching product is all set up. There are many ways to do it. Whether you are a certified coach offering coaching on a specific topic, or you’re just an expert providing mentorship, our coaching product can help you fulfill that. If you have any additional questions on how to set up your coaching, here are additional resources to help you.
Next up: Set up your sales page on Teachable and start marketing your new coaching product.

Imagine this: you’re the go-to person for project management. You have more than seven years of Excel experience. After answering all the same questions and doing the same one-off projects, you have an idea in your head—one that could get you paid. All your knowledge could make for a great e-book or online course. Whatever you’re dreaming up in your head, Teachable can make it a reality. We provide you with the tools to build your online course and productize your knowledge into a business. Whether it’s a pre-recorded curriculum or a combination of live and pre-recorded, you can build it on our platform.
Here’s a quick overview of the type of products you can build with the Teachable platform.
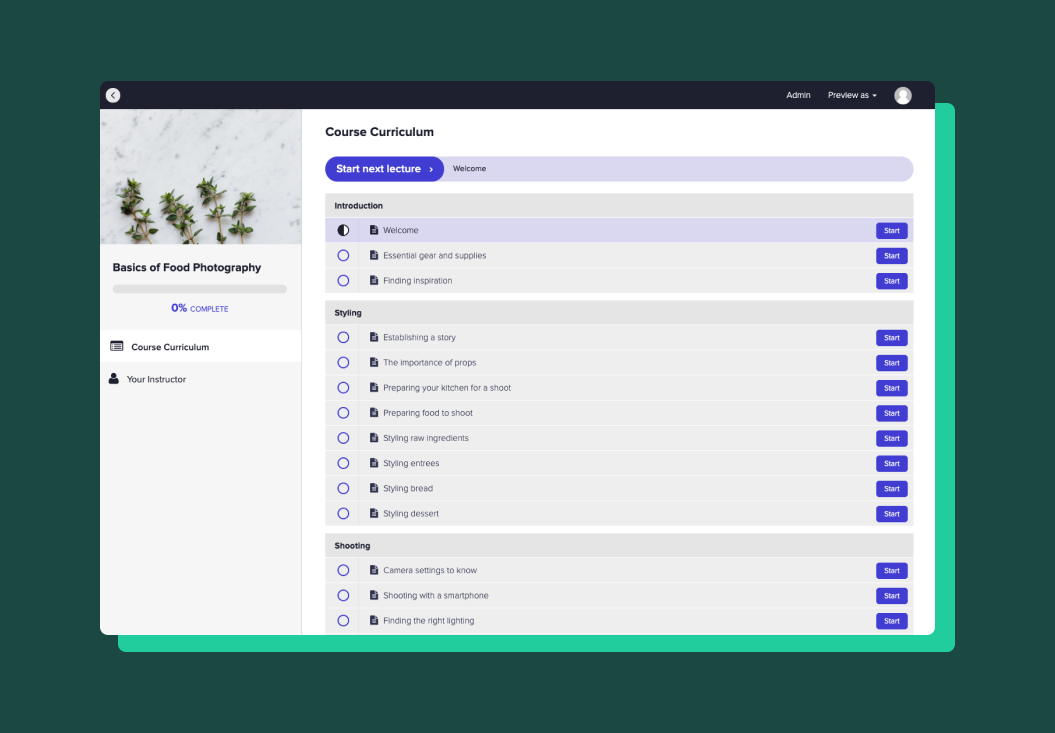
Build your online course with a self-paced curriculum that offers students a meaningful transformation and a series of milestones they’ll hit to get there. A standard online course is digestible and robust. It also gives your students the flexibility to progress at their own pace and allows access to all of your content right after purchase.
For instance, this could look like building an online course about the basics of project management. This course promises to prepare students for an entry level project manager job.
If you wanted to test out an idea for a course first or wanted to get a smaller course out ASAP, you should start with a mini- course. A mini-course is a short, valuable version of a standard online course. You want to build this online course to focus on one very specific topic. This is where students can learn the content in just a handful of steps. It can be a sneak peek into what your standard online course offers. In fact, it’s a common strategy to take one of the sections out of their standard online course and offer it as a mini course.
As the name suggests, this type of course is structured around scheduled live sessions that you’ve set up prior to student enrollment. Within the course, you can provide helpful resources that all your students will need to supplement your live course:
Plus, you can upload all replays from live sessions. Because of this, anyone who missed your event or wants to revisit the content is able to do so. For the creator with Excel expertise, this could be a series of live workshops on different Excel case studies.
Think YouTube how-to tutorials—except instead of giving completely free access, you can capture students’ email addresses to follow up with additional content. If your standard course is on project management basics, then you can offer a free tutorial. This could be a chapter on accountability. Overall, this is a great way for you to build your online course audience and to gauge interest for your content.
Cohort-based courses are courses with a more traditional academic structure you may have experienced in school. Build your online course that is designed for students to finish in three months (or whatever time frame you want). After the specified time, students will lose access to the course so they are incentivized to complete it. Or, they can repurchase at a discounted price for longer access.
This type of course allows you to re-launch it every three or six months. You can have a smaller group of students, which allows students to have a community experience and more access to you as a teacher.
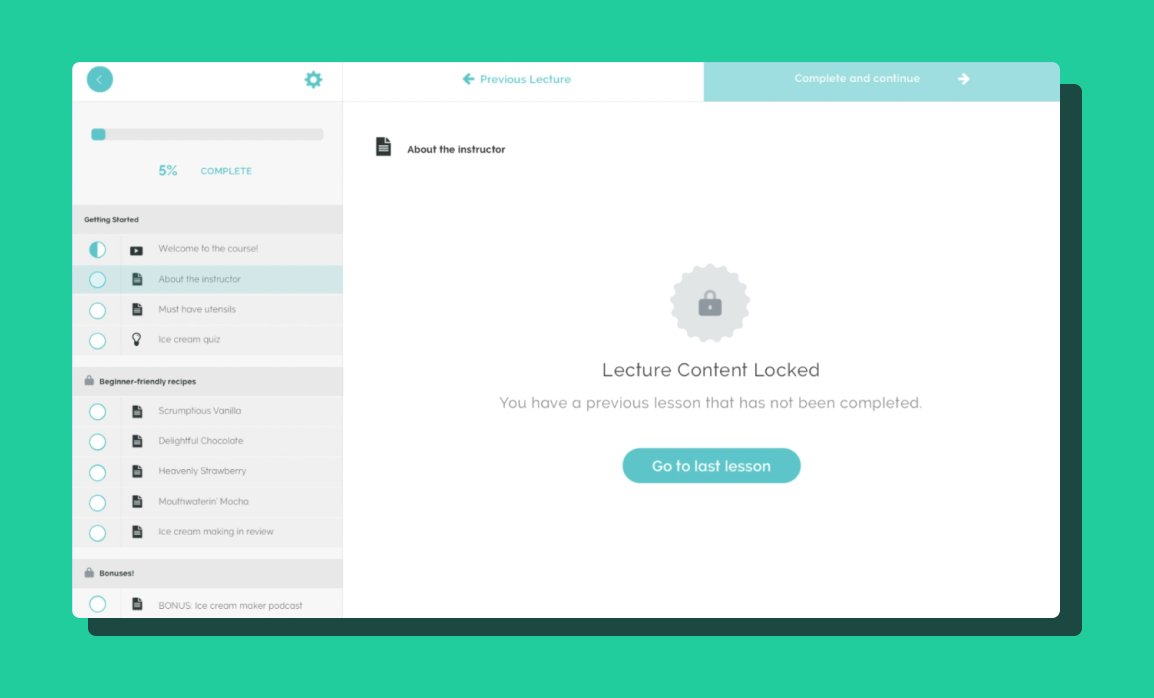
Drip courses are courses where you release content one module or section at a time. This type of course is best used if you are pre-selling your course or you want to keep students engaged. Because you’re limiting the content they get access to, students aren’t immediately overwhelmed and cannot jump ahead. Plus, drip courses allow you to create, prepare, and update course content right before you roll it out to your students. With drip, you can release each section after a specified period of time or on a specific date.
{{minicourse-component="/blog-shortcodes/blog-popup"}}
Companies want to provide their employees with software and skills training. Professionals want to find ways to level up on the skills they have to put on their resume. You can create software/skills training on Teachable that you can sell in bulk to businesses and à la carte to individuals who are interested. With our easy-to-use platform, you can build an online course that suits any type of skill training.
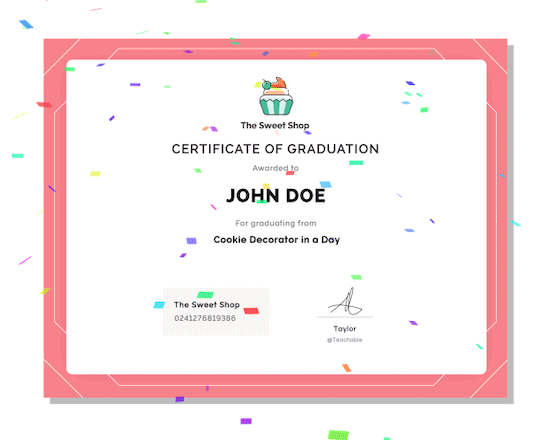
Certification training offers a certificate that guarantees all students have completed and obtained the skills taught in the training. Certificates serve as motivation for students to pass all quizzes in order to receive them. They also serve as external validation of knowledge. As such, certification courses have enforced lesson completion, enabled video compliance, and minimum passing quiz scores. Once your student completes the course, they’ll automatically be awarded with a certificate of completion that you can design and keep branded.
One-on-one coaching or consultations are usually short, one-time bookings where you are able to offer your expertise. If you are a blogger, you can offer a keyword or editorial calendar consult. If you are a vocal coach, you can offer a one-hour vocal coaching session. These are simple and fast options you can offer to your audience.
Coaching packages are for coaching topics that require more than just one session. For topics that require weekly coaching sessions and a longer time with your students, you can create coaching packages for eight weeks or six months. You can schedule, meet, and document all progress notes all in one place on Teachable.
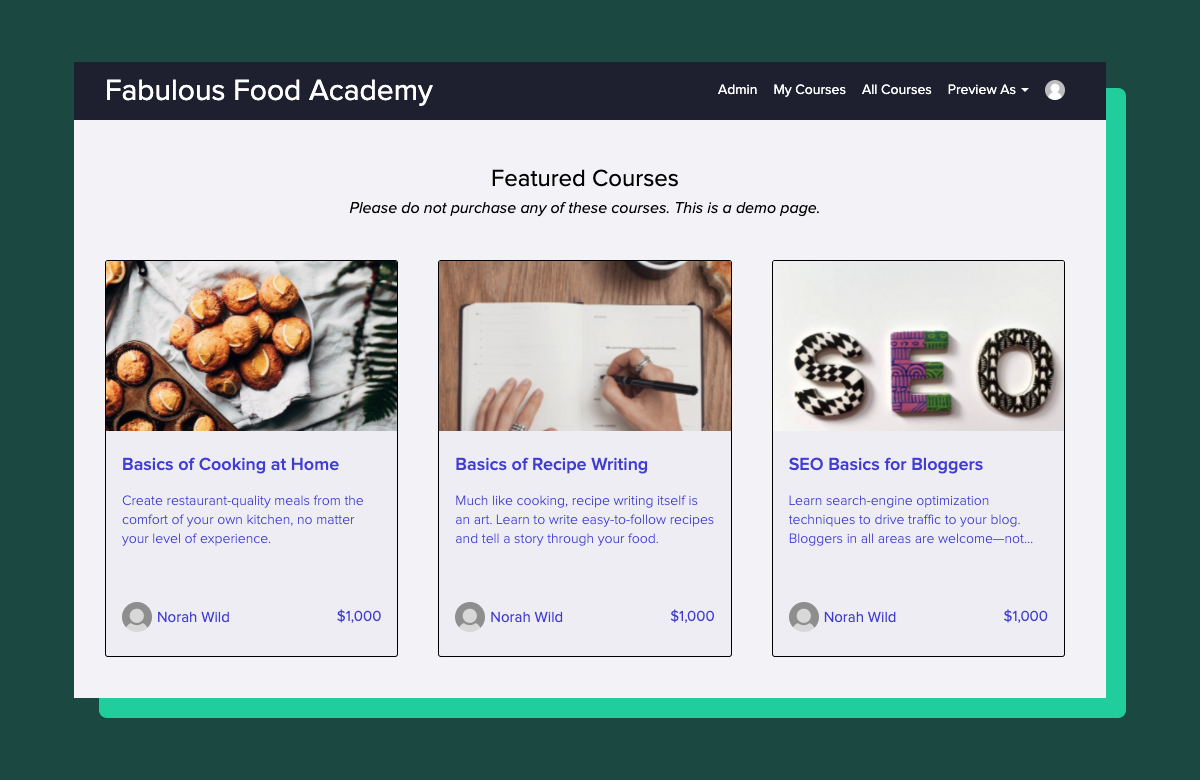
A course marketplace is where you have a variety of courses on different topics, created by different people. Bring in your network of course creators and do all the backend work to get their courses set up. All courses will be hosted in one place where students can filter by categories and authors and find the course that’s the best fit for them. Plus, you can set the author commission for courses. Don’t worry, we handle the payouts to your authors, as well.
Course bundles are a bundle of courses you’ve created. If you’ve created multiple courses on similar topics, you can sell these courses together at a discounted price. Take for example, you’ve created a Foundations of Project Management course, Project Management Templates course, and an Advanced Project Management Certification course, you can sell them together as a bundle to help your audience progress through all the material. This is a great way to upsell your audience.
Some course topics are better suited to a subscription model because of the learning behavior related to the subject—take coding or watercoloring, for example. Allow your students to keep subscribing to the course content until they are proficient in the skill before they cancel.
Although Teachable is best known for building online courses, you can also use our platform to offer digital goods. Teachable is a great way to sell and give students access to any e-books, workbooks, PDFs, templates, etc. that you’ve built and curated.
A membership is a hybrid course—one that consists of many of the options listed above together. Memberships are typically subscription-based and consist of pre-recorded course elements, live sessions, and one-on-one coaching and engagement with (and between) students.
Beginning to see how the course you are dreaming up in your head can be a reality on Teachable? We can, too. If you are still unsure how this might look, register for our on-demand QuickStart Webinar and get a in-depth look at what our platform can do for you.

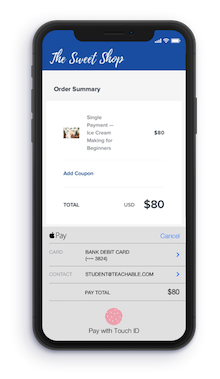
Have you ever left a purchase because your credit card was too far away? Or maybe you didn’t have the time to input your card details because you were on-the-go? If you’ve had that experience, you can be sure your students have had the same experience too—maybe even while trying to purchase your course. Mobile payment adoption is growing every year. That’s why we’re excited to share that online courses will be the first to accept Apple Pay® and Google Pay™ on Teachable.
Now, anyone can purchase your course using just their phone and fingerprint or Face ID®. All schools using Teachable native payment gateways can accept Apple Pay and Google Pay at no extra cost.
It’s no secret that mobile checkouts can be frustrating to navigate. Based on a CIO Dive study in 2017, 70% of internet traffic comes from mobile phones, and that number will likely move upwards of 80% by the end of 2019. To keep up, we explored ways to enhance the mobile checkout experience, so you can continue to expand your reach and enroll more students.
Mobile pay is designed so users don’t have to fumble around during the checkout process. No more struggling to remember your credit card number. Even better, Apple Pay and Google Pay aren’t limited to mobile devices—they can also be used on tablets and desktops.
Email marketing is a part of every online business marketing plan. Even in the world of social media, email has continued to be an effective way to reach customers. In 2017, almost two-thirds of US users opened their emails on a mobile device, and 75% of Americans use their smartphones to check their email.
So imagine if every launch email, every retargeting email, and every upsell email you send is opened on an iOS or Android device with Apple Pay or Google Pay enabled, how much easier will it be for your prospective students to enroll in your course?
{{tpay-component="/blog-shortcodes/blog-popup"}}
We also want you to think about how you promote your courses on Facebook and Instagram. Whether you’re publishing organic posts or running ads and sponsored posts, your target audience is most likely consuming this content on their phone.
In fact, in 2017, 95.1% of active Facebook user accounts were accessed via mobile. Don’t let your marketing efforts fail because of a mistyped credit card number. Enabling Apple Pay and Google Pay on Teachable will help speed up your checkout, and give your students a better checkout experience while boosting your conversion rates.
Offering credit and debit card sales, PayPal, Apple Pay and Google Pay on Teachable courses can be a huge draw to potential students. It lets them know how they can pay for your course before they dive too deeply into checkout, and turn away frustrated.
If you plan to use any of these payment options as a way of marketing your course, please make sure you follow copyright and trademark laws and include disclaimers on your page if you choose to do so. Here are some helpful links for Apple Pay, Google Pay, and PayPal’s trademark guidelines.
If you’re already set up on Teachable Payments or the Monthly Payment Gateway, you’re all set to go. Apple Pay and Google Pay will automatically be activated and will appear in the payment option dropdown. There is no extra cost to accept Apple Pay or Google Pay on Teachable, however, standard credit card processing fees will apply.
Not on one of our native payment gateways? If you’re based in the United States or Canada, set up Teachable Payments now to activate Apple Pay and Google Pay. Plus, enjoy the additional features that Teachable Payments has to offer.
If you’re based outside of the United States or Canada, you can set the Monthly Payment Gateways to activate Apple Pay and Google Pay.
Apple, Apple Pay, Touch ID, and Face ID are trademarks of Apple, Inc., registered in the U.S. and other countries and regions. Google and the Google Pay are trademarks of Google LLC

As an entrepreneur, overcoming obstacles becomes sort of a superpower. No doubt your multitasking knows no bounds. But, even our most successful course creators have told us time and time again that the biggest challenge they face is time.
We’re talking about the time to sort through administrative work, write and film content, promote their businesses, and retain customers. The list goes on. Naturally, solving that problem became our sole focus several months ago as we dove into planning our next new product for you. So, the core question for us became—what new feature set can we develop to save you time and help you expand your business?
It turns out the answer was simplifying your workflow and amplifying your ability to diversify your income beyond courses. So, we’ve just rolled out coaching to all paid Teachable members. Now you can offer more products on Teachable and simplify your workflows to take back your valuable time.
Whether you’re just getting started or are looking to scale, our new coaching feature can help get your products in front of your audience in less time and with more ease.
With coaching on Teachable, you can:
We know coaching isn’t just a stand-alone product. It can also be a powerful companion to courses. Within your online courses, you can offer supplemental 1:1 coaching in lessons with difficult concepts. You can also use coaching to run your Q&A sessions. On the flip side, patterns observed from 1:1 coaching can inspire a new online course. They can even help validate a course topic you’ve been exploring.
And together, there’s no limit to how much your business can grow.
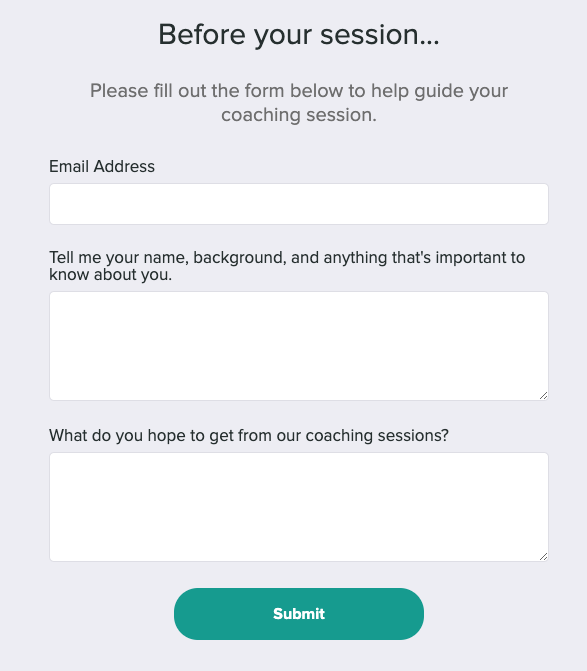
All Teachable members on paid accounts now have the option to offer their students coaching sessions. Just like with courses on Teachable, the coaching product comes with its own sales page, checkout page, and thank you page. However, instead of a dynamic curriculum block, you can add intake forms to get upfront information about clients to prepare for your first call or to ensure they are the right fit for the service.
You no longer need to include typeforms or Google forms in your workflows to get additional information about your clients. Now, all this information now lives in one central location.
In addition, you will now see a completely new coaching user interface that allows you to build tailored 1:1 coaching with specific milestones.
You have the option to add assignments, calendars, or meeting times as specific milestones for your clients. You can upload worksheets for students to fill out beforehand, add in a calendar link to schedule sessions, or immediately add in a video conference link to access.
Instead of combing through emails or setting up individual client documents, you can send messages to your clients within each milestone to keep track of their progress. Your client will receive an email notification every time you create a new milestone or leave a message. Each coaching space is unique to the client and all messages are private.
We don’t want to reinvent the wheel and eliminate the software you already use and love. Instead, we made it easier for you to use with coaching.
Calendly

Our native integration allows you to add in your Calendly API key. This means all meetings scheduled using Calendly link in the scheduler will automatically be pulled into your coaching space. You and your clients will not only have your scheduled session on your calendars but also within the Teachable coaching space as well.
Zapier
Just like with courses, we’ve also updated the Zapier integration. You can use Zapier to set up a New Sale and Enrollment Record action and connect it to any subsequent third-party trigger.
Integration with courses
Creators are always thinking about the next step to grow. And, so are we. While courses and coaching can be offered independently, we believe together they make a powerful offering.
For those of you who already offer courses, you can now add in an upsell within your course in a specific lesson. What’s more, you can use the coaching product you’ve created and promote it in targeted areas of the course to provide your students with additional support.
We don’t develop products in silos. We develop them in partnership with you. In testing this new coaching product, we’ve identified a few things we can add to the feature set that you can already look forward to.
Zoom integration
We are working with Zoom to include a native integration that allows us to pull in any recorded sessions to the cloud. You’ll be able to add a Zoom meeting link. This will not only be able to direct your clients to their coaching session but will also automatically generate a link they can go to see the recorded session. This means you no longer have to upload or send recorded sessions over email.
Milestone templating and saving
Coaches often have coaching programs with set milestones they want to progress through with their clients. We want to make this an easier solution by giving you the option to create and apply templates to your coaching products. This way you don’t have to customize every coaching space for each client.
Coaching and course bundling
We know the power of coaching and courses together. Many of you already offer 1:1 coaching as a bonus or a package with your courses, and we want to make this a more robust offering.
Ultimately, these are just a few of the items that we’ve prioritized as next steps for us to build for you.