Thank you! Your submission has been received!
Oops! Something went wrong while submitting the form.
MENU

Organic traffic is great. It’s free, highly targeted, more likely to engage with your content and convert and increasingly harder to get. But search engine optimization (SEO) is a very obscure practice. There’s a lot of technical terms and unspoken rules no one really agrees on, right? Not quite. This post will teach you the exact process you need to follow to do on-page optimization for your online course. This post will guide you through the exact step-by-step process of how to perform on-page SEO.
SEO is the practice that aims to improve the visibility of a website in search engine results to get more organic traffic—that which comes from people finding your page in:
If you’re looking to increase your course sales and have a sustainable source of valuable traffic, SEO is something you should definitely look into. There are three fundamental areas you need to work on to optimize your website.
By performing keyword research, you’ll find which phrases people use when looking for information. Most importantly, you’ll uncover how often a particular phrase is used as compared to others. (Note: When talking about search engine optimization, the term “keyword” can refer to a single word or a sentence.)
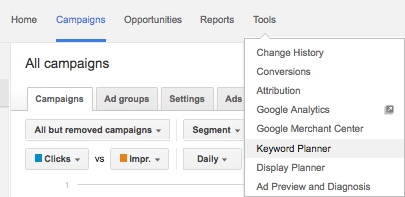
To get started, go to your Google AdWords account (if you don’t have one yet, create one—it’s free!). Under the “Tools” section, click on “Keyword Planner.” This is Google’s tool for finding keyword ideas related to a specific topic, product, or service.
Next, you’ll have the option to look for keywords related to a product or service, a website, or a category. Under the “product or service” field, write the main topic that your page will be about. Since this blog post is about teaching you “how to do on page optimization,” that’s the keyword we used to start our research.

Pro-tip: Set filters under “Targeting” to target a specific location or language, or exclude unrelated terms.
The first thing you’ll see are Google’s suggestions for “Ad group ideas.” To do this like the pros, go ahead and click on “Keyword ideas” instead. This is what we got when looking for keywords for this blog post:

Under the “Avg. monthly searches” column, we found there is search volume for the keyword we started with. We went ahead and clicked on the last column to add this keyword to our plan.
Now, scroll the list and look for other keywords that are directly related to the topic you’re planning to write about.
Here’s an example of how we evaluated some keywords for this post:
Pro-tip: Most people don’t realize that you can input several keywords (with comma separators) into the search field of the keyword planner. After you’ve added several keywords to your plan, copy all of them to the “product or service” field and click on “get ideas” again. The keyword planner will generate suggestions that are more closely related to what you’re looking for.
Now that you’ve built a comprehensive list of keyword ideas to helps with your on-page SEO plan, go ahead and export it by clicking on “download plan” on the right sidebar and get the CSV file.

{{todolist-component="/blog-shortcodes/blog-popup"}}
This is the spreadsheet that we got after our keyword research.

Most of the data columns in this spreadsheet are related to paid search advertising, not SEO. The only columns you should care about are “Keyword” and “Avg. Monthly Searches.” So after cleaning up the sheet and sorting our list by volume, we got this.

After our research, we noticed our index fingers got a little click happy and added a couple of keywords that are not related to what this post is about, which we highlighted in red.
Next, it was time to prioritize which keywords we chose to focus on for this on-page SEO blog post. It’s easy to get greedy and want to go after the highest volume keywords. However, those were not as intimately related to the topic we were writing about. Instead, we chose a couple of lower volume but longer keywords that represented exactly what this post is about—these are called long-tail keywords.
There are several advantages to doing this:
Based on this we decided to optimize this blog post for “on-page SEO checklist” and “on-page SEO tutorial.” Remember these two keywords.
Pro-tip: Performing keyword research not only allows you to know which keywords to focus on, but it’s also a good assessment of whether it’s worth it to write a blog post on that topic. That’s why this is the first step.
If there is one mistake most people make when they’re getting started with on-page SEO, is that they try too hard to include the keywords in the copy of the page and end up writing text that seems unnatural to the reader.
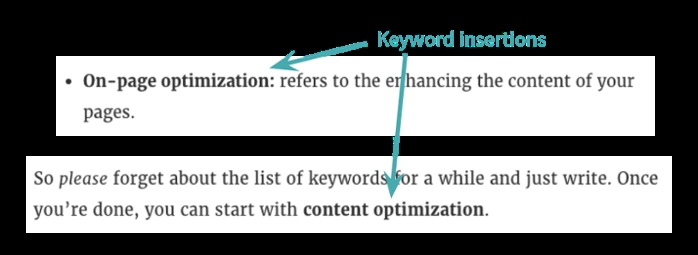
You should always think about the user’s experience first. If readers find it hard to understand what you’re trying to communicate, then you’ve failed in your objective of providing valuable content to them. So please forget about the list of keywords for a while and just write. Once you’re done, you can start with content optimization.
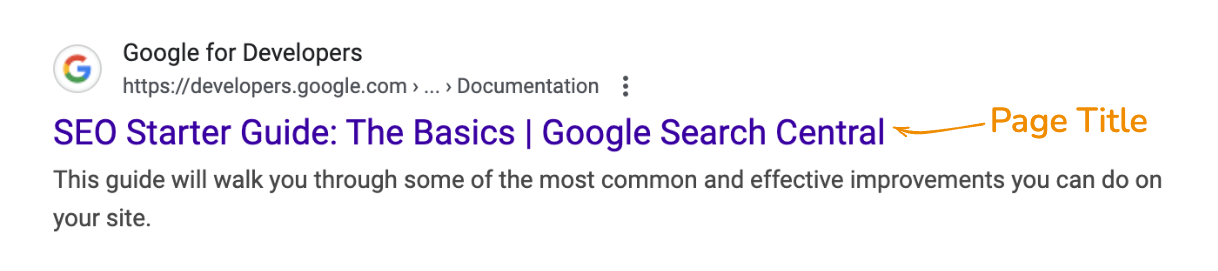
The page title is the name you’re providing to the search engine crawler and the browser. This will show in the search engine results page in blue and underlined, and also in the tab of the visitor’s browser.
We chose a page title that includes the keywords that we focused on. There are two crucial things you should keep in mind when writing your title:
Check out the page title we chose for this post.
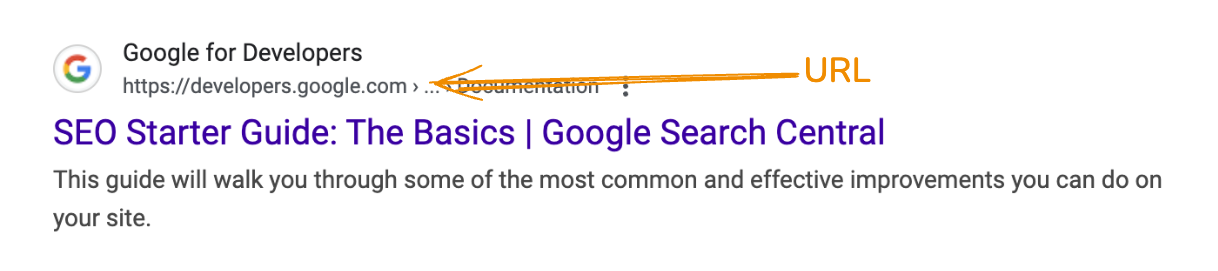
If you’re creating content for pages other than your homepage, you will have the opportunity to choose the URL slug for those pages. This will also show in the search engine results right under the page title.
Again, we included the keywords that we were optimizing for.

Upon hearing the term meta description, you may think it sounds like a super technical, complicated thing. Yet, it’s nothing else than the text that explains the content of your page. This is the grey text what shows under the URL in the search engine results.
Here’s what you should know about meta descriptions:
This is the meta description we wrote for this blog post.

If you’ve done these three simple things, you’ve optimized every element that your visitors will see when they find you in search results.
Up next, we’ll teach you how to optimize the content your visitors will get upon entering your website.
The heading of the page is a critical element when performing on-page SEO optimization and, in most cases, it’s the first piece of text your visitors will see when they land on your page.
In most platforms, the page’s main heading tend to mirror the text of the page title (or vice versa) by default. In some others you can choose to write different ones to present visitors that land on the page with a more descriptive heading of the post or page without the 65-character limitation you should follow when writing page titles.
As you can see, we just chose to keep the same title and heading.
Pro-tip: Your title should always be tagged in HTML as an H1.
After optimizing your heading, it’s time to work on the body copy—which is just a fancy term for the rest of the text in your page.
Don’t try to include only your target keywords every chance you get. Search engines are smart and can tell when you do that, which could be detrimental to your search rankings.
Instead, work through the list of keywords you’ve built.
Include variations and synonyms of the target keywords in the body copy. You may have noticed that, throughout this blog post, there are several phrases that we chose to bold. Those are the keyword insertions we made based on the list that we created in step one.
Once you have included keywords in the text of your page, move on to the images in it. Image optimization is not as obvious to the visitor. However, since search engines can’t see, optimizing your images helps them understand what they’re about.
The two elements you should mind when optimizing images are:
Since visitors of a page don’t see that an image has been optimized for search engines, some people make the mistake of over-optimizing the image titles and alt text by stuffing keywords in them. This could also have negative effects on your page rankings. So avoid doing this.
Only include keywords in image titles and alt text if it really makes sense to do so. It’s way better to be descriptive in the naming and description of the images.
Want to find out if this post’s images have been optimized? Right-click the image below and choose “inspect element” to check out the HTML code—you should see exactly what’s in the image. The image file name is at the end of the “src” attribute, and the alt text is after the “alt” attribute.

You’ve reached the final step of mastering on-page SEO optimization. So, let’s talk about links.
Links are the basis of how every search engine algorithm works. Here’s how you should use them to optimize your page.
We can classify links on your page as:
External links are somewhat counter-intuitive to some people. Why would you want to drive visitors away from your site? There are three main reasons:
We found sites to link to by doing a Google search for the terms we’re optimizing for, and linking to some of the best-ranked pages in the results.

Internal links, on the other hand, are useful for two reasons.
When linking internally, it’s best practice to use keywords in the anchor text (the text over which the link is placed), as opposed to generic text like “click here.” This way, you’re not only telling search engines that other pages are also valuable, but you’re letting them know what the page is about.
When it comes to on-page SEO, each of these steps will incrementally make your page more valuable in terms of search engine rankings.
And remember, SEO is a long-term play. You will not notice improvements for days (or even weeks) after optimizing your content. However, for free highly-targeted traffic, it’s well-worth the wait.
It may seem like a lot of work right now, but we can guarantee that once you do this a couple of times, it will come naturally to you every time you have to create a new page or write a new blog post.
