Thank you! Your submission has been received!
Oops! Something went wrong while submitting the form.
MENU

When I talk to people about what Teachable does, more often than not, their ears perk up, their eyes brighten, and they exclaim something like, “Oh! I’ve been thinking about doing a course!” I get it: Creating an online course allows you to make money talking about something you love, and do it from anywhere. It means doing something that energizes you and gives you more control over what your career looks like, and how you live your life.
And that’s huge! But when I ask what kind of course they want to create, they suddenly turn bashful, back away, and mutter, “Oh, I’m not sure yet. I have to figure it out.”
This exchange has happened so many times it got me thinking—why do so many would-be course creators get stuck just thinking about teaching online?
My guess? It’s a prioritization problem.
Creating a course involves countless tiny steps, and it’s easy to get stuck in a “chicken-or-the-egg” scenario, wondering what comes first. Meanwhile, since there are no clear goals to hit, it’s impossible to stay on track, and you end up just feeling bad about yourself.
Here at Teachable, we spend a lot of time thinking about the ideal path a course creator needs to take to go from thinking about creating an online course to succeeding at it.
In this post, I’m going to cover all the steps you need to work through, in what order, and how to tell when you’re ready to move from one phase to another.
We’ve published a course creator’s checklist before. In this post I’m going to break it down even more, so you can get a clear picture of the hurdles you need to make.
This is a long post, so bookmark this page and check back as you work through each step. I recommend reading through this once, then taking notes on a plan of your own!
My guess is you’ve already got a vague idea of what you’d like to create your online course about. You’ve got your own interests and passions, and perhaps you already have an online business.
Let’s take your vague idea and turn it into a money making course topic.
The key here is to marry your passions and skills with your audience’s wants and needs.
You can transform an existing curriculum or program into an online course. Which of your programs are the most popular? What questions do your clients ask you the most?
Chances are, your existing clientele has already told you exactly what kind of course you should create. If they’re interested in your expertise in coaching form, they’ll be interested in course form, too.
Look to your analytics. Which pieces of content are getting the most engagement and traffic? It’s likely that you’ll be viewed as an expert on your high traffic topics by your audience.
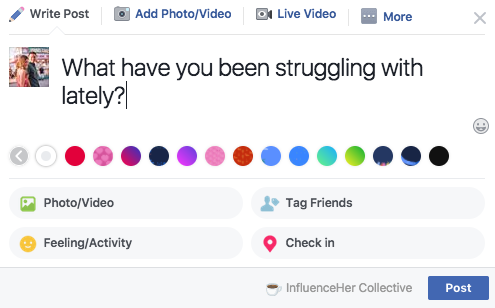
You can also look to your comments and social media messages. Which questions are people asking you? Do you hear one or two questions over and over again? That might be a good place to start for narrowing down a course topic. You could also post a message in a niche Facebook group to discover common struggles your audience is dealing with.
First things first: congratulations on beginning this new adventure! Things are about to get very exciting for you.
With your clean slate, you can build a brand and create a course on any topic at all. Figure out what you love to do and what you could teach people. Now try and figure out where the two overlap.
Theoretically, you could create infinite online courses and bring all of your brilliant ideas to life. But let’s say our goal is to release your first profitable online course as quickly as possible.
Ask yourself these questions:
Validating your online course idea is essential if you’re worried about whether or not you’ll have any interest in your course.
We’ve borrowed a validation tactic from Jeff Cobb that involves four categories of research: searching, listening, asking, and testing.
Searching: Searching is the easiest and fastest way to validate your course topic. All you do is search the Internet to see what other people are looking for, clicking on, and engaging with.
BuzzSumo is a great tool for seeing what online content is attracting the most attention. It’s particularly useful for seeing what is being shared on social media.
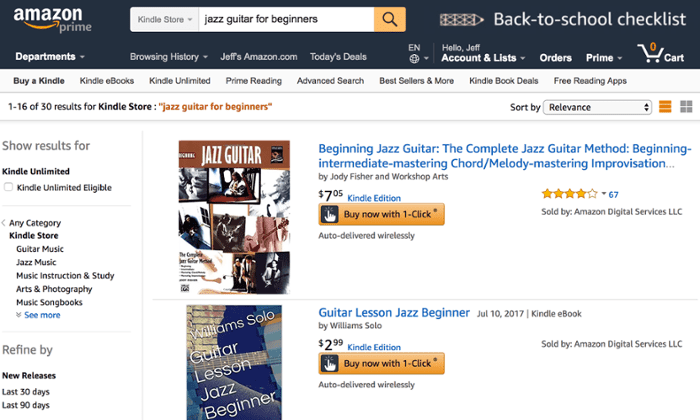
Another tool is the Amazon Kindle Store, which is actually a search engine filled with ebooks and other information products. You can search for successful ebooks on your topic.
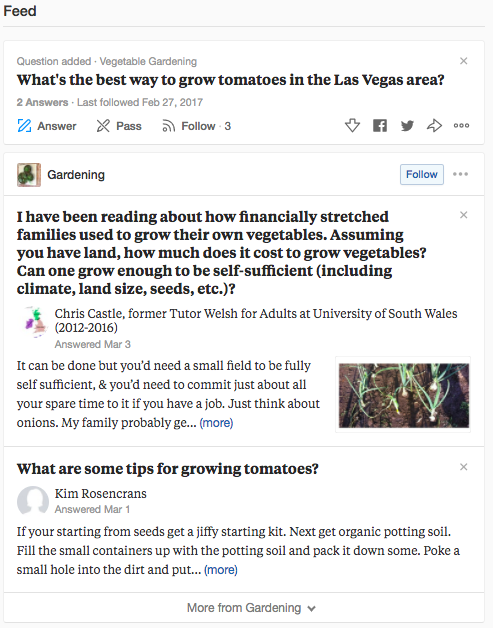
Listening: See what people in your target audience are already wondering. Quora is a place for people to ask any kind of question they have, and wait for subject matter experts to weigh in on the answers. It’s valuable here for you to see not just what questions people are asking, but also how others are answering.
Asking: Get the answer on whether not people will buy straight from the source. The thing is, you can’t actually straight up ask because often times people aren’t able to accurately predict their own future behavior.
Instead, you should ask questions that will tell you what challenges people are facing. If your course solves their problems, that’s a good sign that people will purchase.
A few ways to ask are:
Testing: The idea is to put a product in front of your audience and see if they’re interested in buying. This can be a smaller ticket item like an ebook or PDF.
Instead of starting off the bat with a paid product, you can use a lead magnet. This allows you to see if your audience are willing to give you something in exchange for your expertise. In this case it’s just their email address.
Once you’ve got your foot in the door, they’ll be more likely to pay for your products down the road.
One of the common mistakes we see online entrepreneurs make is they don’t know who it is they’re selling to. It’s hard to cater a product to your audience when you don’t even know who your audience is.
Step 1: Who do you want to help?
I’m sure you have a vague idea of who you’re best suited to help. If not, ask yourself a few of these questions: What group do you understand better than anyone else? WHat do you care most deeply about? Is there a specific community that could truly benefit from your knowledge? A group that you’re part of that you deeply understand?
Step 2: Research
Researching is the fun part. First, Google your course topic and related words and phrases. Take a look at the results. What sites are popping up? What are the similarities that you’re seeing? Is there a certain group of people that is interested in your topic?
Check Quora and see what questions people are asking about your topic and dig into their profiles. What other things are they interested and where else are they spending their time? See how deeply you can dig and try to make predictions about who these people are.
Step 3: Find similarities
1. Is your audience mostly located in a specific country?
2. What language does your audience speak?
3. Are they mostly male, female, or evenly represented?
4. What’s the level of education?
5. What age range are most of them?
6. Are there any other identifying characteristic or similarities in the group?
The more nitty gritty you can get with your course topic, the better. If you’re too broad, you’ll find yourself in the creation stage for forever. Try to narrow it down to one specific transformation.
For example: Instead of creating a course on how to open your own online shop on Etsy, you could create a course walking your audience through how to create your own online shop selling handmade goods on Etsy while balancing their full-time job.
When you’re writing your course curriculum, the easiest way to begin is to put yourself back into your students’ shoes. Look back to when you were learning whatever it is you’re teaching and write out the major milestones that you had to cover to get to where you are.
Write each milestone down. This will help you visualize what your course will look like and ensure that it won’t be too big.
Example milestone / transformation:
After taking my course, people who are trying to start a blog will have beautifully designed websites and they’ll have a clear idea of what content to publish. They’ll feel confident about the direction of their site, and have ease when it comes to choosing which content to publish and promote. People who take my course will be able to:
You wouldn’t believe how many people get caught up by this step. They know they want to move forward, but without anything to call their brand they throw in the towel.
I’ll let you in on a secret: You don’t need to have a perfect name to have a successful brand. Of course, a great name is obviously ideal, but don’t get too hung up on this step.
Here are some quick tips for naming your school:
Before naming your course, you need to do two things:
There are three rules to writing a good course name:
To keep in line with my Etsy example, perhaps you want to brand your students as “supermoms.” Naming your course “How to be a supermom” conveys emotion and you could argue it’s benefit driven, but it’s not specific.
Instead, something like “The Supermom’s Guide to Earning More” shows exactly what will happen as a result of taking your online course.
You’ve got your perfect course all mapped out and you’re ready to grow your audience so you can have a massive launch. Good for you!
Luckily, we’ve perfected our audience growing tactics and have created a fool-proof formula to help you explode your audience.
I know, you’re probably super eager to create your bread and butter course, but first we’ll create a mini course that you can use to get your foot in the door and grow your audience. This is something you’ll give away for free in exchange for an email address.
When selecting a mini course topic, you should never start from scratch. Instead, you should work backwards from your main course.
If there is one specific section in your main course that you think would make a great transformation for a mini course, start there.
… is to keep it mini. We see so many people offering “mini-courses” that could be stand-alone products selling for hundreds of dollars because the creator got carried away. And while it’s incredibly generous to give away all of that for free, that’s not our goal today.
Creating a mini course is actually quite formulaic, too:
Try to use only one section, and try not to add more than 5–7 steps.
You can also use video in your mini course, but again, try not to get carried away. Instead, create a single introduction video and a single video in your mini course. Keep with text lessons and valuable downloads for most of your content. We’ll save the high-value videos for your main offer!
Unfortunately, you have to do more than just create your mini course to get people to sign up. It takes a good amount of promotion to get your name out there especially if you’re new to the online marketing space.
Let’s talk about a few ways to attract new traffic to your mini course:
When you tap into someone else’s traffic, you:
And you can also find your audience on an existing platform. To do that, you can:
Your curriculum acts as the skeleton of your online course. You’ll build everything around your curriculum, it acts like an outline.
We crafted our transformation earlier on in the post, and identified our milestones, too. For the sake of the example, I’ll copy them here:
After taking my course, people who are trying to start a blog will have beautifully designed websites and they’ll have a clear idea of what content to publish. They’ll feel confident about the direction of their site, and have ease when it comes to choosing which content to publish and promote. People who take my course will be able to:
You’ll see above that I have seven main “milestones.” As a rule of thumb, we generally recommend choosing between 5-10 milestones.
If your course has more than ten milestones, ask yourself “why?” Is it because your topic really is so extensive, or should you break your topic down into multiple smaller courses? If there are too many milestones, you may want to go back and redefine your topic.
On the other hand, too few milestones might mean that your course would be better off as a minicourse. Trust your gut.
Once you’ve defined your milestones, break them down into lessons.
As a rule of thumb, each lesson should cover one major takeaway and won’t take more than ten minutes to explain.
Let’s break down one of our example milestones into lessons:
You want your course to be munchable, or easy to consume. If your student goes through you course and forgets a very specific point, it’ll be easier for them to go through and find their information if there are clearly labeled 6 minutes videos, rather than having to rewatch an entire 60 minute video.
Online courses don’t have to consist of just videos. There are five main content types we tend to see course creators use.
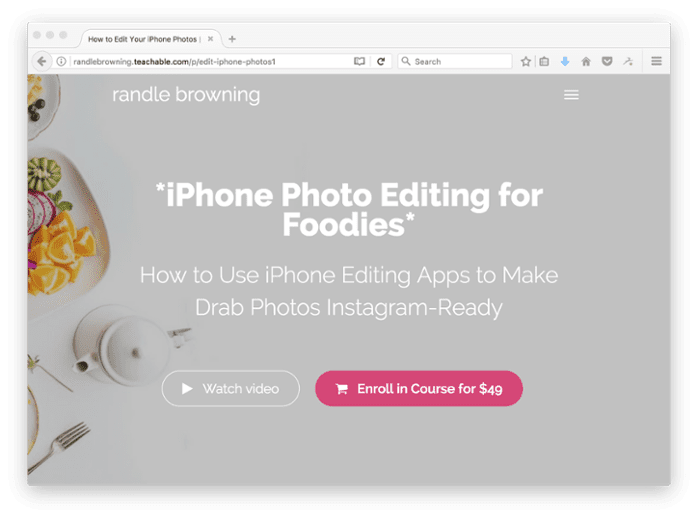
Text and photo lessons: These are made up a lot like this blog post. Utilizing written word and photos to get a point across. These are the easiest lessons to create and they take no advance skill. Plus, they can be built entirely on Teachable.
PDFs, spreadsheets, and other documents: If your course has a workbook, a cheat sheet, or resource material that you want students to easily reference, you may want to make it available for download in PDF form. Offering these extra materials can really help your students feel like they’re getting a great value.
Screencasting, or screen recording: With screencasts, you can demonstrate a topic on your computer and record the screen. Often, when screencasting, you’ll also include an audio voiceover, which you can record at the same time or after you have the video recorded. These simple videos are a great way for you to directly teach your students without being on camera yourself.
Video: Here you can speak directly to your customers. Sitting down on video is a great way to really make that connection with your audience and get your points across. Video is a great content choice, but there are times when Text & photo might be better, like when there is too much information to recite on video.
There are a number of different ways you can create video for your online course, all with their own set of pro’s and con’s.
Talking head videos: When you’re sitting down and talking to the camera, this is a “talking head” video.
Video demonstrations: Here you’d record a video teaching your audience how to do something specific like cooking or painting or building something.
Interviews: Interviews can add a lot of value to your online course, and you can offer these interviews as bonus content.
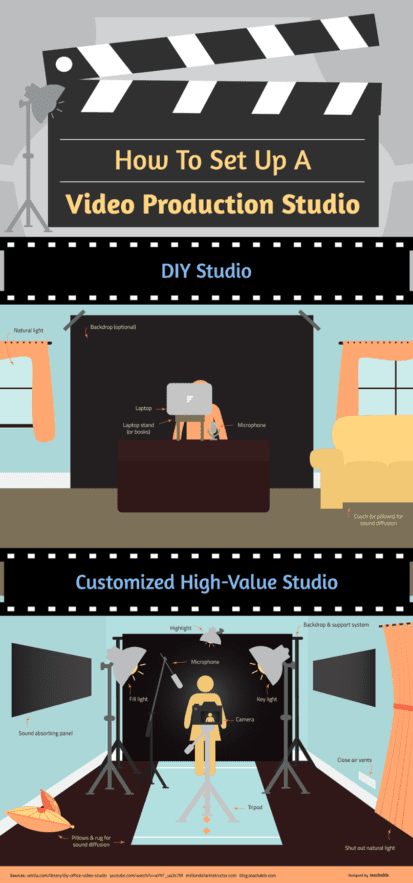
Lighting is important. Use natural lighting when possible, but always make sure that you’re well-lit, without shadows or tinted lights. Lamps and house lights can look yellow, but even an inexpensive professional light kit can give your lighting a professional look.
When all else fails, standing near a large window or standing glass door can provide beautiful results.
But audio is more important. Viewers are actually more tolerant of low-quality video than choppy, fuzzy audio. Film in a quiet location, with no air conditioners or heaters running. Make sure there is a lot of soft material covering hard surfaces to prevent echo, too.
Off frame, cover the walls, floors, counters, and other hard surfaces with blankets, pillows, and laundry to dullen the echo.
Think about the scenery. It’s easy to just hit “record,” but first make sure your scenery looks good. What’s in the background of your shot? A blank white sheet always works, but a tidy office or workspace looks great, too.
Make eye contact. When filming, look straight at the camera lens and avoid shifting your eyes around the room, down at your script, etc. If you have to look at your script, make sure to pause before looking down and before looking back up so you can edit those parts out!
This is the most exciting part of your entire journey, you’ve been working towards this for weeks! When you finally open your doors and launch, that’s when all of your hard work begins to pay off.
But you’re not out of the woods, yet. You see, not all launches are created equally, and some launches have higher success rates than others. To simplify it, we recommend launching to your email list and holding an open-close launch.
An Open-Close Course Launch just means that you make your course available for enrollment for a limited time only. Instead of making your product available year round, your course will have launch windows and you can only purchase within that time frame.
You might feel like this is counterintuitive, afterall, you want as many people as possible to buy your course, right? Well, let me explain the elements that make open-close launches so successful.
The first is anticipation. When you run a course launch, you don’t start the launch with an announcement that your course is available. You send emails leading up to the big release day that build excitement around the topic of your course. This builds anticipation for your audience and keep them reading and waiting to see what comes next.
Next is scarcity. When there is less of something, or if it’s only available for a limited time, people will want it even more. This is why limited-time sales windows work so well for launches. If your course is always available, there’s no scarcity, or no motivation for people to make a purchase right now, rather than later. But if you tell people their opportunity is going away in just a few days, they’re much more likely to seize the moment.
Third is event-based. When there’s a big event going on, like a course launch, people feel like they’re part of something larger than themselves. You’re uniting people around a shared experience, like your course release date, and that gives your audience a sense of connectedness that keeps people feeling involved and engaged.
Next is “reason why.” One of the most powerful words you can use is the word “because.” People are logical beings, and if you give us a reason why we need to make a purchase, we’re much more likely to act than if you just tell us to do something with no cause.
And lastly, storytelling, the biggest psychological trigger of all. People use stories to pass down knowledge through generations, and we don’t need to look further than the box office to see how much humans love to hear stories. Although TV shows and movies often focus on fictional stories, storytelling exists in our everyday lives, from the imaginative stories our kids make up to the stories we recount from our day over dinner. Storytelling is the backbone of human communication, and running a course launch will give you the opportunity to share your story with your audience.
Before we get started, let me tell you this: Most online course creators don’t charge enough for their online product. $100 is the minimum you should charge for your course, and even then sometimes $100 isn’t enough.
As a quick guide for how much you should be charging:
Using premium pricing can be intimidating, I get it. But it’s so important. It’ll help you maintain your sanity and meet your revenue goals with greater ease. Let’s discuss why that is:
Which brings me to the goal setting phase of this conversation. How much money are you hoping to make with your online course?
There is no wrong answer here, dig deep and figure out what number would make you jump for the stars happy.
Now lets reverse engineer that to see how you should price your course.
How many people will you need to sell your course to at $100 to meet that goal? At $250?
Let’s say you still wanted to make $1000 as your revenue target, and you’re offering a $200 course. Now you only need 5 students to buy your course, which means you only need around 250 engaged people on your email list to hit that goal.
Seems doable, right?
Creating your sales page is an exciting aspect of the course creation journey. This is your final tool in convincing people to purchase.
Use your sales page as an opportunity to educate your audience and share why your course is the best possible solution to their problems
Writing sales copy
There’s a well established principle in the world of sales copywriting called the 40/40/20 rule.
This rule says that there are three key factors that contribute to someone’s decision to buy your product.
The first is your offer, which includes your course and maybe a special bonus offering or discount. The offer accounts for 40% of their reasoning.
The second factor is whether or not they are your target audience, so 40% of someone’s decision to buy your course will depend on if you’ve attracted the right audience.
The third and final factor is your creative, which includes the sales page, your emails, the design, and everything else. This creative, or your marketing efforts, only account for 20% of someone’s decision to buy your course.
Despite creative only accounting for 20% of your audience’s decision to purchase, it’s not something you want to get wrong.
Great sales pages are typically made up of a few standard building blocks. These are the essential pieces to your sales page puzzle that will make purchasing a no-brainer for your audience.
A headline
This is your opportunity to be clear and concise about what your course is about. You also have a subheading just underneath the headline, and this is a great opportunity for you to share what the big transformation is for your course.
A course description
The biggest mistake people make in their course description is jumping right into logistics, or into telling your audience about the course features. Remember, benefit driven language is your friend here. You’re really presenting the solution to their problems with this section, not talking about the nitty gritty technicalities of your course.
Social proof
Here is where you’ll use case studies or testimonials to reassure your audience that other people love and trust you.
Think about any purchase you make online, you probably check the reviews to ensure you’re not getting ripped off or wasting your money. That’s what testimonials do for online courses. They show that other people have trusted you and have benefited from it.
Pro tip: If you don’t have any testimonials yet, offer your course for free to a small group of people in exchange for an honest testimonial.
About the instructor
Include relevant information about yourself here – why are you suited to be teaching what you’re teaching? What experiences have you had or trainings have you taken that have qualified you to be an incredible teacher?
CTA buttons
CTA’s are also known as “Calls to Action” and they act as the push to tell your audience, “Hey! Buy this cool course!”
CTA’s can be as simple as saying, “Buy now” or you can make the message more convincing by getting specific. “Earn more on Etsy today” might be more enticing to our audience of moms we mentioned earlier.
Course curriculum
Teachable automatically builds this for you, and it helps your potential students get an idea of what you have to offer inside of your online course. Whenever I’m considering taking a course, I go straight to the curriculum to see the specifics of what is going to be covered.
You can also choose to turn on one or more lessons to Preview Mode. This will allow prospective customers to be able to view these lessons without enrolling. This can be a great way to give prospects a taste of what your course is like.
Your FAQ
Your FAQ is so important and one of your biggest time saving tools. Any relevant questions you don’t include in your FAQ will probably be emailed to you dozens of times by prospective students.
The FAQ section gives you the opportunity to get inside your customers’ heads and think about why they’d choose not to buy your course. So address their worries early on and make their decision easier.
Beautiful sales pages are so important to brand your business and make your school look as professional as possible. Luckily, Teachable makes creating a beautiful sales page easy within our sales page editor, but there are a few essential tips to keep in mind.
You’re also going to want to make your sales page easy to read and digest. Don’t give your audience a wall of text, instead break it up so that it’s not overwhelming.
Here are some great ways to make your sales page more munchable:
This might sound intimidating, but don’t stress. Your checkout page flow is already built into Teachable’s design, but there are a few elements you can customize with your course information to strengthen the checkout.
Teachable checkout pages reinforce your transformation by including testimonials and course bullet points. These are already elements you’ve collected, so it’s as easy as pasting them into your checkout page.
You may also want to consider including a purchase guarantee, sometimes called a trust seal. This guarantee significantly derisks your customer’s decision. If they hate your course, they can get a full refund within 30 days, it’s as easy as that.
Things are finally heating up! It’s time to begin launching your course and getting a return on all of that hard work you’ve put in leading to this moment.
We recommend launching to your email list, after all they’re your most engaged audience and they convert at the highest rate.
Your email launch will have three elements: Engagement, Presales, and Sales.
Engagement
The goal of the engagement phase is simple: you want people to start reading your emails, getting excited about your topic, and building trust and authority. In the engagement phase, the CTA, or call to action, is simply reading your emails, and maybe clicking through to your blog posts or responding to your survey. Your engagement phase will last for a few weeks, depending on how engaged your audience was before today.
Presales
Your presale phase will come in a one-two punch.
Day 1 is the course teaser. This is when you tell your subscribers that you’ll have an exciting announcement coming out soon, and that you’ll be opening an online course. You can share a little bit about what the course covers, but tell them that you’ll mention the full details later. This is where you start building anticipation, which will keep readers engaged and coming back for more.
Day 2 covers the course details. In this email, you answer, “What’s in the course?” and you explain in detail what your milestones and lessons are for the entire course. You aren’t giving away the content, but you are outlining the details of what you’ll be covering, as well as the overall outcome or transformation students will feel by the end of the course. You’ll end by telling them that the course is going to become available tomorrow, but you won’t share the sales page yet.
Sales
On Day 3, you’ll announce that your course is open. This email is your big moment, when you finally get to share that your course is available. You’ll link to your sales page, and you might consider including a few testimonials in your email. You’ll also need to ake it clear that this is a limited-time offer.
Day 4 is your FAQ email. Using an FAQ email is the perfect opportunity for you to appeal to your subscribers’ logical side and squash any concerns they might have about your course.
Tell them about your 30-day guarantee, and reassure them that they’ll have lifetime access.
Share what the course includes, and see if you can anticipate their burning questions. You’ll provide the questions and answers right in the body of your email. Again, the CTA for this email will be to click on your sales page link, and you’ll want to reiterate that this offer ends on X date at Y time.
Day 5 is the surprise bonus email. This is a fun opportunity for you to tell you subscribers that you’re giving them a new surprise that you haven’t mentioned on the sales page if they buy now. This should either be bonus content or an even steeper discount. In either case, it should be something truly valuable to your customers, and you’ll again remind them that this incredible offer goes away on X date.
Day 6 is the thank-you & social proof email. At this point, you want to thank everyone for reading your emails and being part of your launch. Hopefully by now you may have gotten excited emails or social media posts from new customers, so you can include some anonymized screenshots where new customers are raving about your content. This social proof will be exactly what a few people need to convince them to act now and enroll in your course.
By now you’re nearing the end of your launch, so Day 7 – the day before your launch ends – is the logical argument. You’ll tell everyone that your course will be closing, and you’ll build a logical argument convincing them why they need to buy right now. Remind them about your bonus, and remind them how soon the sales window closes.
Then finally you’ll arrive at Day 8, the final day in your launch. On this last day, you’ll be sending not one but two emails. Is this a little aggressive? Yes. But it’s proven and effective. Trust us on this one! It’s worked for our most successful instructors here at Teachable.
The morning email goes out at 11 AM. You’ll announce that today is the absolute last day to get the course, and that sales end at midnight. Then the afternoon email should go out around 3 or 4 PM, and this is their last chance email, when you’ll reiterate that sales close at midnight, and that they won’t want to miss out on this opportunity.
Congratulations! You’ve hosted your first launch and I’ve got a feeling that you killed it. But even after launching there are a few steps you’re going to want to take to keep the momentum and end your launch on the right foot.
Analyze your launch
After all of the chaos surrounding your first launch, you might never want to have to think about launching again. But I recommend you reconsider.
You should be collecting data, or information, about how things are going along the way so you can know what to expect for next time.
First, track how much money you brought in per day. You’ll be able to easily access this data in Teachable. Next, if you’re a little more comfortable with data, track your email analytics. Email analytics are useful because they can show you where people are engaged – or not engaged – with your launch experience.
Knowing which emails performed the best can help you when you’re refining your launch sequence for round two.