Thank you! Your submission has been received!
Oops! Something went wrong while submitting the form.
MENU
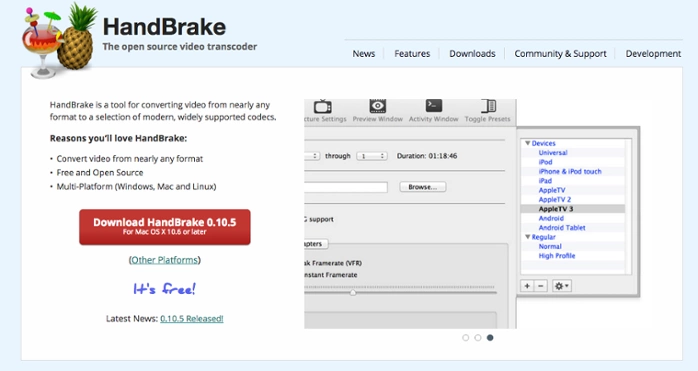
Step-by-step guides to building, launching, and selling your course.
%2520(1).png)
If you are a creator with a technical itch, the pitch is almost irresistible: describe what you want, let Claude Code build it, and launch your course platform in a weekend. No monthly platform fees. No revenue share. Total control over the student experience.
That pitch is real. Claude Code genuinely can scaffold a working LMS from your terminal in hours. But working and production-ready are two different things, and most builder-educators find that out the hard way around week three.
This guide gives you the honest version. You will learn exactly how to use Claude Code to build a course platform from scratch, with real commands, real stack decisions, and real code. You will also see precisely where the complexity compounds, so you can make the right call for your business. For context on what happens when that complexity catches up with you, see our companion post: What happens when your vibe-coded course app breaks (and it will).
Claude Code is Anthropic's agentic coding tool that runs directly in your terminal. It reads your entire codebase, writes and edits files, runs commands, and debugs errors, acting as a senior pair programmer with a 200,000-token context window. Yes, it can scaffold a fully functional course platform, including auth, payments, and video delivery. Anthropic's official Claude Code in Action course, available on both Coursera and Anthropic's Skilljar platform, confirms this architecture: you are directing an autonomous agent, not copying snippets into your IDE.
For course creators with some technical confidence, this opens a genuinely exciting door. The typical stack Claude Code reaches for when you ask it to build an LMS:
That is a legitimate production stack. Now let's build with it.
Install Claude Code via npm: npm install -g @anthropic-ai/claude-code. Authenticate with your Anthropic API key, then run claude in your project directory. Claude Code reads your filesystem and starts scaffolding immediately.
Before generating anything, spend 15 minutes writing a CLAUDE.md file in your project root. This is your project memory. Claude Code reads it at the start of every session. Include your stack decisions, naming conventions, and any constraints:
That context file is worth more than any prompt. Claude Code references it across the entire build, keeping your architecture consistent as the codebase grows.
Start the session:
Claude Code will generate a supabase/migrations/ folder with your schema, enable RLS, and write the corresponding TypeScript types. Review the output carefully. The schema decisions it makes here will shape every query you write for the rest of the project.
Tell Claude Code to implement Stripe Checkout for one-time course purchases and Stripe Subscriptions for recurring access. The critical pieces are a webhook endpoint to handle payment events, a Supabase function to update enrollment status, and idempotency logic to prevent duplicate enrollments from webhook retries. Teachable's Get Started with Payments support article is worth reading to understand what a production-grade payment integration looks like in practice.
Payments are where most AI-generated LMS builds introduce their first serious technical debt. Claude Code will implement the happy path correctly, covering customer creation, checkout session, and redirect. Three things it sometimes misses unless you ask explicitly:
Paste the webhook handler above into your Claude Code session and ask it to implement enrollStudentIdempotent against your Supabase schema. It will write the upsert logic correctly when the full context is available.
Use Mux for video hosting rather than self-hosting on AWS S3. Mux handles transcoding, adaptive bitrate streaming, and signed URL protection out of the box. Direct S3 hosting works initially but becomes expensive and complex to secure as your student count grows.
Claude Code will happily generate an S3 upload pipeline. Starting there is not wrong. Here is what you need to know before you ship to real students:
Raw S3 video delivery with CloudFront costs roughly $0.085 per GB transferred. A 45-minute HD lesson runs about 2 to 3 GB. If 100 students each watch it twice in a month, you are looking at $34 to $51 in bandwidth for a single lesson. Scale that across a full course library and the bill surprises people. Mux prices by the minute, not by gigabyte, which makes costs more predictable. Current rates are published on Mux's pricing page and have dropped significantly since late 2025. For a direct comparison of the two approaches, Mux's S3 cost comparison post is worth reading.
Signed URLs expire, which is the right security pattern, but you need to regenerate them on each page load or your video players break mid-session. Claude Code generates this logic correctly, but the expiry management becomes a source of ongoing bugs in production.
Ask Claude Code to scaffold the Mux integration:
Enable Row Level Security (RLS) on every Supabase table before you write a single query. Wiz Research found that 1 in 5 vibe-coded applications have critical security misconfigurations, with disabled or overly permissive RLS policies among the most common. RLS misconfiguration in a course platform means any authenticated user can read any student's data.
The Veracode 2025 GenAI Code Security Report, which tested over 100 LLMs across 80 real coding tasks, found that AI-generated code introduces security vulnerabilities in 45% of cases. Java had the highest failure rate at over 70%. The CLAUDE.md instruction we wrote earlier -- "RLS must be enabled on all Supabase tables" -- handles this if you are consistent. Verify it manually before you launch. In Supabase Studio, check every table in the Table Editor: the RLS toggle should be green.
Your core RLS policies for a course platform look like this:
Feed these to Claude Code and ask it to verify your entire schema has matching policies. It will flag any tables missing coverage.
The complexity that compounds as a custom LMS grows falls into four categories: video bandwidth costs, payment webhook reliability, certificate generation, and EU compliance (GDPR and VAT). Each is solvable. Each also requires weeks of engineering time that grows with your student count, not your feature list.
This is the part nobody covers in the weekend-build tutorials. You shipped. Students enrolled. Things work. Then:
None of these are insurmountable. Each one is a real engineering problem that pulls you away from creating content, building your audience, and running your education business.
A custom Claude Code-built LMS makes sense for technical creators with highly specific requirements: unusual course structures, deep integrations with proprietary systems, or a business model that no existing platform supports. For most knowledge businesses, the maintenance overhead of a custom platform outweighs the platform fees within 6 to 12 months of launch.
The calculus is simpler than it sounds. Add up the hours you spent this month on infrastructure: debugging, updating dependencies, monitoring error logs, responding to student-reported bugs. Multiply that by your effective hourly rate. Compare that number to what a dedicated platform costs per month.
Most creator-educators who run that math end up in the same place. The platform fee is not a cost. It is a salary for a DevOps engineer who never sleeps.
If you have built your proof of concept with Claude Code and validated that students will pay, Teachable is the natural next move. You keep everything you built, your curriculum, your brand, your community relationships, and hand off the infrastructure layer entirely.
Teachable handles Stripe webhooks, video transcoding and video hosting and delivery, GDPR-compliant data management, EU VAT collection, automated certificate delivery, student progress tracking, and mobile optimization. All of it is included in your monthly plan. For a full breakdown of current plan options, see Teachable's 2025 pricing and plan updates. You stop debugging and start teaching.
The Claude Code build was not wasted. It validated your business model, sharpened your understanding of what your students need, and gave you the technical credibility to customize Teachable's integrations intelligently. Build to learn, then switch to ship.
If you are ready to stop playing DevOps and focus on what you are actually good at, start a free trial on Teachable and see how much of your week comes back.
%2520(1).png)
It starts with a feeling of total power. You open Claude or Cursor, describe your dream course platform, and watch a working application emerge from nothing.
Custom enrollment flows. A branded video player. Payment logic wired exactly the way you imagined. You shipped something real without hiring a single developer.
Then launch day arrives.
A dependency update pushed by an upstream npm package silently breaks your video player at 9:47 AM, twelve minutes after your first students try to log in.
This is the part of vibe coding that nobody talks about on Twitter: the maintenance.
This article covers what actually breaks in a custom-built course platform, why AI-generated code makes those failures worse, and how to recognize when the real cost of "free" software has outgrown your calendar.
(For context on what vibe coding is and why creators are building with it, see our related post: Claude Code vs. Teachable: Which makes sense for course creators?)
Vibe coding is the practice of building software by describing what you want in natural language to an AI model and iterating on the generated code until it does what you need. For course creators, it became a path to custom platforms without hiring developers, often producing a working prototype in days rather than months.
The term was coined by AI researcher Andrej Karpathy in February 2025, and it spread fast. Creators who had spent years frustrated by the limitations of off-the-shelf platforms suddenly had a path to something custom: a course library with their exact UI, payment flows that matched their offer structure, and community integrations built precisely how they wanted them.
For a landing page, a lead magnet, or an MVP you want to test with your first ten students, vibe coding is genuinely effective. The problem appears on every day after that.
The most common failure points in vibe-coded course platforms are dependency conflicts, video player integrations, payment webhook handling, and authentication edge cases. These are areas where the AI writes plausible-looking code that passes a surface test but fails under real production conditions, especially when a third-party package updates without warning.
Here is what actually goes wrong:
A vibe-coded platform runs on a stack of npm or PyPI packages that the AI selected for convenience. AI models do not pin versions the way a disciplined engineer would. When a package in your video player's dependency tree releases a breaking update, even a minor version bump, your player can silently fail. No error page. Just a blank div where your course content used to be.
Hacker News threads from early 2025 document creators hitting exactly this wall. One commenter described it plainly: vibe coding has "exponential levels of difficulty past the simple landing page," with auth and package management as the most common sticking points. When your video player is glued together with three AI-selected libraries that nobody audited for compatibility, any one of them can take your platform down on a Tuesday morning.
AI-generated webhook handlers are particularly fragile. The code often looks correct. It receives the Stripe event, parses the payload, fires an enrollment. What it skips is idempotency logic. A duplicate event, which Stripe sends routinely during retries, triggers a duplicate enrollment or leaves a paying student locked out. Tracking down why one student got enrolled twice and another did not get enrolled at all means reading code that nobody on your team actually wrote. For a clear overview of how payment logic works on a purpose-built platform, see Teachable's Get Started with Payments support guide.
AI-generated authentication code handles the happy path well. Password reset flows that expire in the wrong timezone. Session tokens that fail to invalidate on logout. OAuth integrations that work on your machine but break for students on mobile. These bugs do not surface in a demo. They show up when real people with real devices try to access content they have paid for.
AI-generated code produces roughly 1.7 times more major issues than human-written code, according to a December 2025 analysis of 470 open-source pull requests by CodeRabbit. The code often works on first run but accumulates logic errors, poor error handling, and security gaps that only surface under real usage.
The maintenance problem has two distinct layers.
The first is readability. CodeRabbit's analysis found that readability issues were three times more common in AI-authored pull requests than in human-written ones, the single largest gap in the entire dataset. The AI targets working code, not comprehensible code. Long functions, minimal comments, nested conditionals, inconsistent naming conventions. When something breaks at 2 AM, you are reading code that was never designed to be read.
The second is error handling. AI models routinely omit null checks, skip exception guards, and write error handling that covers the path they imagined a user would take, not the paths real users actually take. A Sonar analysis of leading AI models found that more than 90% of issues in AI-generated code are "code smells," subtle structural problems that do not throw an immediate error but degrade reliability over time.
The maintenance cost is real even for experienced developers. A Harness survey found that 67% of developers reported spending more time debugging AI-generated code. A 2025 METR study found that developers using AI tools were actually 19% slower on real-world codebases, even though they believed they were 20% faster. Code ships quickly. Fixes do not follow that timeline.
When a custom-built course platform goes down, there is no SLA, no rollback mechanism, no on-call engineer, and no support team. You debug alone or pay a freelancer emergency rates to decode code they did not write. Every minute your platform is down is a minute your students are filing chargebacks and losing trust in you as an educator.
Here is the scenario. Two months of building with Claude. Beta students loved it. You open enrollment on a Tuesday morning, send your launch email to 4,000 subscribers, and within fifteen minutes your video player goes blank. An npm package your AI-generated code depended on released a breaking patch at midnight.
The code lives in a GitHub repo you have added to and tweaked but never fully understood. You search Stack Overflow. You ask Claude to debug it. Claude suggests three different fixes, each of which introduces a new error. Two hours later, your launch window is gone. Some students have already asked for refunds.
The New Stack has documented how vibe-coded systems under real load surface failure modes that were invisible during testing, with experts warning of "catastrophic explosions" in 2026 as more production apps built this way hit real scale and real users. The core issue: AI has no awareness of what it does not know, and neither does the creator who prompted it.
The real cost of a custom-built course platform is not the build. It is everything after: developer time to debug AI-authored code, unplanned infrastructure costs, dependency management, security patches, GDPR compliance, and the opportunity cost of your own time spent on DevOps instead of teaching.
Here is what "free" actually costs:
The hidden cost is attention. Every hour spent managing infrastructure is an hour not spent on curriculum, coaching, or building the relationships that make an education business work. You became a creator to teach, not to run your own DevOps operation.
AI models sometimes hallucinate package names, generating import statements for npm or PyPI packages that do not exist or that exist under slightly different names. Attackers have started registering malicious packages that match the names AI models commonly hallucinate. In September 2025, a malicious npm package called "nodejs-smtp" was discovered mimicking the legitimate "nodemailer" library, with 347 downloads before removal. If your vibe-coded app installed it, your students' data was at risk. This makes a vibe-coded production app an ongoing maintenance commitment, not a finished product you walk away from.
Moving to a dedicated course platform makes sense when maintenance costs you more time than building new features, when downtime affects student trust, or when you have outgrown what you can reasonably debug yourself. That is not a consolation prize. That is graduating to infrastructure purpose-built for exactly what you are doing.
The honest framing: you built a custom platform because you wanted control and flexibility. That was a smart instinct for the prototype phase. The value of your education business does not come from your server architecture. It comes from your expertise, your curriculum, and your relationship with your students. Every hour you spend maintaining infrastructure is a direct tax on the thing that actually generates revenue.
Teachable handles the parts of a course platform that are genuinely hard to build well and extremely tedious to maintain: video hosting and delivery via adaptive bitrate streaming, payment processing powered by Stripe with 0% transaction fees on paid plans via teachable:pay, GDPR compliance, student enrollment logic, and certificate generation. The platform maintains 99.9% uptime with a dedicated support team available Monday through Friday, 8 AM to 8 PM ET.
Teachable also supports the business model flexibility that made custom-building feel attractive in the first place. You can sell courses, coaching, memberships, and digital downloads, with bundles, certificates, and learning paths, without patching a single package. The platform is built for creators who are serious about their education business. For a full breakdown of current plans and pricing, see the 2025 pricing and plan updates post.
If maintaining your vibe-coded platform has started to feel like a part-time job, that is useful information. You have validated that students want what you are building. You have proven the model. The smart next move is to stop building the building and start teaching inside it. Start a free trial on Teachable and migrate your existing content to see how much of your week comes back.
%2520(1).png)
The case looks obvious at first. Claude Code can scaffold a Next.js app, wire up Stripe webhooks, and write a Supabase schema in an afternoon. You have watched the demos and done the math on Teachable’s current Starter plan, and building your own course platform starts to feel like the smarter move. The assumption is that AI can generate the infrastructure, so paying for it feels unnecessary.
This is a question worth answering carefully. The creator economy in 2026 is full of people who are technically capable of building custom platforms, and increasingly reaching for AI tools to do it faster. Some of them should build. Most of them should not. The line between those two groups has nothing to do with technical skill. It comes down to what you actually want to be doing with your time.
This piece walks through both paths in real detail: what it takes to build a course platform with Claude Code, where the hidden costs appear, and how to decide which approach actually serves your education business. No glossing over costs on either side.
Claude Code is Anthropic’s agentic coding tool that runs in your terminal and can write, edit, and execute code across your entire codebase. It can generate the core components of a course platform: authentication, payment flows, content delivery, and student dashboards. Generating the code is only the first step of running a real platform.
Claude Code is available starting with the Claude Pro plan at $20/month, with higher usage limits on the Max plan starting at $100/month. See Anthropic’s current pricing for the latest plan details. It is a capable agentic coding assistant: give it a task, and it will create files, run commands, read your codebase, and iterate on its own output. For technical creators who want to prototype fast, it is impressive.
Here is what Claude Code can realistically scaffold for a course platform in a productive session:
That is a real foundation. If you are building an internal training tool for your company, a one-off cohort program, or a prototype to validate a course idea before investing in infrastructure, Claude Code can get you there in days rather than weeks. The generated code is not always production-ready, but it is a solid starting point for a developer who knows how to review and harden it.
The critical word there is developer. Claude Code accelerates technical work. It does not replace the judgment of someone who understands what production-ready means. If you are not the person who will debug a 3am database connection error, you need that person on retainer before you start building.
A custom course platform built with Claude Code typically costs $80 to $200/month in infrastructure before you count developer time. That is comparable to, or more expensive than, Teachable’s Builder plan at $89/month with 0% transaction fees, once you factor in hosting, video delivery, email, and payment processing.
The comparison that makes building look attractive is usually Teachable’s Starter plan versus a $5 VPS. That is not a fair comparison. Here is what a production-ready custom platform actually requires:
Add it up: $90 to $190/month in infrastructure, before a single hour of your time or a developer’s. Compare that to Teachable’s Builder plan at $89/month with zero platform transaction fees and unlimited student capacity. The cost gap that looked obvious on a napkin disappears under real numbers.
Teachable’s June 2025 pricing refresh introduced four new plans. The Starter plan costs $39/month with a 7.5% transaction fee and one published product. The Builder plan removes all transaction fees for $89/month. Growth and Advanced plans add automation, webhooks, and higher product limits at $189/month and above.
The Starter plan triggers most of the “Teachable alternatives” searches, and the frustration is legitimate. A 7.5% platform fee on top of Stripe’s 2.9% means you are giving up nearly 11% of every sale to get started. On a $200 course, that is $22 per enrollment before you have paid for a single ad.
Here is the full picture of Teachable’s current plans:
Worth noting: bundles, memberships, and community spaces do not count toward your published product limit on any plan. That matters if your business model includes bundling courses or layering in a membership community.
If you are currently on the Starter plan and frustrated by the transaction fee, the honest calculus is this: switching to Builder at $89/month pays for itself at around $667/month in course sales. That is not a high bar for a creator who is actively selling.
Claude Code excels at generating custom integrations, automating repetitive dev tasks, and building one-off tools that no off-the-shelf platform covers: custom onboarding flows, API integrations with existing tools, and internal admin dashboards. It is a force multiplier for technical work, not a replacement for a course platform.
Some real-world cases where building makes sense:
Outside those scenarios, building your own tends to look like cost savings and feel like technical ambition, but functions in practice as a long-running distraction from the actual work of educating people.
The Day 2 problems on a custom course platform include webhook reliability, GDPR compliance, failed payment recovery, video transcoding for different devices, student support infrastructure, and platform security updates. None of these problems are insurmountable, but each one requires someone’s time and attention.
Stripe sends a checkout.session.completed event when a student pays. Your handler has to receive it, verify the webhook signature, update the enrollment database, send a confirmation email, and do all of this idempotently, because Stripe will retry failed events and you do not want to enroll the same student twice or send five welcome emails. Claude Code will write this logic for you. Keeping it running as your traffic grows, your database schema evolves, and Stripe occasionally changes its event structure is ongoing maintenance work.
Raw video files uploaded by course creators need to be transcoded into multiple resolutions for different devices and connection speeds. Mux and Cloudflare Stream handle this automatically. If you are managing your own video pipeline, you are either paying for a transcoding service, which brings you back to the infrastructure cost table above, or dealing with student complaints that videos will not play on mobile.
If any of your students are in the EU, you are responsible for data processing agreements, the right to erasure, and cookie consent flows. A platform handles this infrastructure for you. On a custom build, it is your compliance problem. Claude Code can generate the cookie banner, but the legal exposure from getting it wrong is not a code problem. For a deeper look at what compliance infrastructure looks like in a purpose-built learning platform, see our guide to choosing an LMS for continuing education.
Subscription businesses lose meaningful revenue to failed payments. Teachable’s Builder plan includes automated abandoned-cart emails. On a custom platform, you are building a dunning system: retry logic, failure notification emails, and student communication flows. Skip it and you are leaving money on the table every month.
Dependencies have vulnerabilities. Next.js releases security patches. Supabase updates its client libraries. On a SaaS platform, these updates happen without your involvement. On a custom platform, you are responsible for monitoring, testing, and deploying them, or you are running outdated software that is vulnerable to known exploits.
Each of these is a task that requires someone’s time. For a solo creator running a course business, that someone is you.
Teachable makes sense when your goal is running an education business rather than building platform infrastructure. If you want to spend your time creating content, teaching students, and growing revenue, a purpose-built platform lets you do that from day one.
For most knowledge business creators, the real comparison is not Teachable vs. a custom platform. It is Teachable vs. the opportunity cost of six months of infrastructure work. The platform cost shows up on your credit card statement. The cost of not launching a second course, not improving your content, and not building your student community while you are debugging webhook handlers is invisible, but real. For more on building a course business that compounds rather than stalls, see our guide to making money selling courses.
Teachable’s Builder plan, at $89/month with zero transaction fees, gives you:
That is not a consolation prize for creators who lack the technical skills to build. It is the infrastructure layer that frees you to do the work that actually requires your expertise: designing curriculum and teaching students in ways that actually change what they can do.
The honest peer recommendation here is this: if you are reaching for Claude Code to avoid a $39 Starter plan fee, the infrastructure math does not support it. If you are on the Builder plan and frustrated by a specific limitation, a custom integration, a unique content format, or a workflow your current setup cannot handle, that is when Claude Code becomes useful as a tool to extend your platform rather than replace it.
The builders who get the most out of AI tools are not the ones replacing their course platform. They are the ones using AI to create better content faster, and letting Teachable handle the infrastructure that makes selling and delivering that content reliable. For more on how established creators are using AI to scale their content output rather than their DevOps burden, see how to make money selling courses.
Claude Code is a powerful tool for technical creators who need custom integrations, internal tools, or platform features that do not exist off the shelf. For most course creators focused on growing their education business, Teachable’s purpose-built infrastructure delivers more value than the equivalent time and cost of building from scratch.
If you are evaluating this decision right now:
Most creators land in the second category. The technical capability to build something and the business case for building it are not the same thing, and AI tools, as good as they have gotten, do not change that calculus.
Start your free trial | See Teachable’s plans | Talk to our team
The pitch is seductive. Claude Code can scaffold a Next.js app, wire up Stripe webhooks, and write a Supabase schema in an afternoon. You've watched the demos. You've done the math on Teachable's new Starter plan — $39/month plus a 7.5% transaction fee — and you've decided that building your own course platform is the obvious move. Why pay for infrastructure when AI can generate it for you?
This is a genuinely interesting question, and it deserves a genuinely honest answer. The creator economy in 2026 is full of people who are technically capable of building custom platforms — and who are increasingly reaching for AI tools to do it faster. Some of them should build. Most of them shouldn't. The line between those two groups isn't technical skill. It's about what you actually want to be doing with your time.
This article walks you through both paths in real detail: what it takes to build a course platform with Claude Code, where the hidden costs appear, and how to decide which approach actually serves your education business. No hand-waving, no vendor spin — just the honest picture a senior developer friend would give you over coffee.
Claude Code is Anthropic's agentic coding tool that runs in your terminal and can write, edit, and execute code across your entire codebase. Yes, it can generate the core components of a course platform — authentication, payment flows, content delivery, and student dashboards — but generating the code is only the first step of running a real platform.
Claude Code is available starting with the Claude Pro plan at $20/month, with higher usage limits on the Max plan starting at $100/month. It's a capable agentic coding assistant: give it a task, and it will create files, run commands, read your codebase, and iterate on its own output. For technical creators who want to prototype fast, it's genuinely impressive.
Here's what Claude Code can realistically scaffold for a course platform in a productive session:
That's a real foundation. If you're building an internal training tool for your company, a one-off cohort program, or a prototype to validate a course idea before investing in infrastructure, Claude Code can get you there in days rather than weeks. The generated code isn't always production-ready, but it's a solid starting point for a developer who knows how to review and harden it.
The critical word there is "developer." Claude Code accelerates technical work — it doesn't replace the judgment of someone who understands what production-ready means. If you're not the person who'll debug a 3am database connection error, you need to have that person on retainer before you start building.
A custom course platform built with Claude Code typically costs $80–$200/month in infrastructure before you count developer time. That's comparable to or more expensive than Teachable's Builder plan ($89/month, 0% transaction fees), once you factor in hosting, video delivery, email, and payment processing.
Let's run the real numbers. The comparison that makes the "build your own" option look attractive is usually Teachable's Starter plan versus a $5 VPS — but that's not a fair comparison. Here's what a production-ready custom platform actually requires:
Add it up: $90–190/month in infrastructure, before a single hour of your time or a developer's. Compare that to Teachable's Builder plan at $89/month with zero platform transaction fees and unlimited student capacity. The cost gap that looked obvious on a napkin disappears under real numbers.
Teachable's June 2025 pricing refresh introduced four new plans. The Starter plan costs $39/month with a 7.5% transaction fee and one published product. The Builder plan removes all transaction fees for $89/month. Growth and Advanced plans add automation, webhooks, and higher product limits at $189/month and above.
The plan that triggered most of the "Teachable alternatives" searches this year is the Starter plan — and honestly, the frustration is legitimate. A 7.5% platform fee on top of Stripe's 2.9% means you're giving up nearly 11% of every sale to get off the ground. On a $200 course, that's $22 per enrollment before you've paid for a single ad.
Here's the full picture of Teachable's current plans:
Worth noting: bundles, memberships, and community spaces don't count toward your published product limit on any plan. That matters if your business model includes bundling courses or layering in a membership community.
If you're currently on the Starter plan and frustrated by the transaction fee, the honest calculus is this: switching to Builder at $89/month pays for itself at around $667/month in course sales. That's not a high bar for a creator who's actively selling.
Claude Code excels at generating custom integrations, automating repetitive dev tasks, and building one-off tools that no off-the-shelf platform covers — things like custom onboarding flows, API integrations with existing tools, and internal admin dashboards. It's a force multiplier for technical work, not a replacement for a course platform.
This is the part of the article where we're honest: Claude Code is genuinely excellent at a specific kind of work. If you have a technical need that a platform like Teachable doesn't cover out of the box, it's a powerful tool for filling that gap. Some real-world examples where building makes sense:
Outside those scenarios, "build your own" tends to be a decision that looks like cost savings and feels like technical ambition — but functions, in practice, as a long-running distraction from the actual work of educating people.
The Day 2 problems on a custom course platform include webhook reliability, GDPR compliance, failed payment recovery, video transcoding for different devices, student support infrastructure, and platform security updates. These aren't unsolvable, but each one takes time that isn't going toward your course content.
Claude Code can write the code for your Stripe webhook handler in twenty minutes. Running that handler reliably for a year is a different project. Here's what the production reality looks like once students are paying you money:
Stripe sends a checkout.session.completed event when a student pays. Your handler has to receive it, verify the webhook signature, update the enrollment database, send a confirmation email, and do all of this idempotently — because Stripe will retry failed events, and you don't want to enroll the same student twice or send five welcome emails. Claude Code will write this logic for you. Keeping it running as your traffic grows, your database schema evolves, and Stripe occasionally changes its event structure is ongoing maintenance work.
Raw video files uploaded by course creators need to be transcoded into multiple resolutions for different devices and connection speeds. This is what Mux and Cloudflare Stream do automatically. If you're managing your own video pipeline, you're either paying for a transcoding service (which brings you back to the infrastructure cost table above) or dealing with student complaints that videos won't play on mobile.
If any of your students are in the EU, you're responsible for data processing agreements, the right to erasure, and cookie consent flows. A platform handles this infrastructure for you. On a custom build, it's your compliance problem. "Claude Code can generate the cookie banner" is true — but the legal exposure from getting it wrong isn't a code problem.
Subscription businesses lose meaningful revenue to failed payments. Teachable's Builder plan includes automated abandoned-cart emails. On a custom platform, you're building a dunning system — retry logic, failure notification emails, student communication flows — or you're leaving money on the table every month.
Dependencies have vulnerabilities. Next.js releases security patches. Supabase updates its client libraries. On a SaaS platform, these updates happen without your involvement. On a custom platform, you're on the hook for monitoring, testing, and deploying them — or you're running outdated software that's vulnerable to known exploits.
None of these problems are insurmountable. But each one is a task that needs someone's time and attention. If you're a solo creator running a course business, that someone is you.
Teachable makes sense when your goal is running an education business rather than building platform infrastructure. If you want to spend your time creating content, teaching students, and growing revenue — rather than debugging deployment pipelines — a purpose-built platform lets you do that from day one.
There's a version of the "build your own" conversation where the math genuinely works out. If you're a developer who enjoys the infrastructure work, if you have specific requirements no platform covers, or if you're building at a scale where platform fees represent serious money — building can be the right call. But that's a much narrower group than the Teachable alternatives search traffic suggests.
For most knowledge business creators, the real comparison isn't "Teachable vs. my custom platform." It's "Teachable vs. the opportunity cost of six months of infrastructure work." The platform cost is visible on your credit card statement. The cost of not launching a second course, not improving your content, and not building your student community while you're debugging webhook handlers — that's invisible, but it's real.
Teachable's Builder plan, at $89/month with zero transaction fees, gives you:
That's not a consolation prize for creators who can't build. It's the infrastructure layer that frees you to do the work that actually requires your expertise: designing curriculum, teaching students, and building the kind of learning experience that creates real transformation.
The honest peer recommendation here is this: if you're reaching for Claude Code because you want to avoid a $39 Starter plan fee, the infrastructure math doesn't support it. If you're on the Builder plan and frustrated by a specific limitation — a custom integration, a unique content format, a workflow your current setup can't handle — that's when Claude Code becomes genuinely useful, as a tool to extend your platform rather than replace it.
The builders who get the most out of AI tools aren't the ones replacing their course platform. They're the ones using AI to create better content, faster — and letting Teachable handle the infrastructure that makes selling and delivering that content reliable.
Claude Code is a powerful tool for technical creators who need custom integrations, internal tools, or platform features that don't exist off the shelf. For most course creators focused on growing their education business, Teachable's purpose-built infrastructure delivers more value than the equivalent time and cost of building from scratch.
If you're evaluating this decision right now, here's the honest framework:
Most creators land in the second category. The technical capability to build something and the business case for building it aren't the same thing — and AI tools, as good as they've gotten, don't change that calculus.
If you're ready to stop thinking about infrastructure and start building your education business, Teachable's free trial lets you try the platform before you commit. The Builder plan's zero-fee structure and course delivery tools are worth a real look before you spin up a VPS.

The right audio editing software can do a lot for your business. Recording good quality audio for your online course is just one part of your content creation process. But, editing is where you tie things together and really make your content shine. Choosing the perfect editing software can be overwhelming with so many different choices available, but it doesn’t have to be. You just have to know what to look for when shopping. And that’s where we come in. Keep reading for everything you need to know about choosing the right audio editing software for beginners and the top tools on the market.
There are a lot of options to choose from when it comes to audio editing software and plenty of functions to understand when it comes to choosing the perfect tools for your business. Here are a few things to consider and remember before you commit and make a purchase:
Audio editing tools’ prices can range anywhere from $0 to $1,000 or more, depending on the complexity of the software. When you decide which one to choose from, start with the budget. You can find good audio editing software no matter your budget, so don’t get too concerned about extending your budget. In fact, knowing your budget limits will help you actually minimize the pool of editing software and eliminate decision fatigue.
It’s a small detail that’s very easy to overlook, but you should always make sure you’re choosing an audio editing software that’s compatible with your computer system. For example: If you’re using Windows, Garage Band is not going to be the best editing software option for you because Windows don’t support Apple products and vice versa.
When it comes to choosing the perfect editing software for beginners, it’s always best to stick with the “less is more” mindset. Producing good quality audio mostly depends on the microphone and the environment you’re recording in, so the editing process is merely that extra cherry on the top. This means, you don’t really need all the fancy features that a professional music producer might need.
The important thing to keep in mind while choosing the easiest audio editing software for beginners ease of use. How easy is the software to use? Remember: Less complicated mechanics and features makes it simpler for you. So, as a beginner, start with less. You can always upgrade later.
The first thing you want to do before choosing the right audio editing software is to familiarize yourself with the functions you’ll need to produce good quality audio. Here are some key functions you’ll want to look for when choosing your software:
The majority of audio editing software out there will have all of these functions with some even having more. You might have to try different ones to see which ones you’re the most comfortable with.
If you’re on a tight budget but still want to produce high-quality audio, you’re in luck. There are some really great audio editing software for beginners that have great functionality and are totally free.
GarageBand is the native macOS audio editing software that is totally free and very easy to use. Its only downside is that it’s available exclusively to Apple users. This editing software has a clean and very straightforward interface, which makes it a top pick for beginners.
When creating a new project, you can either upload pre-recorded audio into the software, or you can record your audio straight with GarageBand. You can easily add up to 255 audio tracks when editing and navigate base audio, background music, and any other sound effects you’re looking to add to your audio. There is a built-in sound library for GarageBand, so if you’re looking for a way to improve your audio, you can browse the library for sounds and music that is free to use.
Editing is also extremely easy with GarageBand. You have all the controls in the “Edit” tab at the top of your screen with shortcuts that allow you to perform actions like “cut,” “paste,” and “undo” with just a few buttons. You can also drag and drop any audio clips however you like, with just one click of your mouse. GarageBand allows you to export your audio in four different formats: AAC, MP3, AIFF, and WAVE. It also allows you to select the quality of sound when exporting, which will affect the size of your audio file.
Audacity is hands down one of the best free audio editing software out there. It has built a large following throughout the years, which means company is constantly updating it. With Audacity, you’re able to upload your pre-recorded audio or record your audio within the software. It also offers multiple audio tracks, which allows you to work with different audios at the same time while editing.
What makes Audacity stand out from the other audio editing tools is the fact that it’s widely available for all computer systems—Windows, macOS, and Linux. And on top of that, it has very modest, minimal system requirements. And, it doesn’t require you to have the newest computer system to run it comfortably and without interruptions.
Audacity also has a large built-in library of sounds available for usage. You can easily cut, paste, and mix together audio clips with a simple click and drag of your mouse. This make the editing process smoother and effortless. However, all edits are destructive, meaning there is no way to undo an edit without losing all the processes done after it. This makes the editing process less flexible than other editing software.
In addition, Audacity has a large library of plug-ins available that can all improve the quality of your sound. These plug-ins aren’t included with the initial download of the software and need to be installed separately. But it’s worth your time to do so—they can truly change the way your audio sounds, even if you don’t have the best microphone.
Youtube creator Jason R. has a great video explaining and showcasing the difference Audacity plug-ins can make when implemented during the editing process:
Another great free audio editing software for beginners is Ocenaudio. It’s not as complex as Audacity, but it still offers a great array of built-in tools and features that allow you to easily edit your audio files. It has a very straightforward and simple interface that allows you to see all the files you’re working on in front of you. You can easily cut, clip, paste, and move audio clips within the software and apply different effects and filters.
This software is also available for Windows, Linux, and macOS operating systems and has tons of plug-ins available to install, just like Audacity. Ocenaudio is less popular than Audacity and GarageBand, and therefore, doesn’t update as frequently.
If the audio editing software we mentioned above doesn’t fit in with what you’re looking for, then we have a great paid alternative for beginners, too.
Adobe Audition stands out from the crowd as audio editing software. Interestingly, it wasn’t originally created with musicians in mind like all the other software were. It was developed specifically for content creators, podcasters, and video producers, which makes it a perfect software for online course creators. Just like all Adobe Cloud products, Adobe Audition is available for Windows, Linux, and macOS operating systems. And it’s included in the Creative Cloud subscription. So, if you’re already an avid user of Adobe CC, this software is a perfect option.
Adobe Audition has a clean and straightforward interface that allows you to see the audio tracks you’re editing. You can work with multiple audio tracks at the same time, and it allows you to cut, clip and move the clips with just one click. Removing background noise is very easy and possible with one button, which can save you effort and time. This allows you to focus on editing the content of your audio.
One downside of using Adobe Audition is the price. If you’re not a user of other Adobe products, it has a monthly subscription starting at $20/month if you choose their annual plan.
The pressure of using the newest, fanciest, and trendiest audio editing software is real for every creator. But, the good news is that you don’t need much to produce high-quality audio for your online course lessons. So, determine your budget and your needs, and don’t worry about the trendiest software. You can always upgrade your software and tools as you progress and grow your online business.

As a language model trained on a variety of texts, ChatGPT has become a popular tool for creating content, generating ideas, and providing insights. Its features have an uncanny way of synthesizing information. And it has a way of understanding natural language input to produce coherent and relevant responses. This has made it a valuable asset for writers, marketers, researchers, and anyone who needs to generate content quickly and efficiently.
Using ChatGPT for the first time can be an exciting and rewarding experience. But it can also be overwhelming if you don’t know what to expect. It’s also important to understand the limitations of ChatGPT and prepare yourself for the amount of work needed on your end to create quality content. It’s a great tool, but it’s not at the point where it can emulate your authentic voice or your expertise.
So we’re going to guide you through the process of using ChatGPT to create content. We’ll cover it from start to finish and give you an idea of the level of quality to expect and the limitations of ChatGPT. Including an idea of how much work you’ll need to put into making the AI content up to par.
{{aicurriculum-component="/blog-shortcodes/blog-cta"}}
ChatGPT has been lauded as a very intelligent, ML-based robot that can replicate human work in a way that is more accurate, more efficient, and of higher quality. The global ML (machine learning) market size already reached an estimated 21.17 billion in 2022. And this number is expected to reach 209.91 billion by 2029. With the ever-increasing prevalence of ML-based tools such as ChatGPT, it’s not difficult to see why.
But while artificial intelligence carries many promises, we are not at the point yet where this tool can begin to create high-quality content. AT least not on its own without human supervision and intervention. One of the biggest limitations ChatGPT has is that its knowledge only extends as far as 2021. Leaving it in the dark regarding almost a year and a half of recent developments.
Of course, this isn’t a problem when creating evergreen content. But it can pose a big problem if you’re trying to create content covering a recent event or trend. Or if your content is specific to a rapidly changing industry or field.
For detail-oriented instructions or complex topics, ChatGPT can be great for providing an outline for your content. But it will most certainly need a lot of editing and input from you. That will make sure that the content is specific enough to be useful. ChatGPT is not typically capable of addressing the in-depth aspects of the topic you are writing about. Which is, of course, the most important part of any article teaching someone how to do something for the first time.
Now that we know the limitations it poses, let’s move on to how to use it!
The first step in utilizing ChatGPT is to choose a topic that aligns with one of your content buckets and provide the input. You may find that your initial request is too complex for ChatGPT. You can try rephrasing your request or simplifying your request as much as possible, opting to handle the more complex aspects of the content on your own.
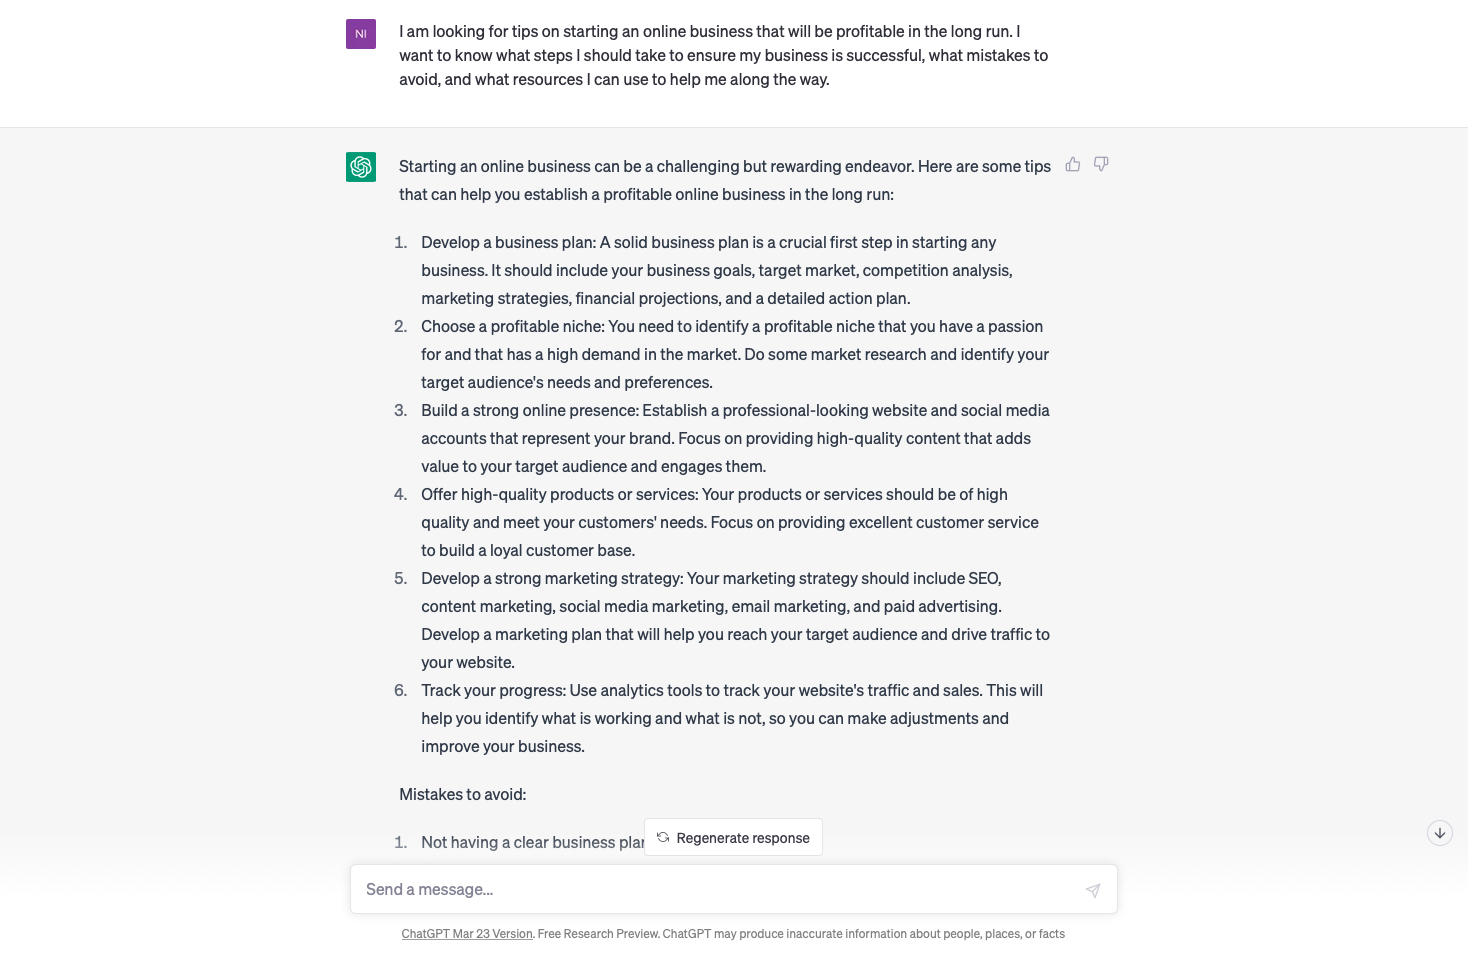
To choose a topic, start by brainstorming ideas and narrowing down your focus. For example, if you are writing an article on “How to Start a Successful Online Business,” you might provide input such as:
“I am looking for tips on starting an online business that will be profitable in the long run. I want to know what steps I should take to ensure my business is successful, what mistakes to avoid, and what resources I can use to help me along the way.”
{{aiprompts-component="/blog-shortcodes/blog-popup"}}
It is essential to review the generated ChatGPT content carefully. And make any necessary edits or revisions to ensure that the content meets your needs and goals.
One of the advantages of using ChatGPT is that it can generate a large amount of content quickly. Which can save you a lot of time and effort. However, it is important to keep in mind that AI-generated content is far from perfect. ChatGPT content will require some time editing or revising depending on how specific your needs are. As you can see in the example below, it will give you quite a bit of content. But it will not sound like your typical writing style, or have any of your expertise involved in it.
After reviewing the AI-generated content, it’s time to edit and personalize the content to make it your own. This step involves adding your voice and perspective to the content. Make it more engaging and relevant to your target audience. That’s why it makes for a great outlining tool, but not a great content creation tool from start to finish.
To personalize the content, you can start by adding your insights, experiences, and opinions to the content. This will help make the content more unique and relevant to your target audience. Additionally, you can make stylistic changes to the content, such as changing the tone, style, or formatting, to better reflect your brand or personality. ChatGPT will create generic content for you in a structured manner. But it’s up to you to add the details that will make the content worthwhile to read.
Keep in mind that your audience wants to hear from you. So you really need to make sure your content feels like it’s coming from you. Not from ChatGPT or another bot.
Review your content before publishing. Make sure to read the entire article so that you can ensure your editorial additions mesh with the tone and voice of the article written by ChatGPT. You should also treat it like other content you would publish. That means adding images and other multimedia elements to your content to cater to different learning styles.
ChatGPT can be a great tool to help you create content when used correctly. It is a time-saver for content creators because it can do research and write content in a fraction of the time it would take a human to do the same. But it’s important to understand the limitations of ChatGPT. As it stands currently, ChatGPT will require a large amount of editing and input by humans to provide high-quality content.
Like a standing mixer that saves time for the baker by mixing the flour while they prepare the other ingredients, ChatGPT makes content creation easier by handling some of the more routine tasks. Like any tool, when used properly, it can improve your content and help you save time while you focus on more important aspects of content creation, like incorporating your perspective and experiences while including in-depth instructions and relevant current developments surrounding the topic you are writing about.

Video stimulates auditory and visual needs in viewers, making it more easily digestible than other mediums such as photos or writing alone. And, more than 80% of video creators have stated that videos have not only increased traffic on their sites but have also directly increased sales and leads on their products and services. In other words, ROI on video content is high and steadily growing. We want to help you record better video at home.
Contrary to belief, you don’t have to call upon a pro when creating stellar video content for your online course. All you need is the drive to get it done and the know-how to record video content at home that will continue to maximize and grow your business. Explore tried and true ways to record professional-looking videos from home.
Have you ever been watching video content and asked yourself, how did they create this high quality video? Chances are your favorite creator started with a clear plan before shooting.
When creating video content, whether it be for your online course, social media, or YouTube, you want to keep in mind your audience and what value they’re getting from your content. By writing a script (or even just an outline of talking points), you’re able to get inside the head of your viewers and create a video that answers their burning questions.
Depending on your comfort level in the video content creation realm, you may want to write out a full script and pair it with a storyboard. Going into recording and video production with an ending or ultimate video goal in mind will ensure you capture content that not only grasps your audience’s attention but also is valuable and useful.
It’s human nature to analyze everything you see, especially when watching videos. A distracting background in your course video could easily take attention away from you and put it on something that has nothing to do with the message you wish to get across. When choosing the right place to shoot, these three main options won’t steer you wrong:

Not everyone is comfortable on camera. However with practice, you’ll be able to perfect your camera presence overtime. When you’re uncomfortable on camera, it’s noticeable. Though camera presence may seem like a small detail when compared to the attention and time spent on the actual content you’re delivering on screen, it’s still important to consider when engaging with an audience, especially in a home video for your online course.
The first step to appearing more confident and credible on camera is nailing good posture. Confidently sitting up straight and speaking to the camera makes your viewers feel like you’re speaking directly to them from a place of authority and that what you have to say is valuable.
Say every word like you mean it. While you don’t have to yell to get your point across, you want to make sure that your audience can clearly understand all the important information you’re delivering in your video. Projecting your voice exhibits confidence on camera and is non-negotiable to recording good video content.
We understand the temptation to reach for casual attire, but dressing the part can help boost your own confidence on camera and it shows your viewers you’re taking yourself and your content seriously.
When you’re passionate about the subject you’re speaking about, it’s evident. It encourages others to be just as enthusiastic, which for you means more captivated viewers that can’t wait to see what video content you put out next—or in the case of video content for your students, what more high value content you offer in your online course.
Have you ever stepped into the sun to take a photo and it’s turned out like a professional portrait? That’s a testament to just how important good lighting is when taking pictures and—you guessed it—recording video content at home. Natural light from the sun trumps all, but if you’re unable to get good natural light indoors, you have other beginner-friendly options to sort through.
When you’re starting out recording video content for your business or online course, it’s essential to start small and cut unnecessary costs. However, a few tools can make recording video at home somewhat of a seamless process.
Recording content on your phone? Set optimal settings for capturing video.
You’d be surprised how many of your favorite content creators record on their smartphones or use their phone’s camera and a camera app even when they have pro cameras at their disposal. The trick is to go into your settings and switch over to anything that will make your videos clean. This includes, upping the filming quality to HD and tweaking the FPS to something optimal (between 24-30fps).
As a rule of thumb, you should use your back camera when recording video (as it’s usually much higher quality than that front selfie camera). Also, don’t forget to record in landscape unless you’re uploading to a platform that works best with vertical videos. (Of course, if you’re ready to upgrade your camera, we can help with that, too.)
There’s nothing worse than getting excited to record top-notch video content just to realize something was off—after you’ve already finished recorded. Before stepping into recording, do a test shot (or two for good measure) to double check lighting, video clarity, audio quality, and the like.
Additionally, allow yourself to take breaks to make sure nothing unexpected has occurred while recording—like your memory filling up or your camera shutting off.
We believe in good content shouldn’t get bogged down with complicated tech know-how or jargon. Simply, tweaking a few things can help you learn how to shoot and record better video at home without adding more work or breaking your business’s budget.
{{firstdigital-component="/blog-shortcodes/blog-popup"}}

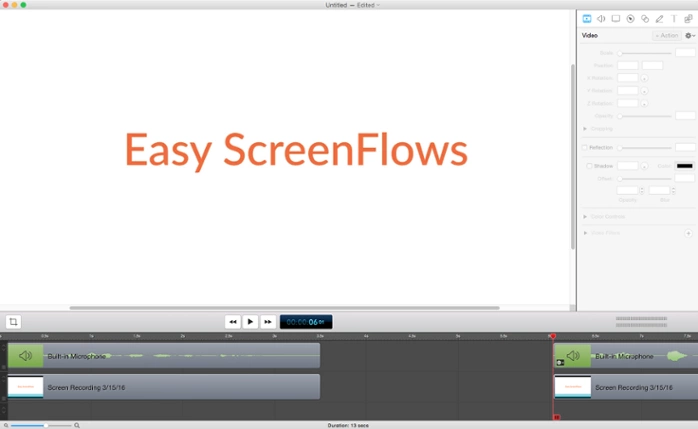
Many online courses are built on a foundation of slideshow videos with voiceovers because they’re quick to create, easy to follow, and when done correctly, quite beautiful. We’re a big proponent of slide videos here at Teachable, so we wanted to share with you exactly how to create ScreenFlow slide content.
Before beginning, you want to know that there are three common types of video content you can create for your course.
Talking head videos are recordings of you sitting and talking to your camera. These are great for conveying emotion and best used in introduction videos or videos meant to excite and engage your audience.

Screencasts are great for student learning and they’re quick to create. Screencasts make your video easy to follow and are ideal if you’re explaining something complicated or moving at a fast pace.
Computer screen and voice: Best for technology tutorials and showing step-by-step instructions for how to do something.

Best used if you don’t want to edit together talking head videos with screencasts and voice. Students engage well with this content.

High quality: Only using screencasts can get boring, so edit together talking head videos with screencasts and voice, or change up video types between lessons.
or
Rough: Use Screenflows and video. It 100% works, but don’t try to charge over $200 for a course filmed this way.
As you create slides for your online course, remember the goal to convey valuable information and help your students reach their transformation as quickly as possible. Before creating your slides, you need to make a decision: Do you want to create slides with a voiceover? Or do you want slides with a video of you presenting in the bottom right hand corner?
You can incorporate both into your course. But, be mindful to leave space on your slides for video. Below, see an example of how the designer places an orange box on her slides where the videos appear to remind us not to place any content in this area.

If you’re advanced with videos and editing, you can shoot talking head videos and edit in clips of the slides.
In this next section, we’re sharing tips to design your own Screenflow slide content.
Before you start designing anything, make sure your slides are in the video format you will be shooting in. For example, we shoot in a 16:9 aspect ratio, so in Keynote we design the slides in widescreen format.
Using slides that are in the same format as your video ensures that no information is cut off and makes editing way easier.
Don’t put paragraphs of information on your slides. It’s too much to take in and your audience may become distracted trying to read what’s on the slides and will stop listening to you. Instead, use bullets or very short sentences. Use multiple slides for a point, if needed.
If you already have a brand, use your branded color palette. But, if you don’t have a brand or color palette already, that’s OK. Picking colors for your slides is an easy place to start. Choose two to three colors to use throughout your slides.
One dark color and one light color is a good place to start. Then choose an accent color for shapes or other design elements, like calling out important points.
As you can see below, the colors in the right hand column look great together. The light blue pops on the charcoal grey background and so does the dark green text on the pale green background.
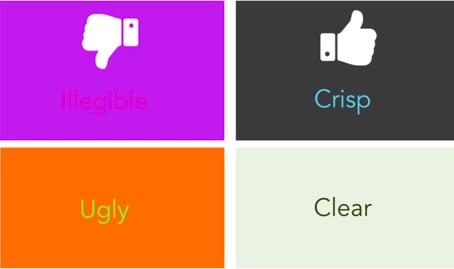
They’re also easy to read, which is definitely another factor when you’re choosing your colors. Keep in mind legibility and how the colors look together.
For text, use one color for the header text or when you want to emphasize an important word. And use another color for the body text.
Choose a serif or sans serif font when creating ScreenFlow slide content. These two fonts are the easiest to read. A serif font has the tails on the edges of the letters, while the sans serif does not.
Avoid using decorative or script fonts for your slides because they’re harder to read, especially when small. They are great to call out an important word or phrase (especially if it’s the only word on the slide). Yes, these fonts add pizzazz to your slides, but use them in moderation.
Here is a great list of the most commonly used fonts. If you’re unsure of what to use, pick something from this list.

Now, although this list is great to get started with, you can have a bit more fun with fonts. Start by exploring fontsquirrel.com. It’s filled with commercially free fonts that can really give your content something extra.
One last thing to remember: make sure the fonts you choose are large enough to read. Don’t go for a size 20 font. Start at least with 60 points for the body text and 112 for the headlines.
You don’t have to be a pro photographer to use beautiful images within your online course. There are plenty of free stock image websites where you can source visuals from. All of these sites are commercially free, which means that you can use these images for anything without attribution.
Now that you have found your images, it’s time to talk about using text with them.
Tip #1: If the image is a darker image, use white or off-white as your text color. Test out other light colors if white doesn’t look great. Just make sure you can read it.
Tip #2: If the image is light, use dark colored text.
Tip #3: If the photo has a lot of colors or a lot of different stuff going on, add a solid colored shape over it. It can be anything—circle, square, rectangle, maybe even a star, and then add the text over the shape.
Tip #4: Another way to make text readable on busy photos is to add a solid color rectangle over the image and reduce the opacity. Make a solid colored rectangle the size of the slide, place it over the photo and then reduce the opacity until you reach your desired image to color ratio.
Bonus: This is another way to bring your brand colors into your slides.
Tip #5: You can also reverse that process. Instead of putting a color on top of the image, just reduce the opacity of the image itself so you can see it faintly in the background.
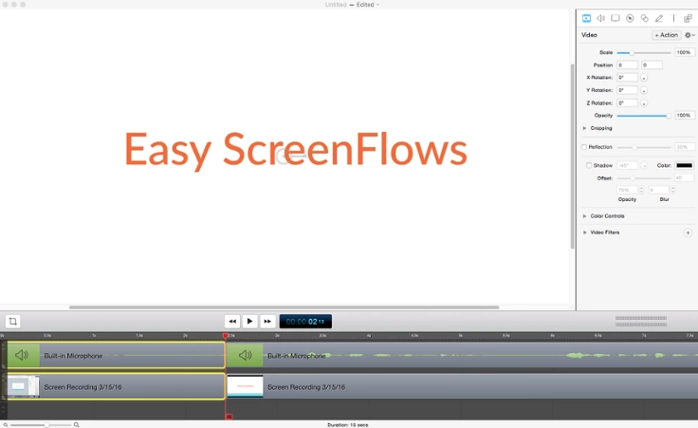
Once your slides are designed and you’re ready to record course content, it’s time to play with technology. We recommend you use ScreenFlow for Mac or Camtasia for PC. ScreenFlow is what we use in all of our courses and that’s what I’m going to demo.
1. Get setup. You can read our DIY Studio Guide, but remember to:
Here’s a perfectly good setup:

2. Open your deck to the very beginning of the presentation (or don’t if you’re not going through slides)
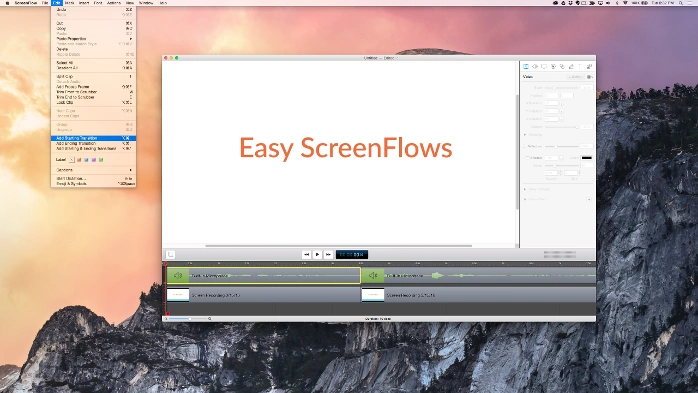
3. Click on the screen flow icon and click though File > New
4. Adjust the recording size here
5. Check your recording options here
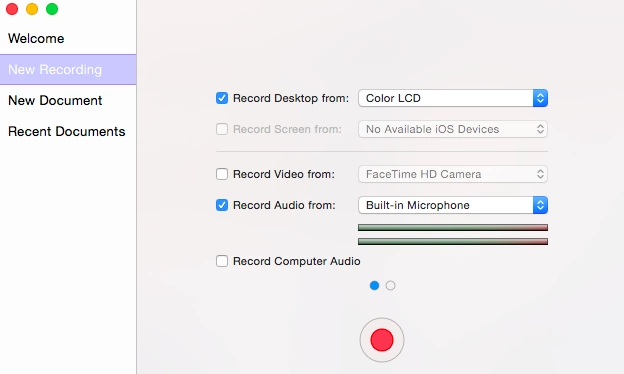
6. Hit the red button (it counts down from 5, but you can adjust this in “Preferences”

7. As the time is counting down, hit “start” on your presentation
8. Start speaking just after the recording starts and flip through your slides as you speak over them
9. Quickly end the presentation using the apple+shift+2 command when you’re done.
10. If you plan to edit off the ending, make a loud noise and then hit the command.
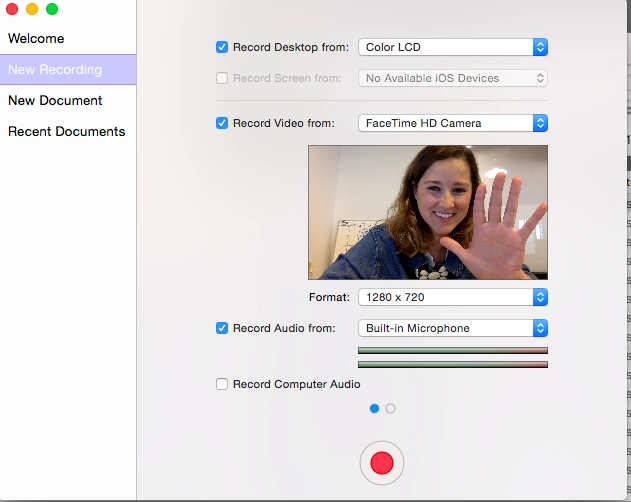
The only difference is that your computer will be recording video not just voice. You’ll want to make sure
While you’re recording, make sure to look at the camera. You can insert presenter notes into you slides if you’ve written a script or download a teleprompter app on a tablet and use this to assist you. Or, you can simply rehearse your script before recording.
It’s a best practice to keep your course lessons short. This has the added benefit of making them easy to remember in chunks. If you’re comfortable, memorize what you want to say for one lesson and record it in one take. You can then review the script and content for a second lesson and record it when you’re comfortable.
As mentioned, this post is focused on creating slide content, but you can use ScreenFlow to create quick low-budget talking head videos. Simply follow the same steps below, but instead of recording what’s on your screen, record with the computer lens, by clicking “Record Video Form” and selecting your camera.
Whatever type of content you’ve created, ScreenFlow is an amazingly simple tool for editing videos.Where editing comes in hand is for large chunks that you redo in the same take. With ScreenFlow, cutting off the beginning and endings of videos is super simple and fast. Cut out any big mistakes, but don’t worry about how many times you said “um,” or stuttered. Additional time can be spent giving bonus worksheets or group coaching, which is more valuable. Students also like people who are relaxed and relatable.
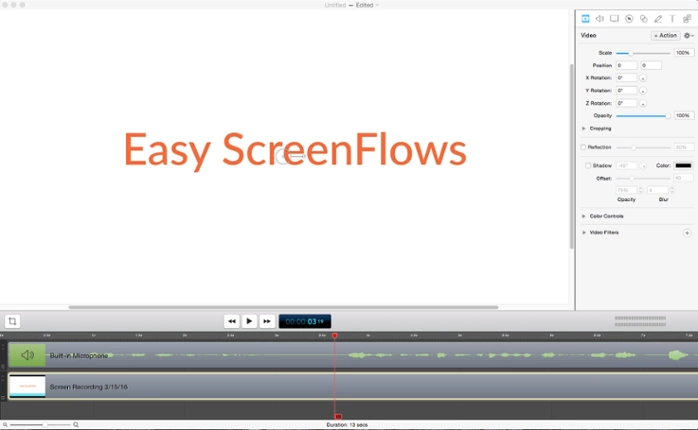
1. Use the scrubber to find the area where you start speaking and look for where the spike indicates audio.
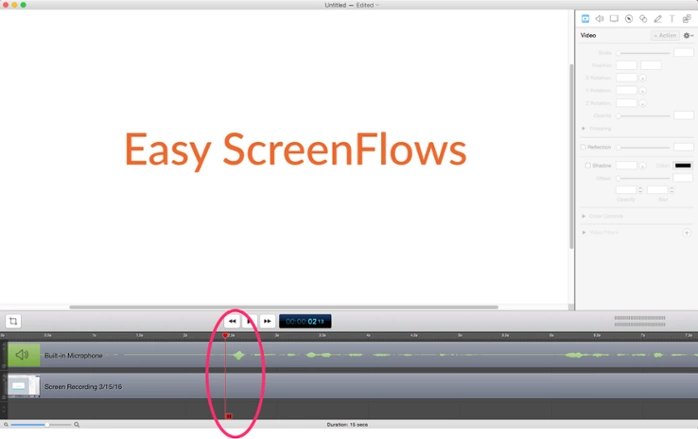
You can magnify the editor to assist.
2. Drag the scrubber to right before the spike, select both the sound and visual, and hit the ‘T’ button on your keyboard.’
3. Pull the clips apart, hit play to test what you just did. If you want to redo it, apply +Z to undo and retry

4. Delete the section you don’t want by highlighting the clipped bars and hitting delete and then dragging the bars to the start of the video
Let’s assume we hate section 3.5 seconds to 6 seconds.
1. Move your cursor to the start of what you want to cut. Highlight the sound and visual bars.

2. Hit T where the undesired section starts
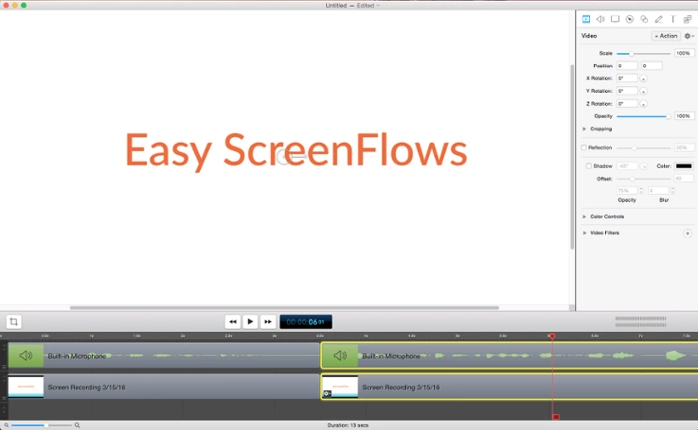
3. Move the cursor to where you want the clip to end, highlight both bars, hit T
4. Delete the middle section
5. Merge the bars by dragging them next to each other

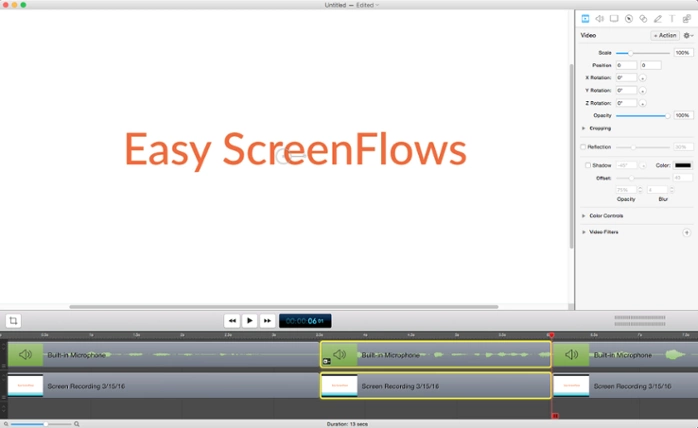
Add transitions to the beginning of your video
This is super simple stuff and looks professional. No need to pay for an editor when you can do this on your own in a matter of minutes and edit it to exactly what you want.
When you’re happy with your clip, it’s time to export your videos. This is as simple as going to file, export, and selecting your settings. Just make sure you select “Dimensions” > Scale by 100 (Not 50).
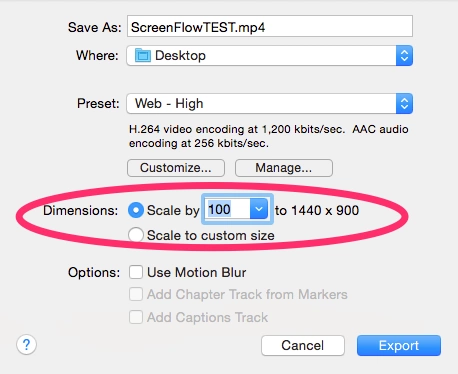
This is extremely important because it affects the quality and resolution of your course videos. If this is small, it doesn’t matter how many precautions you took while filming, you course is going to look gritty, low-budget and bad.
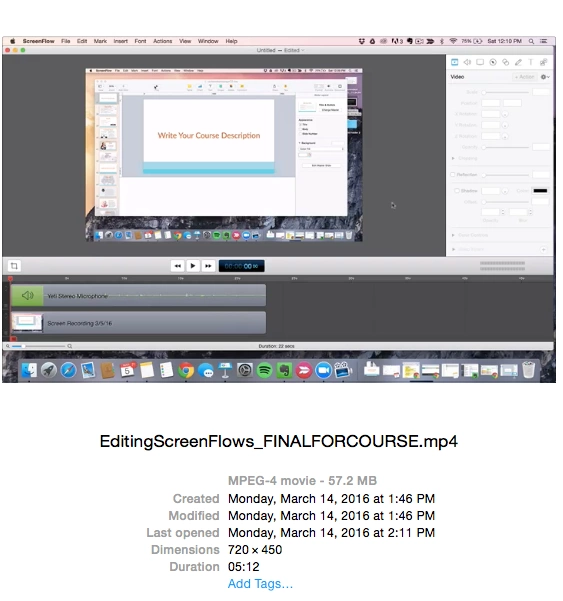
However, what you’ll notice is that the video will be huge. Check out this five-minute video that’s over 57 MB.
For that, you’ll want to use Handbrake. It’s completely free and can be downloaded here.
1. Drag your video file from your finder to the icon at the bottom of your screen
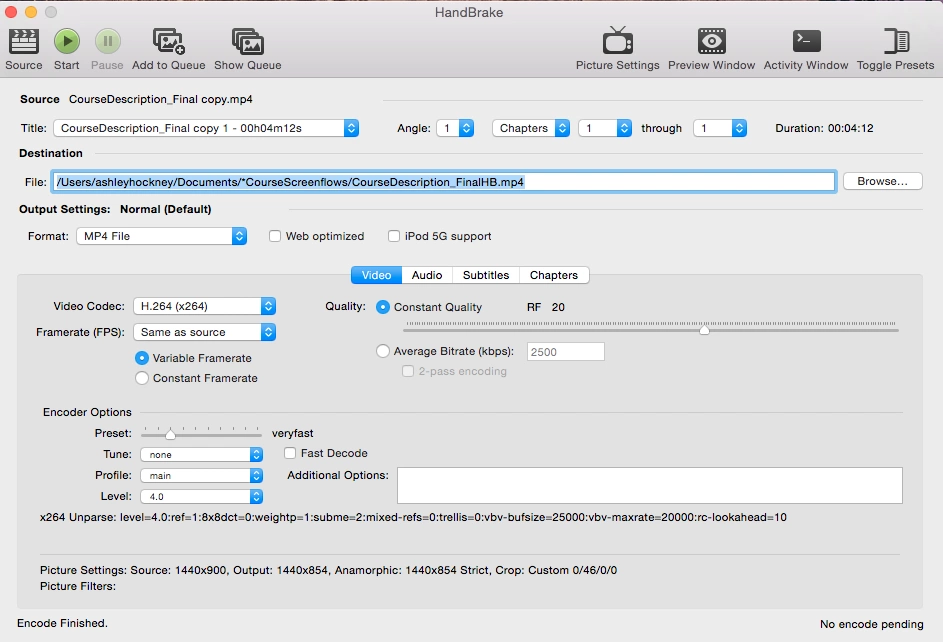
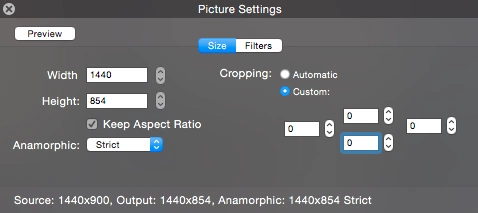
2. Go to picture settings and set anamorphic to strict and select a custom cropping and adjust all numbers to 0.
3. Select browse and set where you’d like the video to be saved and give it a new name if you want
4. Log into your course > curriculum > create a lesson & name it & click on the teal box to “Choose Files”
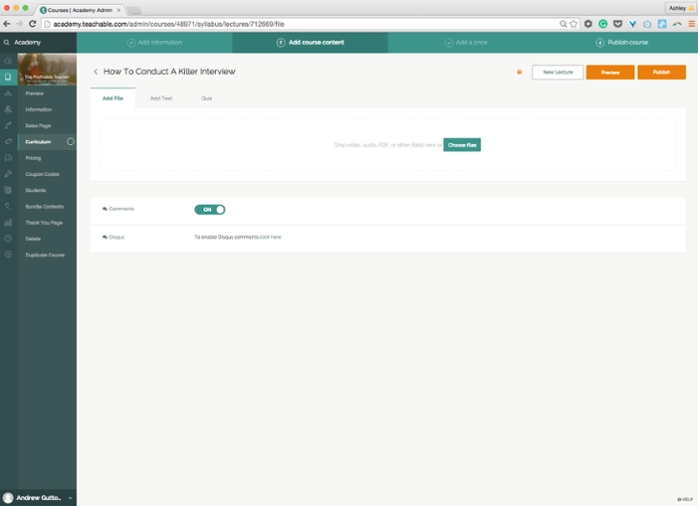
5. Select your file and hit upload
That’s it! You can create a new lesson at the top of the screen or simply use the right arrow key to move to the next lesson from within one to upload multiple videos.
Eventually the inside of your course will start to look like this:
And a preview can be seen from your sales page/landing page:
Now that we’ve covered basic slide design, video recording, and step-by-step editing instructions, you should be feeling more confident in creating ScreenFlow slide content for your online course.

Many creators are hoping to create professional-looking videos for your online course, but are not sure where to start. Using Keynote (or its Microsoft equivalent, PowerPoint) is a simple and fun way to make beautiful videos at home. It’s relatively easy to make an animated videos with Keynote. We’ll show you how.
Animation on Keynote is kind of magical. And it’s way more powerful than you might think.
For example, we made this colorful white-boarding presentation all on Keynote. But, you probably couldn’t tell right away by just looking at it. Just think about all the weeks or months you’d have to spend learning complex animation software to get the same results. Even the process of selecting animation software is overwhelming, and can be a huge barrier to new course creators.
You can harness this power too. And it’s not nearly as difficult as you might think. Below, we’ll walk you through step-by-step how to make animated videos with Keynote (without it even looking like Keynote at all).
Create a new Keynote presentation to start. You’ll see that a new Keynote theme usually begins in “standard” size. Standard isn’t good for video, so you want wide instead.
Select “Wide” at the top and choose the theme you want to begin with.
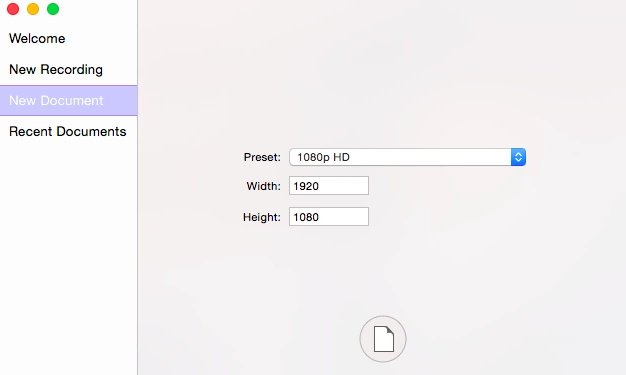
Before you start changing around colors, or adding text and images, this is the most important action you’ll take. Customize your dimensions so they fit YouTube’s high-quality resolution. This will also upload seamlessly onto Teachable’s platform.
To do this, check out the righthand bar of your Keynote program. Select Document. Then you’ll see a category below named Slide Size. Click on that, and toggle to Custom Slide Size.
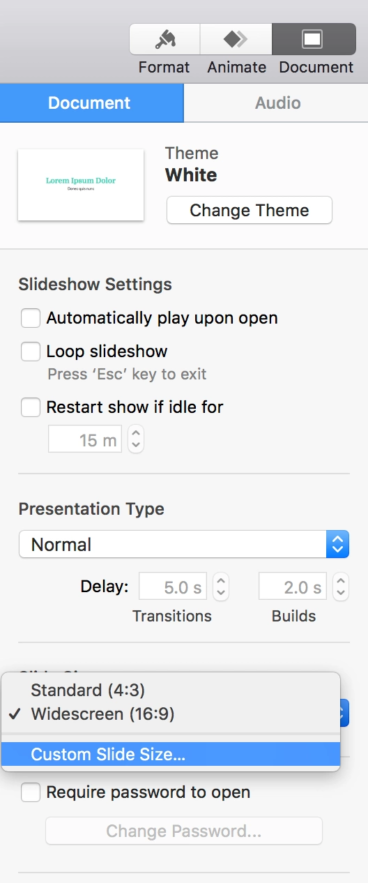
Next, enter the optimal custom slide size. We highly recommend 1920×1080, which we will consistently use throughout the course of this tutorial on how make animated videos with Keynote.
Dimensions are really important. If you don’t get them right the first time, you’ll spend hours fixing it later.

Now that your dimensions are set up, you can start on the design portion. It’s easy to customize Keynote slides to fit your brand colors and fonts.

You’ll find this customization on the right hand corner of your screen under Format > Edit Master Slide.
Editing the master slide means that you’ll pick the default colors and fonts for all the slides. This will make your life easier in the long run, because you won’t have to change font sizes, colors, and background colors every time you create a new slide.

You’ll get this warning because editing master slides will change all slides. Because you haven’t made any slides yet, though, this will be an asset instead of a problem. After you’ve selected your brand fonts, colors, backgrounds and overlays, you can finally get down to creating your course content.
Keynote leaves you plenty of versatility to add shapes, photos, charts, GIFs.
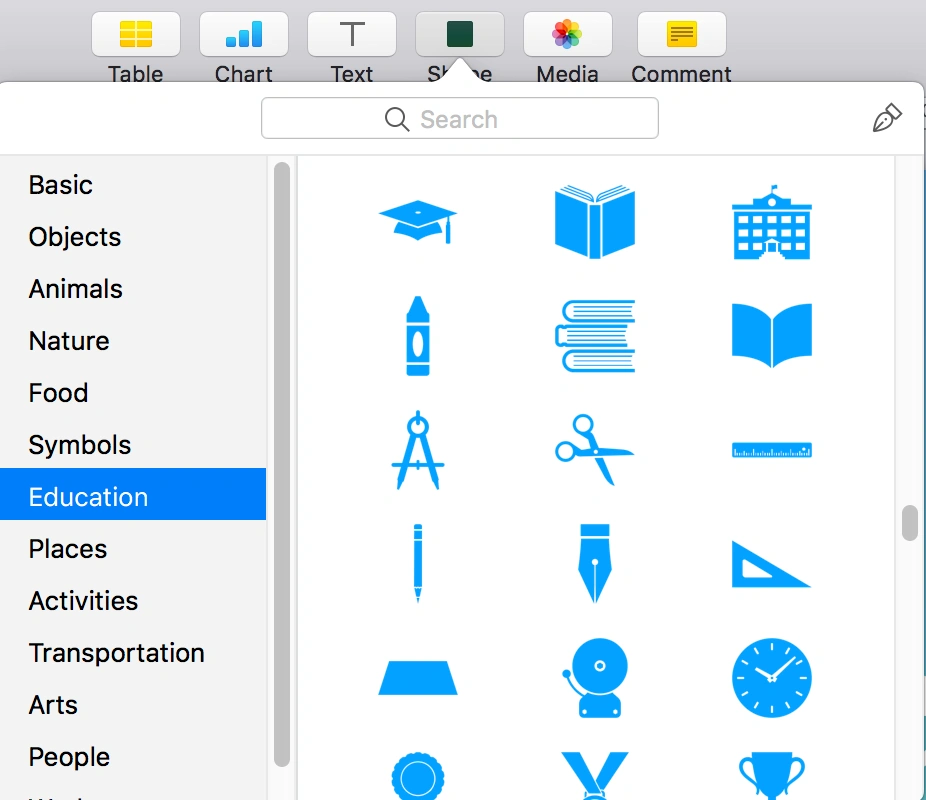
We especially love using their “Shape” section to animate our own videos. You can select as many of these icons as you want, then customize the color or add dimension.
For the SEO course we created, we used the free Keynote icons under “Shape” to animate the introductory video. Here’s an example of how it can look:

Once you’ve added all the imagery and text you want for each slide, you’ve finally arrived to the part that makes this program special: animation.
This is where you can bring your keynote slides to life and make them look like a professionally animated video. Think of this as a shortcut to making professional, fun, highly engaging video, with just a few clicks of a button.

Click on the piece of text or image that you want to animate. Make sure you’ve toggled to the Animate button in the right hand corner, which sits between Format and Document.
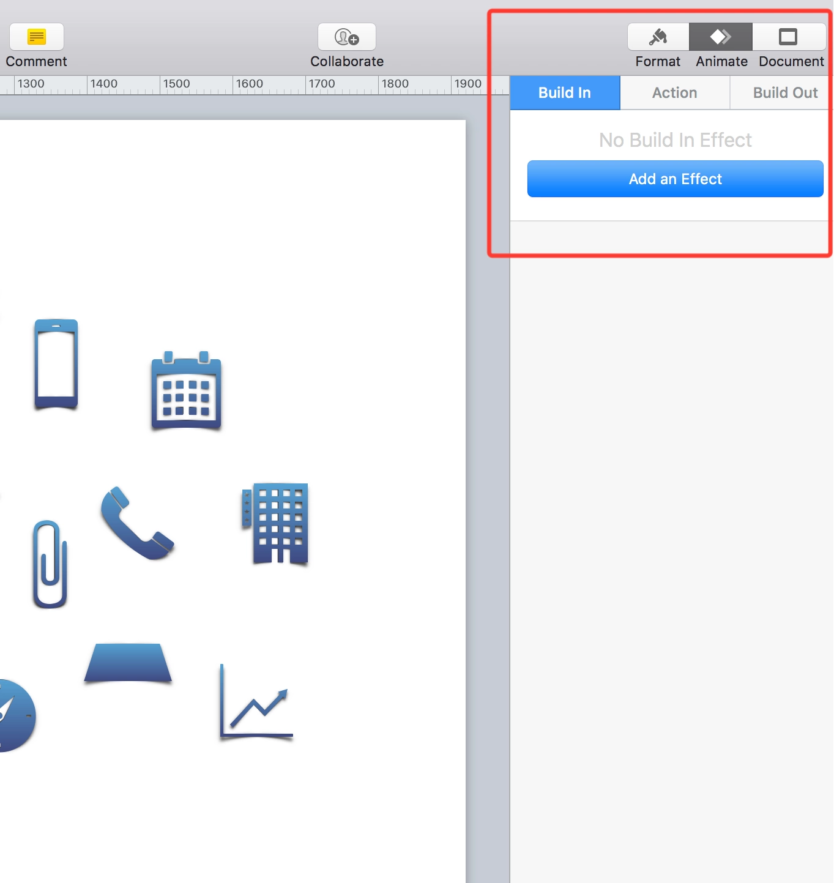
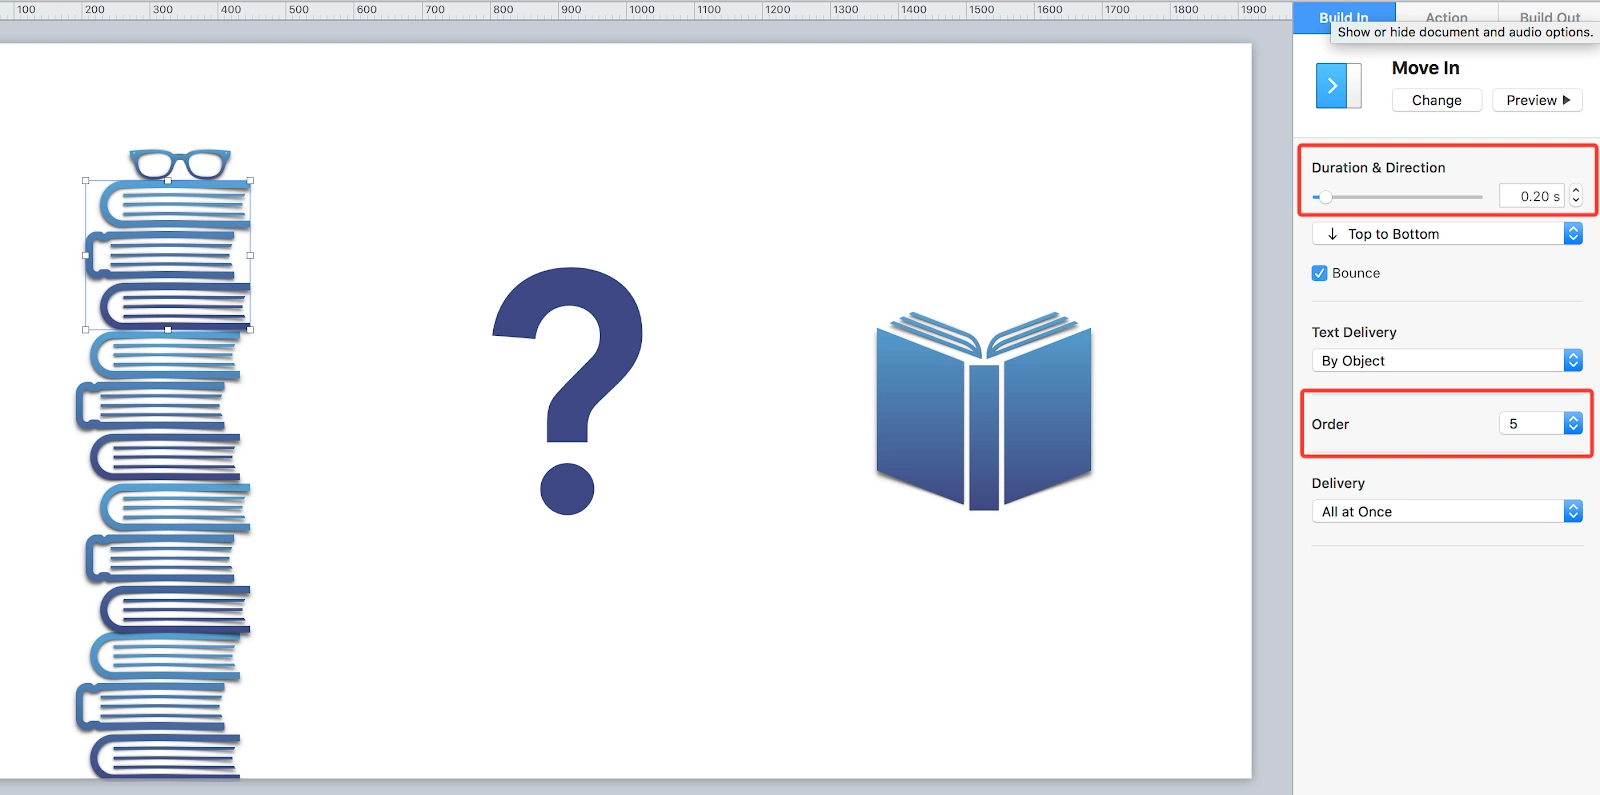
Here are what the Keynote animation features mean:
The best part? There are all different kinds of animations. Toggle around and hit the preview button to see what they’re like.
They’ll make your selected text or objects bounce, fly, go up in flames, burst into fireworks, or wipe away. With such a variety, you can make your videos look way more fun and engaging.

For example, in this part of my video, we used the transitions Move In, Scale, and Move Out. We also checked the Bounce box to give the objects a little pep.
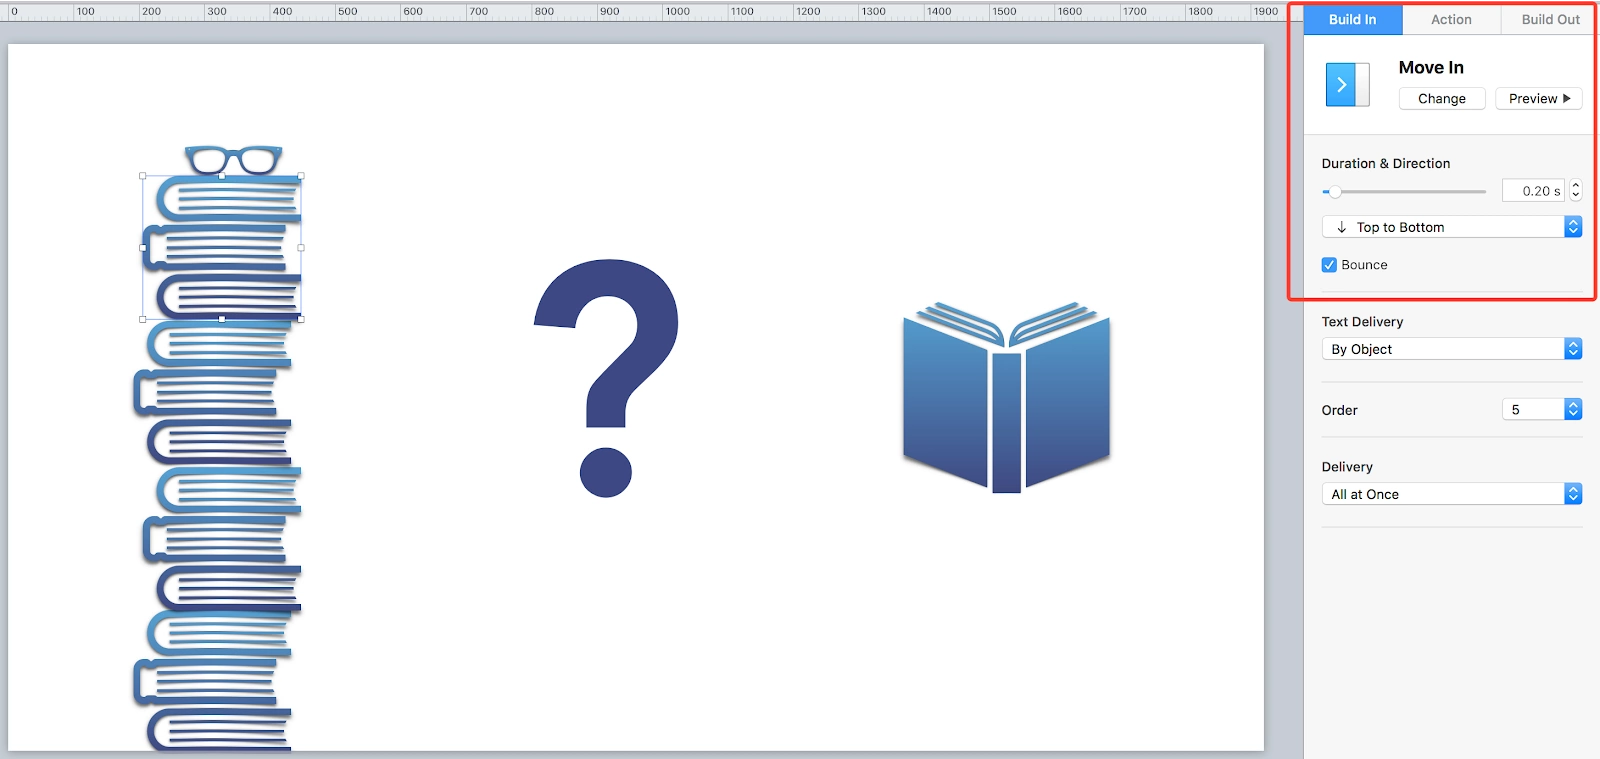
Other features worth mentioning when learning how to make animated videos with Keynote:
Want to see more keynote to video clips? Here’s another Keynote animation example of the slides.

Note that we’ve put this in GIF format for easier viewing, but the frame rates are seamless and clean in the actual video.
Once you’ve completed your animation, you’re ready to prepare for recording. Many people hit snags in this process because the format of their screen is different from the format of their slides.
First, download SwitchResX, or a similar screen resizing software.

Once you’ve installed it, you can temporarily change the resolution size of your screen. Go to SwitchResX > Color LCD > Current Resolutions. You’ll see what your screen is already at (mine is usually set at 1680×1050).
Remember how we formatted the Keynote slides to 1920×1080 in the beginning? You’ll select the same screen resolution here to make sure your slides and your screen are perfectly aligned.

You’ll notice your screen resolution shift and things will look a little different. Don’t worry, that just means it’s working. Now, you’re ready to record.
There are several different ways to record your Keynote to video once it’s ready for action. Which method you choose largely depends on your preferences, but I’ll list some pros and cons of each.
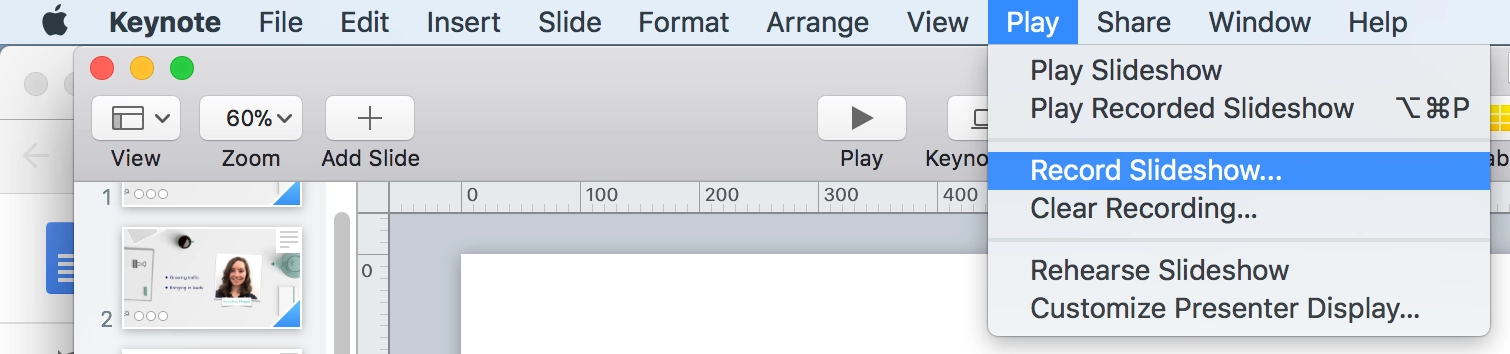
As it turns out, Keynote has its very own recording app.
Screenflow is an app that can simultaneously record your screen and your computer audio at the same time.
Consider recording the screenflow first and then bring in audio recorded from an external mic in later.

You can also see your Keynote program while using QuickTime. All you have to do is enter the program and then select File > New Screen Recording. You can select the entire screen instead of cropping because you’ve already formatted the screen correctly.
Once you’ve completed recording a video, make sure to export it in the correct dimensions as well. (See why we wanted you to know about all of them!)

For example, with QuickTime, once the recording is over, you’ll want to save the file in the correct dimensions as well. You can do this by going to File > Export As > 1080. This fits the YouTube-style resolution we’ve been consistently using throughout.
Now, it’s time to mix your animated slides and audio together.
If you’ve decided to go with a computer mic and recorded this all together on Keynote, you may even skip this step. (We do recommend that you use an external mic or headphone mic if possible. You can read more about recording quality sound here.)
If you’d like to add intro and outtro slides, music, or other effects, you’ll need video editing software to complete the job. Here are some basic options, along with the pros and cons.
Apple Movie comes with Macs and has an incredibly simple user interface.
Adobe Premiere Pro is the industry standard for video editing. The industry standard used to be Final Cut Pro, until their product became too similar to Apple Movie.
Overall, the choice of video editor is yours! Do your research to see which one would best fit your needs and your process to make animated videos with Keynote.
We’ve talked about dimensions a lot in this post. But this is tip a million and one: Check your dimensions throughout every step of the process when it comes to understanding the process to make animated videos with Keynote. Here is where you’ve ensured your dimensions are 1920×1080 so far:
Next, you’ll have to look out for these, too:
You’ve created your slides. You’ve learned how to make animated videos with Keynote. And then you’ve edited and uploaded them with the perfect dimensions in mind. Once you complete these steps, you’ll have gorgeous, animated videos built for an exceptional online course.
Still curious what they can look like? Here’s another video we produced with Keynote:

And a couple others we found online:


Those videos will look so professional and may give you the justification to charge more for your courses.

The rise of generative AI has transformed how creators and entrepreneurs approach content, strategy, and workflow efficiency. Generative AI is now by far the most popular form of AI tool, with 51% of businesses using it. While ChatGPT pioneered this revolution, it certainly has limitations that are causing some creators and entrepreneurs to look elsewhere. So, let’s explore leading ChatGPT alternatives and how they complement platforms like Teachable to empower creators and entrepreneurs in 2025.
.png)
When ChatGPT debuted in November 2022, it redefined what AI could achieve, sparking widespread adoption among writers, marketers, and innovators. Its ability to generate text on demand made it a go-to tool for overcoming creative blocks. However, its success also highlighted gaps in specialization. Enter the era of ‘AI copilots’: purpose-built tools designed to tackle specific challenges, from SEO-optimized content creation to CRM automation.
These niche solutions cater to professionals who need more than generic outputs. For example, marketers require brand-aligned messaging, educators demand curriculum-building efficiency, and entrepreneurs rely on seamless integration with existing tools. While ChatGPT remains a versatile starting point, its broad-stroke approach often falls short in scenarios requiring domain expertise or platform-specific workflows. The result? A thriving ecosystem of alternatives that prioritize precision, customization, and reliability.
As the most prominent and popular Generative AI LLM, or large language model, there are a lot of pros to its use. Just the nature of its popularity, as there are many guides and experts out there who can help you use it effectively. It’s also one of the most frequently updated models, with new capabilities end efficiencies being rolled out regularly.
It’s become highly adept and popular for generating text, analyzing data, and even producing images, especially when using the hyper-advanced models accessible by the paid tiers ($20 per month for ChatGPT Pro). Its popularity as a sort of ‘baseline’ for LLMs and generative AI means there are many integrations and plugins developed for it, making it quite an adaptable piece of kit.
But despite its popularity, there are some downsides.
While ChatGPT offers a free tier that lets content creators experiment with prompt-based writing without upfront investment, it can oversimplify nuanced topics, occasionally producing over-generalized or generic prose. Many entrepreneurs appreciate how quickly it can produce outlines, email drafts, and code snippets, but this rapid generation sometimes sacrifices depth and factual accuracy.
In addition, ChatGPT’s standard models can have quite small context windows, making it challenging to maintain coherence in longer-form content without frequent prompt engineering, which can push you towards the premium models.
The popularity of ChatGPT is a double-edged, as people are growing more adept at spotting text it generates due to common, recurring turns of phrase. Ever noticed how many articles you see online start with something like “in the rapidly evolving business landscape” since ChatGPT hit the market?
And while ChatGPT has functionality for direct integration into applications, this often requires selecting separate API pricing plans and navigating fixed subscription tiers, adding complexity and integration overhead that many creators would rather avoid.
Let’s not forget the infamous hallucinations. While things have improved, ChatGPT is still known for confidently offering plausible-sounding information that can be incorrect or misleading, an issue that poses real risks when teaching or marketing requires factual precision.
Taken together, these trade-offs are leading many creators and entrepreneurs to investigate purpose-built AI alternatives that offer specialized workflows, tighter integrations, and higher reliability.

Google Gemini has emerged as a powerhouse for entrepreneurs deeply embedded in the Google ecosystem. Integrated across Workspace apps like Docs, Gmail, and Slides, it streamlines tasks such as drafting emails, summarizing meeting notes, and generating presentation outlines. Its ability to pull data from Google Drive and Calendar reduces context-switching, enabling users to transition from brainstorming to execution seamlessly.
Google offers a variety of packages for Google Gemini use. On the one hand, this means you can be selective and pay for what you actually need, but on the other hand you’ll need to do some research on the different models, pricing tiers, and what you need Gemini for to know what you should purchase.

Perplexity AI distinguishes itself as a research-focused tool, delivering concise, citation-backed answers by scouring live web data. Its ‘Deep Research’ mode mimics an expert’s workflow, analyzing multiple sources to generate comprehensive reports, which makes it ideal for fact-checking or competitive analysis. The free plan includes unlimited quick searches, while the Pro tier ($20/month) offers advanced models, more in-depth searches and file-upload analysis for deeper dives.

Anthropic’s Claude excels in generating natural, human-like text, thanks to its Constitutional AI framework. With much larger context window than ChatGPT’s free models, it can maintain coherence across long-form content, making it perfect for summarizing reports or drafting detailed narratives. The free version suits casual users, while Claude Pro ($20/month) unlocks priority access to updates and higher usage limits.

For teams reliant on the Microsoft Suie, Copilot embeds AI across Word, Excel, and Teams, automating tasks like data visualization, meeting summaries, and email drafting. While basic features are free for subscribers, the Pro suite ($20/user/month) includes collaborative ideation tools and custom agent creation via Copilot Studio, positioning it as a holistic productivity enhancer.
Teachable can complement these ChatGPT alternatives, while also embedding no-code AI directly into the course-building workflow, which reduces the need to context-switch.
For example, the Teachable AI Course Curriculum Generator allows you to input a course title and description and receive a full outline in seconds, including sections, lessons, and even sales-page copy. You can then combine these materials with ChatGPT to produce marketing materials like social media posts and email campaigns to promote the course.
For creating the lessons themselves, you could combine Perplexity AI’s deep research, or Claude’s long form content capabilities with Teachable’s AI Hub to craft lecture scripts, which can then be used to produce quizzes and summaries using Teachable’s AI capabilities, like the Teachable AI Quiz Generator.
Meanwhile, Gemini and Copilot’s integrations with the Google and Microsoft Office suites allow for adaptability in working across those suites, allowing you to plan lessons and courses with integrations across your calendars and email inbox.
This is just the start. Teachable’s extensive AI features and how they complement CHatGPT alternatives makes it ideal for creators and entrepreneurs developing courses and learning materials.
Selecting the right AI tools hinges on your workflow’s unique demands. The ChatGPT alternatives out there all have specific strengths that make them suited to different needs, so you need to think hard about what you’re trying to achieve to guide your choice.
Once you’ve chosen the tools you need, Teachable’s AI capabilities are ready to supercharge all your course and learning materials creation. Once you find the most effective, AI-driven workflows, these tools will become more than just productivity boosters, they can be strategic partners.
AI should help you grow your business, especially for internal processes. See how Teachable AI tools can power your next project.
Start by mapping your most critical workflows and identifying bottlenecks.
No matter which tool you choose, Teachable's built-in AI features complement these systems by streamlining course-building, automating quizzes, and accelerating marketing material production, all critical tasks for creators scaling their businesses.
You can (and should) combine tools strategically.Think of Teachable as the central hub for your course and coaching business. Tools like Gemini, Copilot, and Perplexity can be used to feed research, outlines, and marketing ideas into Teachable’s AI-powered course builder, sales page generator, and quiz creator. This “stacked AI” approach saves time, reduces manual admin, and ensures your content is higher quality and more aligned with your brand, without needing heavy technical expertise.
The main risks include:
Teachable’s AI tools help mitigate these risks by offering structured, guided workflows that keep you in control of the final product. Combining generative AI outputs with your expertise ensures your course material remains credible, customized, and impactful.
Teachable's AI is purpose-built for creators and entrepreneurs. While Gemini, Claude, and others are versatile generalist tools, Teachable’s AI is embedded directly into course creation, sales page writing, quiz generation, and content repurposing workflows.
Yes. Teachable is actively investing in enhancing its AI Hub, with a strong focus on helping creators and entrepreneurs:
In short: as AI evolves, Teachable’s platform will evolve with it, giving you more tools to save time, grow your audience, and future-proof your business in an increasingly competitive creator economy.